How to Make Coconut Oil at Home (The Ultimate DIY Guide!)
Let’s be perfectly honest with each other. You can walk into any grocery store, from here in Khulna to the fanciest market in Paris, and buy a giant, affordable tub of coconut oil. It’s readily available, it’s convenient, and it works just fine. The fact that you’re here, right now, contemplating how to extract this oil yourself from a hairy, hard-shelled fruit, means one of two things: you’re a curious culinary adventurer, or you just really, really like a challenge.
Either way, I respect that. Because today, we’re not just making a simple pantry staple; we’re performing some delicious, old-world alchemy. We’re taking a humble coconut and, through a process of heat and patience, transforming it into pure, liquid gold. You’re going to learn how to make coconut oil from scratch, and the resulting product is so fragrant, so pure, and so intensely flavorful that it will absolutely ruin the store-bought stuff for you forever.
Why This Project Is a Work of Genius
So, why on earth would you spend an afternoon wrestling with a coconut when you can just buy the oil? Because this isn’t just about the destination; it’s about the glorious, fragrant journey.
First, the aroma is intoxicating. The scent of fresh coconut milk gently simmering on your stove, slowly transforming and releasing its precious oil, will fill your entire home. It’s a warm, nutty, slightly sweet smell that is a thousand times better than any scented candle. It’s a reward in itself.
Second, the purity and flavor are unbeatable. This is 100% pure, virgin coconut oil, made by you. There are no additives, no preservatives, nothing. The flavor is intensely coconutty and fresh, perfect for cooking everything from stir-fries to delicate pastries, or even for use as a luxurious, all-natural beauty product.

Finally, it’s an incredibly satisfying, zero-waste project. It feels like a magic trick watching the clear, golden oil separate from the milk solids. Plus, you’re left with a valuable byproduct: the leftover coconut pulp can be dried out and turned into your very own homemade coconut flour. It’s resourceful, it’s sustainable, and it makes you feel like a domestic superstar.
The (Exhaustive) Ingredients List
I hope you’ve got a pen and paper handy for this incredibly complex and lengthy list of ingredients. Are you ready for it?
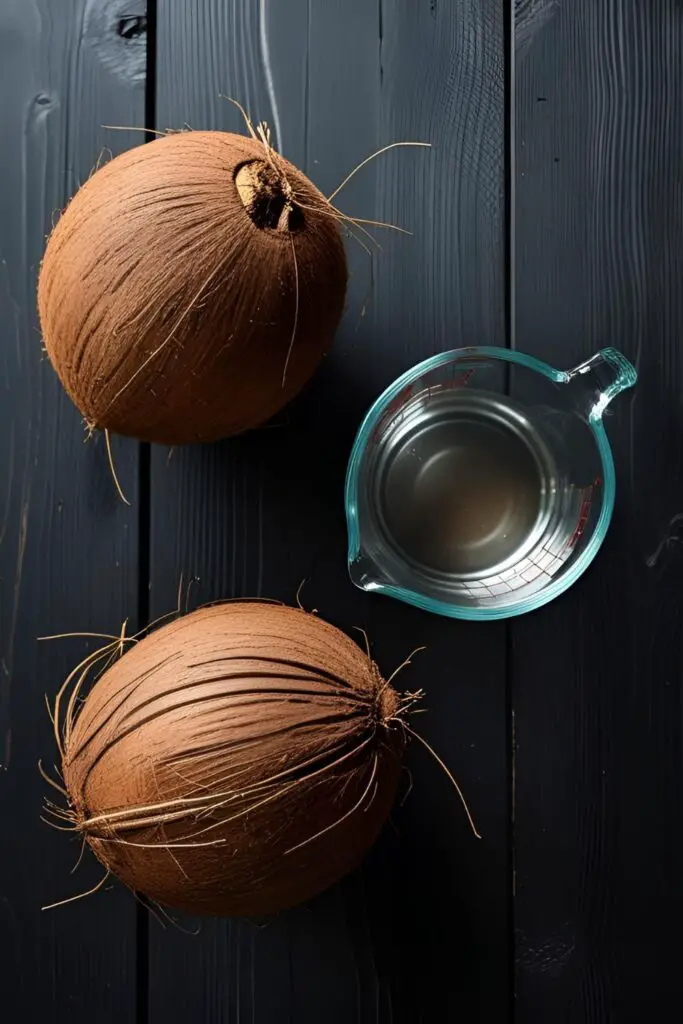
- Mature, Brown Coconuts: 2-3 of them. You need the hard, brown, hairy ones with the thick, white meat inside. The young, green coconuts are for drinking, not for oil-making.
- Warm Water: About 4 cups.
That’s it. That’s the entire list. The real star of the show here is your patience.
The Extraction Equipment Toolkit
This is where things get a bit more interesting. You’ll need a few key tools to transform your hairy rock into liquid gold.
- A Coconut Opening Device: This is a choose-your-own-adventure. A heavy cleaver, the back of a hammer, or a screwdriver and a hammer are all classic choices. A sense of adventure and a healthy respect for your fingers are also required.
- A High-Powered Blender: This is the best tool for pulverizing the coconut meat to extract the maximum amount of milk.
- A Nut Milk Bag or Several Layers of Cheesecloth: This is essential for straining the milk from the pulp. A nut milk bag is much more efficient and less messy.
- A Large, Heavy-Bottomed Pot or Wok: A heavy base will distribute the heat evenly and prevent the milk from scorching during the long simmer.
- A Fine-Mesh Sieve: For the final straining of your beautiful, finished oil.
- A Clean, Sterile Glass Jar with a Lid: For storing your liquid treasure.
Step-by-Step: Your Guide to Kitchen Alchemy
This is a process of stages. Put on some good music, relax, and enjoy the transformation.
Phase 1: The Great Escape (Opening the Coconut)
- First, locate the three “eyes” at the top of the coconut. One of them will be softer than the others. Puncture the soft eye with a screwdriver or a sharp knife and drain the coconut water into a glass. (Enjoy your fresh, delicious coconut water! That’s your first reward).
- Now for the fun part. Place the coconut on a hard, sturdy surface. Using the blunt side of a heavy cleaver or a hammer, give the coconut a firm whack right around its equator. Rotate and whack again. Keep doing this until a crack forms, and then pry it open.
- Use a sturdy spoon or a blunt knife to carefully pry the white coconut meat away from the hard shell. You can then use a vegetable peeler to remove the thin brown skin from the meat, if you wish (this results in a purer white oil).

Phase 2: The Transformation (From Meat to Milk)
- Chop your harvested coconut meat into small, blender-friendly pieces.
- Place the coconut pieces in your high-powered blender. Add about 4 cups of warm water (not boiling, just warm). The warmth helps to extract more of the fat from the coconut.
- Blend on high for several minutes, until you have a thick, pulpy, creamy mixture. It should look like a very rich, thick coconut milk.
Phase 3: The Squeeze
- Place your nut milk bag or cheesecloth-lined sieve over a large, clean bowl.
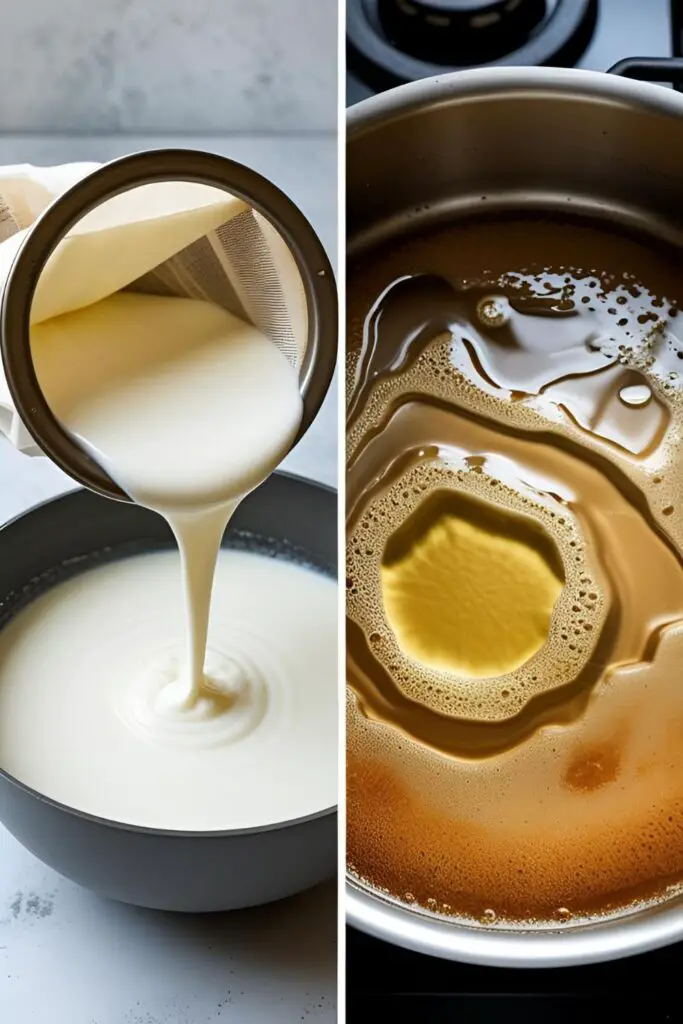
- Pour the blended coconut mixture into the bag. Now, squeeze. And squeeze. And then squeeze some more. You want to wring out every last drop of that rich, fatty coconut milk from the pulp. The liquid in your bowl is the key to everything.
- (Don’t throw away the pulp! Spread it on a baking sheet and bake it in your oven on the lowest possible temperature until completely dry, then blitz it in your blender to make homemade coconut flour).
Phase 4: The Patient Simmer
- Pour your freshly squeezed coconut milk into your heavy-bottomed pot or wok.
- Bring the milk to a gentle simmer over medium heat, then reduce the heat to medium-low. You want to maintain a slow, steady simmer, not a raging boil.
- Now, you wait. This process can take anywhere from 45 minutes to over an hour. You will see the mixture go through stages:
- It will thicken considerably.
- The water will start to evaporate, and the mixture will look like it’s “breaking” or curdling.
- You’ll start to see clear oil bubbling up and separating from the milk solids (the curds).
- Stir the mixture occasionally to prevent the solids from sticking and burning on the bottom of the pot. As the process continues, the milk solids will start to turn a light golden brown, and you will see more and more clear oil.
Phase 5: The Golden Separation
- You’ll know it’s done when the bubbling has mostly subsided, the milk solids are a deep golden brown and have sunk to the bottom, and you are left with a beautiful layer of clear, fragrant, golden coconut oil.
- Carefully remove the pot from the heat and let it cool for a few minutes.
Phase 6: The Final Strain
- Set your fine-mesh sieve over your clean, sterile glass jar. You can line it with a coffee filter or a small piece of cheesecloth for an even purer result.
- Carefully pour the oil from the pot through the sieve, leaving the browned solids behind.
- Let the oil cool completely to room temperature, then seal your jar. Congratulations. You are now a coconut oil tycoon.
Calories & Nutritional Info (Pure & Simple)
This is for one tablespoon of your glorious, homemade virgin coconut oil.
- Estimated Calories: Around 120 kcal.
- Pure Fat: Coconut oil is 100% fat, primarily saturated fat.
- MCT Power: It is a rich source of Medium-Chain Triglycerides (MCTs), which are metabolized differently than other fats and are a popular source of quick energy.
Common DIY Oil Disasters to Avoid

This project requires patience. Don’t let these simple mistakes ruin your hard work.
- The “Scorched Earth” Policy. The biggest mistake is using heat that is too high. You are gently simmering, not conducting a high-heat wok inferno. If your heat is too high, the milk solids will burn before all the oil has a chance to separate, and your final product will taste bitter and burnt. Low and slow is the tempo.
- The Sin of Impatience. This process cannot be rushed. You have to let the water slowly evaporate and the oil slowly separate. If you stop too early, you’ll have a very low yield of oil. Be patient and wait for the solids to turn a nice, toasty brown.
- A Weak, Half-Hearted Squeeze. When you’re straining the coconut milk from the pulp, be ruthless. You need to squeeze every last drop of milky, fatty goodness out of that pulp. More milk = more oil. Put some muscle into it!
- Using a Young, Green Coconut. The beautiful, soft meat of a young green coconut is delicious for eating and the water is perfect for drinking, but it has a much lower fat content. For the highest oil yield, you must use the thick, hard, brown meat of a mature coconut.
Variations & Customizations
Once you’ve made your own oil, you can get even fancier.
- The “Cold Process” Fermentation Method: For a truly “raw” virgin coconut oil, you can try the no-heat method. After you extract your coconut milk, place it in a clear jar and cover it. Let it sit at room temperature for 24-48 hours. During this time, the mixture will ferment and separate into three layers: water on the bottom, solids in the middle, and a pure layer of coconut oil on top. You can then scoop the oil off the top.
- Herbal or Spiced Infused Coconut Oil: After you’ve made your oil, you can gently warm it in a saucepan over very low heat and add your favorite aromatics to infuse it. A split vanilla bean, a few sprigs of fresh rosemary, or a handful of dried chili flakes are all fantastic options. Let it infuse for 15-20 minutes, then strain.
- Use the Byproduct! (Coconut Flour): As mentioned before, don’t throw away that leftover coconut pulp! Spread it in a thin layer on a baking sheet and bake it in your oven on the lowest possible temperature (or use a dehydrator) until it is completely dry and crumbly. Once dry, you can blitz it in your blender until it becomes a fine, high-fiber, gluten-free coconut flour.
Your Burning Coconut Oil Questions, Answered
Let’s clear up some of the most common questions about this DIY project.
How many coconuts do I really need to make a decent amount of oil?
Be prepared: the yield is quite low. As a general rule of thumb, you can expect to get about ½ to ¾ cup of oil from 2-3 large, mature coconuts. This is why you should savor every drop!
Is homemade coconut oil really better than store-bought?
In terms of freshness, aroma, and flavor, absolutely. The smell and taste of freshly made virgin coconut oil is incredibly vibrant and intensely coconutty in a way that mass-produced oil often isn’t.
What’s the difference between virgin, extra-virgin, and refined coconut oil?
“Virgin” and “extra-virgin” coconut oil are essentially the same thing (unlike with olive oil). It means the oil was extracted from fresh coconut meat without the use of high heat or chemicals. Refined coconut oil is made from dried coconut meat (copra), is often steam-refined and bleached, and has a neutral scent and flavor and a higher smoke point. The method we used today produces a beautiful virgin coconut oil.
How do I store my homemade coconut oil?
Store it in a clean, airtight glass jar in a cool, dark place, like your pantry. It will be liquid in the warm Khulna climate and will solidify if the temperature drops. It will last for several months.
What can I use the leftover browned coconut solids (curds) for?
These little browned bits are delicious! They are crispy and have a concentrated, toasty coconut flavor. You can sprinkle them over yogurt, ice cream, or salads for a crunchy, savory-sweet topping.
Why didn’t my coconut milk separate into oil?
This can happen for a few reasons. Your heat might have been too low, and you didn’t let it simmer long enough for the water to fully evaporate. Conversely, if the heat was too high, it might have scorched before it had a chance to separate properly. Patience and a steady, gentle simmer are key.
Can I use pre-shredded, dried coconut from a bag?
Not for this hot-process method. This method relies on the high moisture and fat content of fresh coconut meat to create the initial coconut milk. Dried coconut will not yield the same results.
Final Thoughts
You’ve done it. You took a hairy, primordial-looking rock, you performed a bit of patient, fragrant kitchen alchemy, and you produced your own jar of liquid gold. You have created something that connects you directly to its source, something pure and unadulterated.
So go on, cook something delicious with it. Use it to make a fragrant curry, bake a delicate cake, or just use it to moisturize your elbows. You’ve earned that little bit of homemade luxury.