How to Make Cake at Home Without an Oven (Yes, It’s Possible!)
You have a cake craving. A deep, soulful need for a slice of warm, tender, chocolatey goodness. You’ve got the flour, you’ve got the sugar, you’re ready to go. But there’s one small, oven-shaped problem. Your oven is currently broken, you live in a tiny apartment that considers an oven a “luxury amenity,” or it’s the middle of a sweltering August afternoon and turning on that 350-degree heat box sounds like a certifiably insane idea.
What if I told you that your cake dreams don’t have to die? What if I told you that one of the most essential pieces of baking equipment you own is not an oven at all, but that humble, heavy-bottomed pot sitting on your stovetop? Today, you are going to learn how to make cake at home without oven, and it’s going to feel like you’ve discovered a delicious, world-altering secret.
Why This Method Is Your New Best Friend
So, why should you embrace this seemingly strange, oven-less baking method? Let me tell you, the perks are real.
First and foremost, it’s incredibly resourceful. This technique proves that you don’t need a kitchen full of expensive, high-tech appliances to create something truly magical. It’s a testament to good old-fashioned kitchen ingenuity. Knowing you can bake a cake with just a pot and a stovetop makes you feel like a culinary MacGyver.
Second, the result is a shockingly moist and tender cake. The enclosed environment of the pot traps steam, creating a humid little atmosphere that bakes the cake gently and prevents it from drying out. People will take a bite and refuse to believe it didn’t come out of a traditional oven.
Finally, it won’t turn your kitchen into a sauna. This is the ultimate summer baking hack. You can have a fresh, warm cake without heating up your entire living space. It’s a small victory against the tyranny of the summer heatwave, and a delicious one at that.
The Ingredients for Your Oven-Less Masterpiece

For this stovetop method, we’re going to use a simple but fantastic eggless chocolate cake recipe. Eggless cakes are often more forgiving with the gentle, steamy heat of this method, resulting in a wonderfully soft crumb.
For the Cake Batter:
- All-Purpose Flour: 1 ½ cups.
- Unsweetened Cocoa Powder: ¼ cup. Use a good quality one for a richer chocolate flavor.
- Granulated Sugar: 1 cup.
- Baking Powder: 1 teaspoon.
- Baking Soda: ½ teaspoon.
- Salt: ½ teaspoon.
- Milk: 1 cup, at room temperature.
- Vegetable Oil (or any neutral oil): ½ cup.
- White Vinegar: 1 tablespoon. This is our secret weapon for a fluffy cake! You won’t taste it, I promise.
- Vanilla Extract: 1 teaspoon.
For the “Oven” Setup:
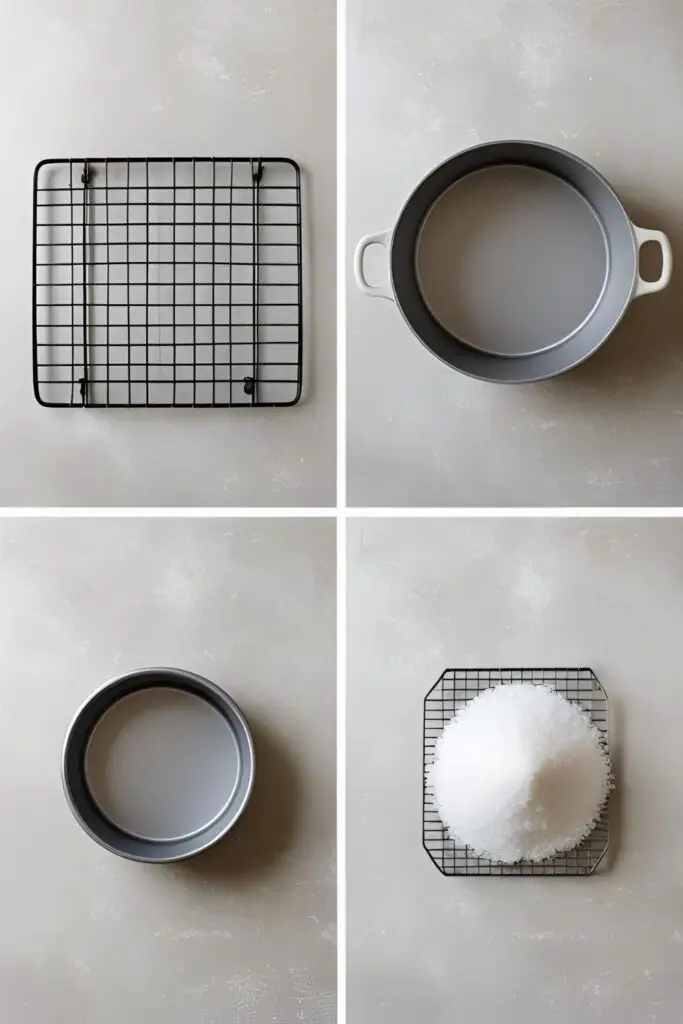
- Salt or Sand: About 1 to 2 cups. This creates a buffer at the bottom of your pot to regulate and distribute the heat evenly.
The Tools for This Kitchen Hack
Your regular kitchen gear is about to pull double duty. Here’s what you need.
- A Large, Heavy-Bottomed Pot with a Tight-Fitting Lid: This is your “oven.” A Dutch oven, a sturdy stockpot, or even a large pressure cooker (without the whistle) will work perfectly. The key is a heavy base and a lid that traps heat well.
- A Wire Rack or Trivet: This must fit inside your pot. Its crucial job is to elevate the cake pan so it doesn’t touch the hot bottom of the pot.
- A Cake Pan: A 6-inch or 7-inch round cake pan is ideal. It must fit inside your large pot with at least a 1-inch gap all around for air to circulate.
- The usual suspects: A couple of mixing bowls, a whisk, a rubber spatula, and parchment paper.
Step-by-Step: Building Your Stovetop Oven
This process is simple, but the setup is key. Read through the steps first to get the lay of the land.
Phase 1: Make the Cake Batter
- Prep Your Pan: Grease your cake pan thoroughly with oil or butter. Line the bottom with a circle of parchment paper, then grease the parchment too. This ensures your beautiful cake comes out without a fight.
- Mix the Dry Stuff: In a large bowl, whisk together the flour, cocoa powder, sugar, baking powder, baking soda, and salt. Make sure it’s well combined.
- Mix the Wet Stuff: In a separate medium bowl, whisk together the milk, oil, vinegar, and vanilla extract.
- Combine and Stop: Pour the wet ingredients into the dry ingredients. Mix with your whisk until just combined. A few small lumps are perfectly fine. Over-mixing is the enemy of a tender cake, so stop as soon as you no longer see dry flour.
- Pour it Up: Immediately pour the finished batter into your prepared cake pan and set it aside for a moment.
Phase 2: Create and “Bake” in Your Stovetop Oven
- Set Up Your “Oven”: Take your large, heavy-bottomed pot. Pour the 1-2 cups of salt or sand into the bottom and spread it into an even layer. Place your wire rack or trivet on top of the salt layer.
- Preheat the Pot: Put the lid on the pot and place it on your stovetop over medium-low heat for 10 minutes. This preheating step is just as important as preheating a regular oven.
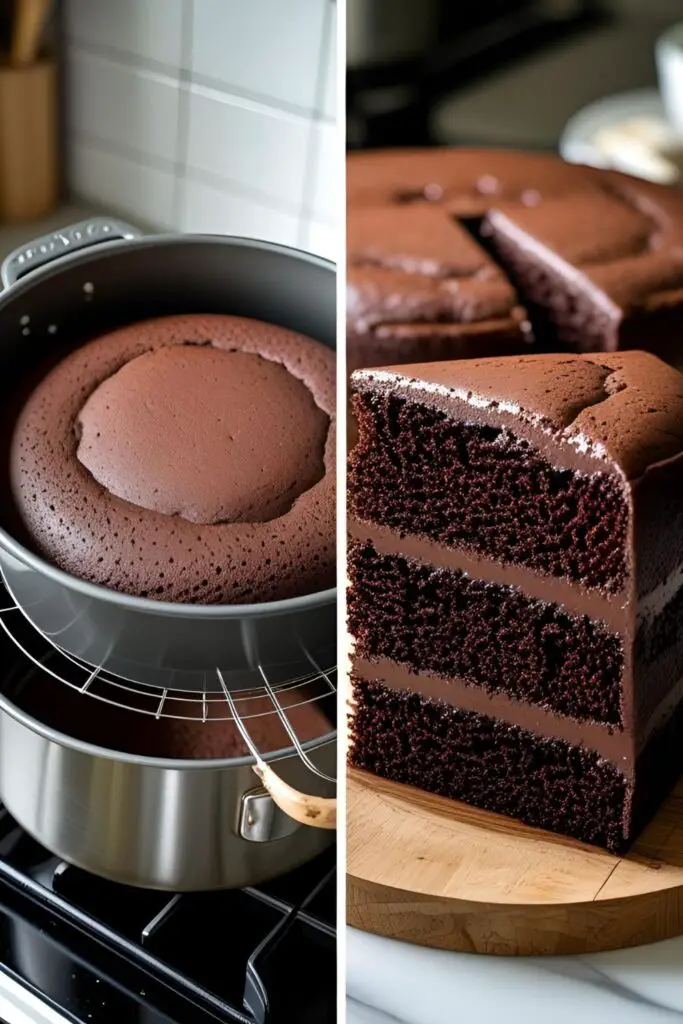
- Time to Bake: Carefully remove the hot lid (use oven mitts!). With great care, place your cake pan onto the wire rack inside the pot. Make sure the pan is not touching the sides of the pot.
- Cover and Wait: Immediately place the lid back on tightly. If your lid has a steam vent, you can plug it with a small piece of foil or dough to trap the heat. Turn the heat down to LOW and let the cake “bake” for 40 to 50 minutes.
- NO PEEKING! This is the most important rule. Every time you lift the lid, all the precious heat and steam escape, which can cause your cake to sink. Trust the process and the timer for at least the first 40 minutes.
- Check for Doneness: After 40 minutes, you can quickly check the cake. Insert a long wooden skewer or toothpick into the center. If it comes out clean, your cake is done! If it has wet batter on it, cover the pot and cook for another 5-10 minutes before checking again.
- Cool It Down: Carefully remove the cake pan from the hot pot and place it on a wire rack to cool for about 20 minutes. Then, run a knife around the edges and invert the cake onto the rack to cool completely before frosting.
Calories & Nutritional Info (A Rough Guide)
This is for the unfrosted cake, assuming you cut it into 8 slices.
- Estimated Calories: Around 320-360 kcal per slice.
- Wonderfully Moist: The oil and the steamy cooking environment make this cake incredibly moist.
- Egg-Free & Easily Vegan: This cake is naturally egg-free and can be made fully vegan by using plant-based milk.
Common No-Oven Baking Mistakes to Avoid

This method is easy, but you have to respect the physics. Avoid these common blunders.
- The Sin of Peeking. I know it’s tempting, but you have to resist. Lifting the lid releases all the trapped heat, dramatically increases your baking time, and is the number one cause of a dense, sunken, undercooked cake. Do not peek for the first 40 minutes.
- Using a Flimsy Pot. A thin-bottomed pot will create hot spots and burn the bottom of your cake long before the center is cooked. You need a heavy, sturdy pot to distribute the stovetop’s direct heat more evenly. A tight-fitting lid is just as important.
- Letting the Pan Touch the Pot. The wire rack is not optional. It creates a crucial air gap. If your cake pan sits directly on the bottom of the pot, it will burn. If it touches the sides, it will cook unevenly.
- The Heat Is Way Too High. This is a “low and slow” baking method. If you use medium or high heat, you will have a cake that is burnt on the outside and completely raw in the middle. Keep the flame on low for the entire baking duration.
Variations & Customizations
Once you realize you can bake a cake in a pot, you’ll want to experiment!
- Classic No-Oven Vanilla Cake: Easily make this a vanilla cake. Omit the cocoa powder and increase the flour to 1 ¾ cups. Add an extra teaspoon of vanilla extract. Voila!
- Pressure Cooker Cake: This is a very popular variation. Follow the exact same setup in your pressure cooker, but remove the whistle/weight from the lid. This allows steam to escape so pressure doesn’t build up. “Bake” on low heat for the same amount of time.
- Chocolate Chip Surprise: After you’ve mixed your chocolate cake batter, gently fold in ½ cup of chocolate chips or chopped nuts for extra texture and pockets of melty goodness.
Your Burning No-Oven Questions, Answered
Let’s tackle some of the most common questions about this unique method.
Is the salt or sand in the bottom of the pot really necessary?
Yes, it’s highly recommended. It acts as a heat diffuser, absorbing the direct flame and distributing it more evenly throughout the pot. This prevents the bottom of your cake from burning and helps create a more oven-like environment.
My cake was still gooey in the middle after 50 minutes. What went wrong?
This usually means your heat was too low, or you peeked too many times, letting the heat escape. Ensure your lid is tight and resist the urge to check on it until the minimum baking time has passed.
Can I use any pot and pan combination?
The pot needs to be heavy-bottomed, and the cake pan needs to fit inside with at least a 1-inch gap all the way around for proper air circulation. Measure before you start!
Can I use a cake recipe that contains eggs for this method?

You can, but I find that eggless recipes, like the one provided, are more reliable and forgiving with this stovetop method. They tend to result in a moister, more tender crumb in this specific cooking environment.
Why does this take longer than a regular oven?
A stovetop “oven” is less efficient than a real oven. It takes longer to build up and maintain the ambient heat needed to bake the cake all the way through, so you need a longer, slower baking time.
The bottom of my cake burned! How do I prevent this?
Your flame was too high. Even if it looks low, it might be too powerful for your pot. Try using the smallest burner on your stove on its lowest setting. Also, ensure you have a thick enough layer of salt/sand at the bottom.
Can I make cupcakes this way?
Yes! You can place a silicone or metal muffin tin inside your pot (if it fits on the rack). The baking time will be shorter, likely around 25-30 minutes.
Final Thoughts
Look at you, you beautiful baking rebel. You just made a cake in a pot on your stove. You defied the tyranny of the oven. You looked at conventional baking wisdom and said, “I’ll find another way.” You are resourceful, you are brilliant, and you are now in possession of a ridiculously moist and delicious chocolate cake.
So go ahead, frost it, slice it, and savor it. And the next time someone tells you they can’t bake because they don’t have an oven, you can just smile knowingly. You’ve got the secret.