The Only Buns Recipe You’ll Ever Need (Seriously, Throw Out the Others)
Let’s talk about the one thing that separates casual cooks from kitchen legends: baking with yeast. For so many, yeast is a terrifying, mystical creature that lives in a packet, ready to ruin your day and refuse to rise. But what if I told you that you, yes you, could master it? It’s Friday evening here in Khulna, the perfect time to start a weekend project that will fill your home with the intoxicating aroma of freshly baked bread. This isn’t just a guide on how to make buns recipes; this is your ticket to becoming a bread-baking rockstar. We’re making the softest, fluffiest, most buttery dinner rolls imaginable, and I promise, it’s easier than you think.
Why These Buns Are a Certified Masterpiece
Why should you dedicate a couple of hours to these fluffy little clouds of goodness? Because they are, without exaggeration, a life-changing experience. Forget those dense, dry, and utterly forgettable store-bought rolls. These homemade buns are impossibly soft and pillowy, with a rich, buttery flavor and a slightly sweet, tender crumb. They are pure, unadulterated comfort in carbohydrate form.
These buns are also incredibly versatile. Serve them warm from the oven alongside dinner, use them as the perfect vehicle for mini burgers or pulled pork sliders, or just eat one (or five) standing over the counter, slathered in more butter. The sense of pride you’ll feel when you pull a pan of these perfect, golden-brown beauties out of the oven is second to none. Your family will think you’re a wizard.
The Dream Team of Dough (aka The Ingredients)
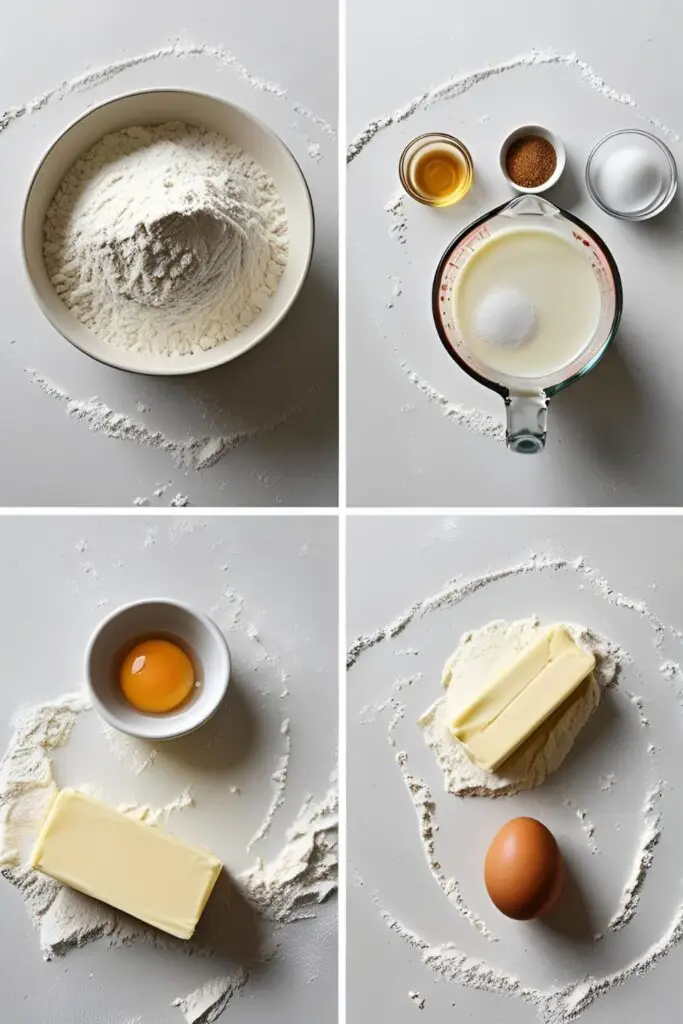
This is an enriched dough, which is just a fancy way of saying we’re adding delicious fat and richness to it.
- Warm Milk (1 cup): It needs to be lukewarm, about 105-115°F (40-46°C). Too hot and you’ll kill the yeast. Too cold and it won’t wake up.
- Active Dry Yeast (2 ¼ teaspoons, or one standard packet): Our magical leavening agent.
- Granulated Sugar (¼ cup): A little snack for the yeast and a touch of sweetness for the dough.
- All-Purpose Flour (3 to 3 ½ cups): Bread flour will also work for an even chewier texture.
- Unsalted Butter (6 tablespoons): 4 tablespoons will be softened for the dough, and 2 tablespoons will be melted for brushing on top.
- An Egg (1 large): At room temperature, for richness and structure.
- Salt (1 teaspoon): Absolutely crucial for flavor. Don’t forget it.
Your Bread-Baking Arsenal (Tools & Kitchen Gadgets)
The right tools will make you feel like a pro and ensure your dough is a dream to work with.
- A Stand Mixer with a Dough Hook: This is the easiest way to knead the dough to perfection. If you don’t have one, get ready for a therapeutic arm workout.
- A Large Mixing Bowl: For the first rise, when the dough will magically double in size.
- A Kitchen Scale: For the most accurate and consistent results, weighing your flour is a game-changer.
- An Instant-Read Thermometer: The best way to check the temperature of your milk to ensure you don’t murder your yeast.
- A Bench Scraper: Incredibly helpful for dividing the dough into clean, even pieces.
- A 9×13 inch Baking Dish: The perfect size for getting those classic, pull-apart style rolls.
- A Pastry Brush: For lovingly brushing the finished buns with melted butter.
Step-by-Step to Fluffy Bun Nirvana
Let’s break down the process. Don’t be scared of the yeast. We’re in this together.
Step 1: Wake Up the Yeast

In the bowl of your stand mixer, combine the warm milk, 1 tablespoon of the sugar, and the yeast. Give it a gentle stir and let it sit for 5-10 minutes. It should become foamy and bubbly. If it doesn’t, your yeast is dead. Hold a tiny funeral, pour it out, and start again with fresh yeast.
Step 2: Form the Dough
Once your yeast is frothy and alive, add the remaining sugar, the softened 4 tablespoons of butter, the egg, and the salt to the bowl. With the dough hook attachment on low speed, gradually add in 3 cups of the flour.
Step 3: The Kneading Process
Increase the mixer speed to medium and let it knead the dough for 5-7 minutes. The dough should be smooth, elastic, and pull away from the sides of the bowl. If it’s still very sticky, add more flour, one tablespoon at a time. To check if it’s done, perform the “windowpane test”: tear off a small piece of dough and gently stretch it. If you can stretch it thin enough to see light through it without it tearing, it’s ready.
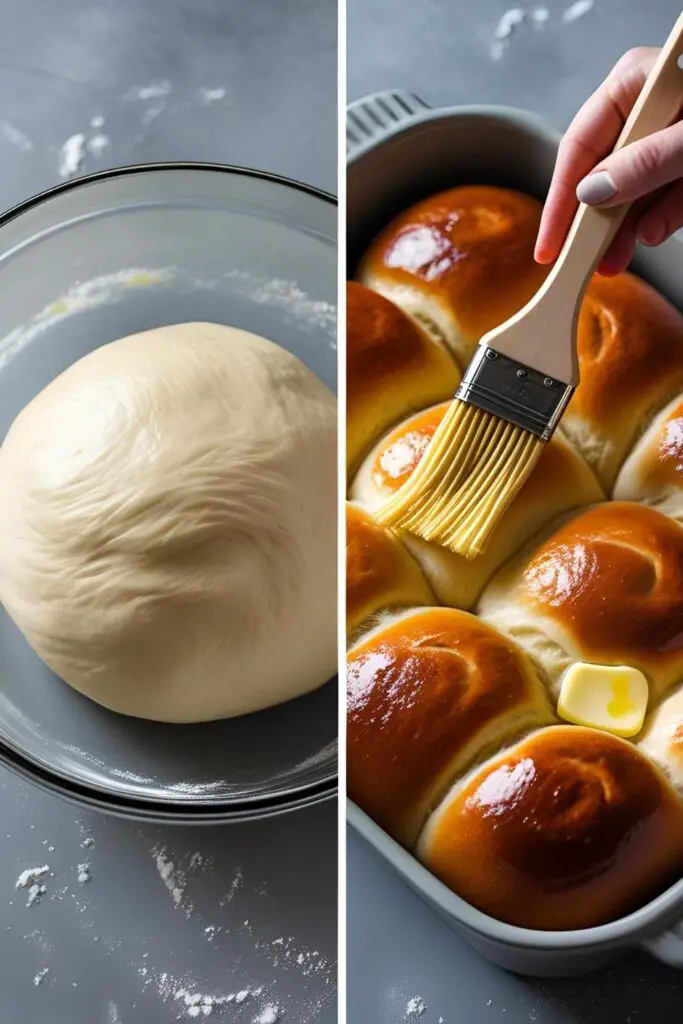
Step 4: The First Rise (The Big Nap)
Lightly grease a large, clean bowl with oil. Form your dough into a ball and place it in the bowl, turning it over to coat it lightly with oil. Cover the bowl with plastic wrap or a damp kitchen towel and place it in a warm, draft-free spot for 1-2 hours, or until the dough has doubled in size.
Step 5: Shape Your Buns
Gently punch the air out of the risen dough. Turn it out onto a lightly floured surface and divide it into 12 equal pieces. (A kitchen scale is your best friend here for uniform buns!). Roll each piece into a tight, smooth ball and arrange them in your greased 9×13 inch baking dish.
Step 6: The Second Rise (The Short Nap)
Cover the dish with plastic wrap and let the buns rise again in a warm place for another 30-60 minutes, or until they are puffy and have started to touch each other. While they’re rising, preheat your oven to 375°F (190°C).
Step 7: Bake to Golden Perfection

Bake the buns for 15-20 minutes, until they are a beautiful golden brown on top. As soon as you pull them out of the oven, take your melted 2 tablespoons of butter and brush it generously all over the hot buns. This is the secret to a soft, buttery crust.
Calories & Nutritional Info (A Fluffy Indulgence)
These are rich, buttery rolls. Let’s enjoy them for the glorious carbs they are.
- Serving Size: 1 bun
- Calories: Approximately 180-220 kcal.
- Good to Know: They’ll fill your home with a scent that is scientifically proven (by me) to increase happiness by 200%.
- The Bottom Line: They’re made with love and real ingredients, which makes them infinitely better than the store-bought kind.
Common Mistakes to Avoid (Bun Blunders)
Don’t let these simple errors result in dense, sad little bread rocks.
- Murdering Your Yeast: If your milk is hotter than 115°F (46°C), you will kill the yeast on contact. It’s a delicate organism. Treat it with respect. Use a thermometer!
- Under-Kneading the Dough: Kneading develops the gluten structure that traps the air and makes the buns fluffy. If you don’t knead it enough, your buns will be dense. Don’t skip the windowpane test.
- Rushing the Rise: Giving the dough enough time to rise is crucial for a light, airy texture. Find a warm spot in your house and be patient.
- Improper Shaping: When you shape the buns, you want to create a tight ball with a smooth surface. This creates surface tension that encourages the buns to rise up instead of spreading out flat.
Variations & Customizations (Pimp Your Buns)
The classic bun is a masterpiece, but feel free to get creative.
- Garlic Herb Parmesan Buns: Add 1 teaspoon of garlic powder and 1 tablespoon of dried Italian herbs to the dry ingredients. Before the second rise, brush the buns with an egg wash and sprinkle with grated Parmesan cheese. Brush with melted garlic butter after baking.
- Cheddar Jalapeño Buns: Gently knead in 1 cup of shredded sharp cheddar cheese and ¼ cup of finely diced, de-seeded jalapeños into the dough before the first rise.
- Sweet Orange Rolls: Add the zest of one large orange to the dough. After baking, instead of the butter wash, drizzle them with a simple orange glaze made from powdered sugar and fresh orange juice.
FAQ: Your Yeast-Related Anxieties, Solved
Let’s demystify the world of bread-making.
1. My dough didn’t rise! What went wrong?
The most likely culprits are: your yeast was expired (dead), your milk was too hot (you killed it), or your kitchen was too cold. Yeast needs warmth to thrive.
2. What is the “windowpane test”?

It’s the best way to know if your dough is properly kneaded. Take a small piece of dough and gently stretch it between your fingers. If it’s kneaded enough, it will stretch into a thin, translucent membrane (like a windowpane) without tearing.
3. Can I make this dough ahead of time?
Yes! After kneading, you can place the dough in a greased bowl, cover it, and let it do its first rise slowly in the refrigerator for up to 24 hours. This actually develops a more complex flavor.
4. How do I get all my buns to be the exact same size?
The secret is a kitchen scale. After the first rise, weigh the entire ball of dough, then divide that weight by the number of buns you want to make (e.g., 12). Then, weigh out each individual piece of dough.
5. What’s the best way to store homemade buns?
Let them cool completely, then store them in an airtight bag or container at room temperature. They are best eaten within 2-3 days.
6. Can I freeze these buns?
They freeze beautifully! Let them cool completely, then place them in a freezer-safe bag. They can be frozen for up to 3 months. To reheat, just pop them in a 350°F (175°C) oven for 5-10 minutes.
7. What’s the difference between active dry yeast and instant yeast?
Active dry yeast needs to be “proofed” or dissolved in warm liquid first (like we did in this recipe). Instant yeast can technically be mixed right in with the dry ingredients, but I still like to proof it to make sure it’s alive and well.
Final Thoughts
You did it! You faced the yeast beast and emerged victorious with a pan of the most beautiful, golden, and ridiculously fluffy buns imaginable. You are now officially a bread baker. You have harnessed the power of fermentation to create pure, delicious magic.
Go on, pull one apart while it’s still warm. Let the steam hit your face. Slather it with an irresponsible amount of butter and take a bite. That is the taste of pure, unadulterated triumph. Just be warned: your family may never let you buy store-bought bread again.