From Gourmet to Goo: How to Make Baby Food Stage 1 (Without Losing Your Mind)
So, you’ve got a tiny human who’s graduated from the liquid-only club and is ready for the thrilling world of… pureed carrots. Exciting, right? Maybe not for you, but for that little explorer of textures (and soon-to-be expert food thrower), it’s a whole new ballgame. If you’re staring blankly at the produce aisle wondering how to make baby food stage 1 that doesn’t resemble something you scraped off the bottom of your shoe, you’ve come to the right place.
Forget those expensive, pre-made jars that taste suspiciously bland. Learning how to make baby food stage 1 at home is easier than assembling those ridiculously complicated baby toys, and you’ll actually know what your little one is putting in their mouth. Plus, there’s a certain smug satisfaction that comes with knowing you’re providing the freshest, most wholesome goodness for your tiny overlord. Ready to ditch the mystery mush? Let’s get started!
Why Homemade Stage 1 Baby Food is Actually Kind of Awesome
Okay, maybe “awesome” is a strong word when we’re talking about single-ingredient purees. But hear me out.
First, you know exactly what’s in it. No weird preservatives, no added salt or sugar (babies don’t need that jazz!), just pure, simple goodness. It’s like a culinary trust fall, but with fewer tears (hopefully).
Second, it’s surprisingly economical. Those little jars add up! Making your own baby food is a budget-friendly way to nourish your little one, leaving you more cash for, you know, those inevitable middle-of-the-night diaper runs fueled by overpriced coffee.

And let’s not forget the flavor factor. Freshly made puree just tastes better. Think about it – would you rather eat a mushy carrot that’s been sitting in a jar for who-knows-how-long, or one that was just steamed and blended? Exactly. Your baby deserves flavor that hasn’t given up on life yet.
The Simple Stars: Your Stage 1 Ingredient Options
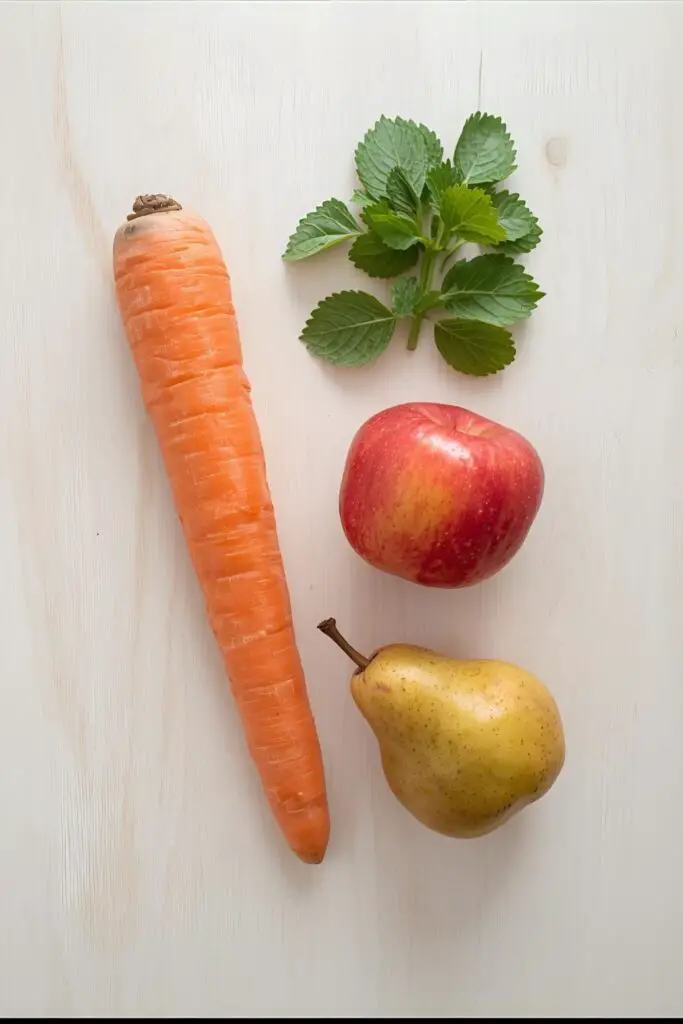
Stage 1 is all about introducing single ingredients to check for allergies and let your baby get used to new flavors and textures. Keep it simple, folks.
- Fruits (peeled and cooked until soft):
- Sweet Start: Apple, Pear, Banana (no cooking needed for ripe bananas, hallelujah!)
- Tropical Treat (if age-appropriate and no allergies): Mango, Papaya
- Vegetables (peeled and cooked until soft):
- Classic Choices: Carrot, Sweet Potato, Butternut Squash
- Green Goodness: Green Beans, Peas
- Single-Grain Cereals (mixed with breast milk or formula):
- Gentle Introductions: Iron-fortified rice cereal, oatmeal, barley
Your Baby Food Making Command Center: Tools & Gadgets
You don’t need a fancy baby food maker (though they exist!). Your regular kitchen gear will do just fine.
- Steamer Basket or a Pot with a Lid: For cooking those veggies and fruits to soft perfection.
- Blender or Food Processor: To achieve that smooth, lump-free puree. An immersion blender also works great for smaller quantities.
- Fine-Mesh Sieve (optional but recommended): To ensure a super smooth texture, especially in the beginning.
- Knife and Cutting Board: For prepping your ingredients.
- Ice Cube Trays (BPA-free): For portioning and freezing your homemade goodness.
- Freezer-Safe Bags or Containers: For long-term storage.
Let’s Get Pureeing: Your Super Simple Steps
Ready to transform whole foods into baby-approved mush? It’s easier than you think!
Step 1: Choose Your Star Ingredient
Pick one fruit, vegetable, or single-grain cereal to start with. Remember, we’re introducing one new food at a time, and waiting a few days before introducing another, to monitor for any allergic reactions.
Step 2: Prep It Right
Wash your chosen fruit or vegetable thoroughly. Peel it and chop it into small, even-sized pieces. This helps ensure even cooking. For grains, skip this step – you’ll cook them according to the package directions.
Step 3: Cook Until Soft (Seriously Soft)
- Steaming: Place the chopped fruit or veggies in a steamer basket over simmering water. Cover and steam until they are fork-tender – meaning you can pierce them easily with a fork. This usually takes about 8-15 minutes, depending on the food and the size of the pieces.
- Boiling: You can also boil the chopped ingredients in a small amount of water until tender. However, steaming helps retain more nutrients, so it’s generally preferred. If you boil, use just enough water to cover the food.
- For Grains: Cook the cereal according to the package directions using breast milk, formula, or water.
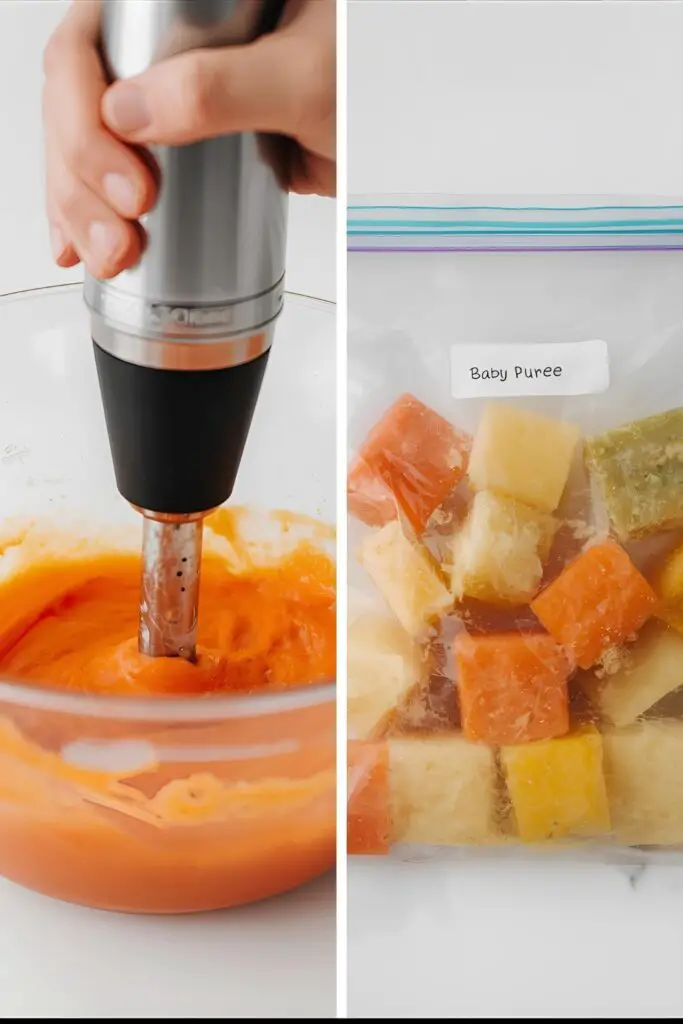
Step 4: Blend Until Smooth (No Chunks Allowed!)

Once the cooked fruit or veggies are tender, transfer them to your blender or food processor. If you boiled them, you might need to add a little of the cooking liquid to help them blend to a smooth puree. Start with a small amount and add more as needed to reach a thin, smooth consistency – like a thick liquid. For grains, ensure there are no lumps.
Step 5: Strain for Extra Smoothness (The Picky Eater Insurance)
For very young babies (around 4-6 months), you might want to push the puree through a fine-mesh sieve to remove any tiny lumps or fibers. This ensures a super smooth texture that’s easy for them to swallow. Honestly, IMO, this step can save you from unexpected projectile spit-up.
Step 6: Portion and Store Like a Pro
Let the puree cool slightly. Then, spoon it into ice cube trays. Once frozen solid, pop the cubes out and transfer them to freezer-safe bags or containers, labeling each with the food type and date. This way, you have convenient, single-serving portions ready whenever you need them. Freshly made puree can also be stored in the refrigerator for up to 3 days.
Step 7: Thaw and Serve (Tiny Tastes for Tiny Humans)
When you’re ready to feed your little one, thaw a cube or two in the refrigerator overnight or gently warm it using a warm water bath (don’t microwave!). Always check the temperature before feeding – it should be lukewarm, not hot. Start with a small spoonful and let your baby explore the new flavor.
Calories & Nutritional Info (Tiny Bites, Big Impact)
The nutritional content will vary depending on the fruit or vegetable you choose. Here’s a general idea for a 1-ounce (about 2 tablespoons) serving of a single-ingredient puree:
- Calories: Approximately 25-50 kcal
- Carbohydrates: Roughly 5-10g (mostly from natural sugars in fruits and starches in veggies)
- Fiber: Varies depending on the food.
- Vitamins & Minerals: A good source of vitamins and minerals found naturally in the specific fruit or vegetable (e.g., Vitamin A in carrots and sweet potatoes, Vitamin C in many fruits).
- Note: Homemade baby food is free from added salt, sugar, and artificial additives.
Common Mistakes to Avoid (Baby Food Blunders)
- Adding Salt, Sugar, or Honey: Babies’ kidneys can’t handle extra salt or sugar, and honey can contain botulism spores, which are dangerous for infants under one year old. Just say no!
- Not Cooking Food Soft Enough: Stage 1 food needs to be super smooth to prevent choking. Ensure your fruits and veggies are fork-tender before blending.
- Over-Blending: While smooth is the goal, blending for an excessive amount of time can make the puree too thin and watery. Add cooking liquid gradually until you reach the desired consistency.
- Not Checking for Allergies: Introduce one new food at a time and wait 3-5 days before introducing another. Watch for any signs of allergic reactions (rash, vomiting, diarrhea).
- Freezing Large Portions: Freezing in individual 1-2 ounce portions (using ice cube trays) makes thawing and serving much easier and reduces food waste.
- Thawing at Room Temperature: This can allow harmful bacteria to grow. Always thaw in the refrigerator or using a warm water bath.
- Re-freezing Thawed Baby Food: Once baby food has been thawed, use it within 24 hours and do not refreeze it.
Variations & Customizations (Eventually!)
Stage 1 is all about single ingredients, but as your baby progresses, you can start getting a little more creative!
- Sweet Potato & Cinnamon: Once your baby has tried sweet potato on its own, a tiny pinch of cinnamon can add a lovely flavor boost.
- Apple & Pear Puree: Once both apple and pear have been introduced separately, try combining them for a naturally sweet and delicious puree.
- Green Bean & Potato (Stage 2): As your baby moves to stage 2 (around 6-8 months), you can start combining well-cooked and mashed or pureed combinations like green beans and potato.
FAQ Section (Your Baby Food Brainwaves, Answered)

1. How do I know when my baby is ready for Stage 1 solids? Signs of readiness include being able to sit up with support, having good head control, showing interest in food (watching you eat, reaching for your plate), and losing the tongue-thrust reflex (not automatically pushing food out of their mouth). Always consult your pediatrician.
2. How much Stage 1 baby food should I feed my baby? Start with just 1-2 teaspoons once a day and gradually increase the amount and frequency as your baby gets used to solids. Follow your baby’s cues – if they turn their head away or seem uninterested, don’t force it.
3. What if my baby doesn’t like a certain food? It can take multiple tries for a baby to accept a new flavor. Don’t give up after the first try! Offer it again in a few days. If they consistently refuse it, you can try another food and revisit it later.
4. Can I use store-bought fruits and vegetables? Yes, absolutely! Just make sure they are fresh or frozen without any added salt or sugar.
5. Do I need to use organic produce? Organic is always a good option to minimize pesticide exposure, but it’s not always necessary or accessible. Thoroughly washing and peeling non-organic produce can also help reduce pesticide residues.
6. How do I know if my baby is having an allergic reaction? Watch for signs like rash, hives, swelling (especially of the face, lips, or tongue), vomiting, diarrhea, difficulty breathing, or excessive fussiness after introducing a new food. If you suspect an allergic reaction, stop feeding that food immediately and consult your pediatrician.
7. What about choking hazards? Stage 1 baby food should be a smooth puree with no lumps. Always supervise your baby while they are eating.
Final Thoughts
Congratulations! You’ve officially embarked on the exciting (and sometimes messy) journey of introducing solids to your little one. Making your own Stage 1 baby food isn’t as scary as it sounds, is it? It’s all about simple ingredients, proper cooking, and a good blender.
So go forth, steam those sweet potatoes, puree those pears, and feel good knowing you’re giving your baby a healthy and delicious start to a lifetime of food adventures. And hey, if you end up with a little extra puree on your own face, consider it a badge of honor. You’re doing great, mama (or papa)!