Alright, my fellow home preserver, let’s talk about apricots. There’s something undeniably magical about those small, sun-kissed fruits, isn’t there? Their delicate fuzz, their vibrant orange hue, that perfect balance of sweet and tart… it’s pure summer in a bite. And while fresh apricots are a fleeting joy, transforming them into jam allows you to capture that sunshine in a jar, ready to brighten up even the gloomiest winter morning. You’ve probably seen apricot jam at the store, but honestly, it rarely holds a candle to the homemade stuff. My first attempts at jam-making involved a lot of frantic stirring and a few jars that ended up more like syrup than jelly. Sigh. But I’ve learned the secrets, battled the setting point anxiety, and discovered that how to make apricot jam at home is not only achievable but deeply satisfying. If you’re ready to fill your pantry with jars of golden, tangy-sweet goodness, then grab your apron. We’re about to preserve some liquid sunshine!
Why Homemade Apricot Jam? Capture Summer’s Gold!
Why go through the “trouble” of making jam when you can just grab a jar at the supermarket? Oh, my friend, the difference is profound. It’s like comparing a watercolor painting to a vibrant photograph. The homemade version bursts with freshness, flavor, and a personal touch you simply can’t buy.
Here’s why I’m a passionate homemade jam evangelist:
- Unbeatable Freshness & Flavor: This is the absolute biggest reason. Homemade apricot jam tastes incredibly vibrant, bursting with the true essence of fresh fruit. It’s light-years ahead of the often overly sweet or one-dimensional flavor of commercial jams.
- You Control the Ingredients: Say goodbye to high-fructose corn syrup, artificial colors, or strange preservatives. You choose the quality of your fruit, the amount of sugar, and the type of pectin (or none!).
- Customizable Sweetness: Apricots vary in sweetness. When you make your own jam, you can adjust the sugar content to your preference, letting the fruit’s natural tang shine through.
- Extends the Season: Apricot season is notoriously short. Jamming allows you to savor that ephemeral summer flavor long after the fresh fruit has disappeared from the market. It’s like time travel for your taste buds!
- Deeply Satisfying & Rewarding: There’s a profound sense of accomplishment that comes with lining up jars of jewel-toned jam on your counter. It’s a culinary hug, literally sealing in sunshine.
- Thoughtful Gifts: Handmade jam makes an incredibly thoughtful and personal gift. Who wouldn’t love a jar of homemade apricot jam for their birthday or holidays? IMO, it’s a showstopper!
The Golden Ingredients: Apricots, Sweetness, Acid, and Pectin

Jam making fundamentally relies on four components: fruit, sugar, acid, and pectin. Apricots, while delicious, are a bit tricky because they are naturally lower in pectin than some other fruits. So, understanding these elements is key.
Apricots: Choosing Your Perfect Fruit
- Ripeness is Key: Choose ripe but firm apricots. They should be fragrant, have a vibrant orange color, and yield slightly when gently squeezed. Overripe apricots can be mushy and lack the necessary acid; underripe ones won’t have enough flavor.
- Flavor Matters: The better your apricots taste fresh, the better your jam will taste. Get the best you can find!
Sugar: Sweetness & Setting Power
Sugar isn’t just for sweetness; it also helps the jam set and acts as a preservative.
- Granulated Sugar: Standard white granulated sugar is most common.
- Less Sugar? While you can reduce sugar, remember it affects the set and preservation. Using less sugar might require more pectin or a longer cook time, which can dull the fruit’s freshness. For beginners, stick to recommended ratios.
Lemon Juice: The Crucial Acid Boost
Apricots are relatively low in acid compared to some other jam fruits. Acid is vital for two reasons:
- Helps Pectin Set: Pectin needs acid to form a proper gel.
- Brightens Flavor: A squeeze of lemon juice cuts through the sweetness and enhances the apricot’s natural tang. Do not skip the lemon juice!
Pectin: Your Jam’s Setting Agent (Natural vs. Added)
Pectin is a natural gelling agent found in fruits. Apricots are naturally low in pectin, meaning without added pectin, you’d have to cook the jam for a very long time to get it to set, potentially sacrificing fresh flavor and color.
- Natural Pectin: Found in fruit, especially in cores and peels. Unripe fruits have more pectin.
- Added Pectin: Available as powdered pectin or liquid pectin. These are derived from fruits (like apples or citrus) and ensure a reliable set with less cooking time, preserving more fresh fruit flavor and color. For apricot jam, I highly recommend using added pectin, especially for beginners. It takes the guesswork out of setting.
Essential Equipment: Your Jam-Making Arsenal
You don’t need a canning factory, but having the right tools makes the process smoother and safer.
- Large, Heavy-Bottomed Pot or Dutch Oven: Crucial! You need a pot that is at least twice as tall as your expected volume of jam because it will bubble up vigorously during cooking. A heavy bottom prevents scorching.
- Large Ladle: For transferring hot jam to jars.
- Long-Handled Wooden Spoon or Heat-Proof Spatula: For stirring.
- Canning Funnel: Makes filling jars less messy.
- Glass Jars with Two-Piece Lids: Pint or half-pint jars are standard. Make sure they are specifically designed for canning.
- Canning Tools (Optional but Recommended):
- Jar Lifter: For safely placing and removing hot jars from the water bath.
- Headspace Tool: For measuring the exact amount of space at the top of the jar.
- Lid Lifter: A magnetic wand to retrieve hot lids.
- Large Pot with Lid (for water bath canning): Tall enough to cover your jars by at least an inch of water.
- Candy Thermometer or Instant-Read Thermometer: For accurately checking jam temperature for setting point.
- Small Plates (Chilled): For the “wrinkle test” (more on this below!).
Prepping Your Apricots: Pit, Chop, and Macerate
Proper fruit preparation is key to the jam’s texture and flavor.
Washing & Pitting: Clean Slate
- Gently wash your fresh apricots under cool running water.
- Halve each apricot and remove the pit. If any spots look bruised or bad, cut them out.
Chopping or Mashing: Texture Control
This is where you decide on your jam’s chunkiness.
- Chunky Jam: Roughly chop the apricots into small pieces (1/2 to 1-inch chunks).
- Smoother Jam: Mash the apricots slightly with a potato masher, or pulse briefly in a food processor (be careful not to over-process into a puree!). My preference is usually a mix – some chopped, some mashed.
Maceration: Drawing Out Juices & Flavor (Optional but Recommended)
This step isn’t strictly necessary but is highly recommended.
- In your large pot, combine the prepared apricots with your sugar and lemon juice.
- Stir well to combine.
- Cover the pot and let it sit at room temperature for at least 2-4 hours, or ideally overnight (in the refrigerator). This process (maceration) draws out the fruit’s natural juices, deepens the flavor, and helps dissolve the sugar, making for a richer jam. I always macerate my apricots; it makes a noticeable difference.
The Jam-Making Process: From Fruit to Jarred Sunshine
Now, for the exciting part – turning those macerated apricots into glorious jam!
Combining Ingredients & Initial Simmer
- If you macerated the fruit overnight in the fridge, bring the pot out and let it come closer to room temperature before heating.
- Place the pot over medium-high heat. Stir constantly to dissolve any remaining sugar and prevent scorching on the bottom.
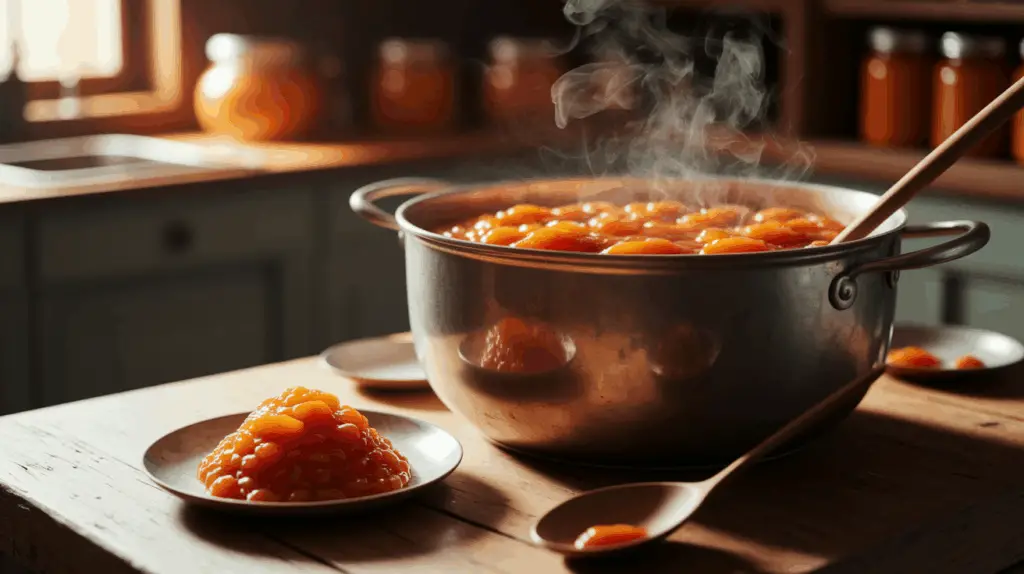
The Boil: Cooking to Temperature & Consistency
- Bring the mixture to a rolling boil (a boil that cannot be stirred down). This high heat activates the pectin.
- If using powdered pectin, sprinkle it over the fruit mixture before bringing it to a boil and whisk to combine.
- If using liquid pectin, stir it in after the jam has reached its full rolling boil and been cooking for a few minutes. (Follow pectin package directions precisely!).
- Once at a rolling boil, set a timer for 5-10 minutes (for pectin recipes) or longer (for no-pectin). Keep stirring constantly. The jam will bubble vigorously, and the bubbles will change from frothy to thicker.
Testing for Set: The Wrinkle Test & Thermometer Check
This is the most nerve-wracking part for beginners! You need to know if your jam will set.
- The Plate/Wrinkle Test: Before you start cooking, put 2-3 small plates in the freezer. When you think the jam is ready, spoon a small amount onto a chilled plate. Return the plate to the freezer for 1-2 minutes. Take it out and push the jam with your finger. If it wrinkles and forms a skin, it’s ready. If it’s still runny, cook for a few more minutes and test again. This is my preferred method.
- The Temperature Test: Jam sets when it reaches a specific temperature, usually 220°F (104°C) at sea level. Use a candy thermometer clipped to the side of the pot (without touching the bottom) to monitor the temperature. This is a reliable scientific method.
Skimming the Foam: For Clarity & Beauty
As the jam cooks, foam often rises to the surface.
- Use a large metal spoon to skim off any white foam from the surface of the jam just before jarring. This improves the clarity and appearance of your finished jam. A small knob of butter stirred in at the end can also help reduce foam.
Pectin Power: Getting Your Jam to Set (Without Tears!)
Apricots are notoriously low in pectin, so a little help often goes a long way.
No-Pectin Method (Longer Cook, More Careful Testing)
If you prefer to avoid added pectin, you can!
- You’ll need to cook the jam for a longer period (sometimes 20-30 minutes or more at a rolling boil) to evaporate enough water for the natural pectin to concentrate and set.
- Use the wrinkle test and temperature test (220°F) diligently. This method results in a deeper, more caramelized flavor but a potentially less vibrant color. You might also want to add the cores from the apricots (tied in cheesecloth) during the boil, as they contain pectin, then remove them before jarring.
Using Liquid Pectin (Quick & Easy)
- Add liquid pectin after the jam has been cooking at a full rolling boil for a few minutes and is almost ready to test for set. Follow the pectin package instructions precisely. Liquid pectin requires a shorter, very vigorous boil.
Using Powdered Pectin (Common & Reliable)
- Mix powdered pectin with a small amount of sugar from your recipe before adding it to the fruit, then whisk it into the fruit mixture before bringing it to a boil.
- Bring to a full rolling boil, then add the rest of the sugar. Bring back to a rolling boil and cook for 1-2 minutes. Follow package directions! This is my typical choice for reliability.
Canning & Storage: Preserving Your Apricot Bounty
This step is essential for safe, long-term, shelf-stable storage.
Sterilizing Your Jars: Safety First!
Cleanliness is paramount in canning to prevent spoilage and food-borne illness.
- Wash jars and lids in hot, soapy water. Rinse well.
- Sterilize jars: Place jars upright in a large pot, fill with water to cover them by at least an inch. Bring to a boil and boil for 10 minutes. Keep hot until ready to fill.
- Heat lids: Place flat lids in a separate small saucepan with hot (not boiling) water. Keep them warm (do not boil seals) until ready to use. This helps the seal form.
Filling & Sealing Jars: No Air Bubbles!
- Carefully remove hot jars from the sterilizing water using a jar lifter. Place them on a clean towel.
- Using a canning funnel and ladle, fill jars with hot jam, leaving 1/4 inch of headspace (space between the jam and the rim of the jar). This space is crucial for proper sealing.
- Use a non-metallic utensil (like a chopstick or plastic knife) to remove any air bubbles by running it around the inside of the jar.
- Wipe jar rims clean with a damp paper towel. Any jam on the rim can prevent a proper seal.
- Place a warm flat lid on the jar, then screw on the band fingertip-tight (just enough to feel resistance, don’t overtighten).
Water Bath Canning: The Preservation Seal
This creates a vacuum seal, making the jam shelf-stable.
- Place filled jars back into the large pot used for sterilizing (your water bath canner). Ensure jars are not touching each other.
- Add more hot water if needed, ensuring jars are covered by at least 1 inch of water.
- Cover the pot and bring water to a rolling boil.
- Process jars in the boiling water bath for 10 minutes (adjust for altitude if necessary).
- Turn off heat, remove lid, and let jars sit in hot water for 5 minutes.
- Carefully remove jars with a jar lifter and place them upright on a clean towel on your counter. Do not disturb them.
Cooling & Checking Seals: The Pop!
- Let jars cool completely undisturbed for 12-24 hours. You should hear a satisfying “pop!” as each jar seals.
- After cooling, check seals: the center of the lid should be depressed and should not flex when pressed. If a jar didn’t seal, refrigerate it and use it first.
- Remove screw bands (they can cause rust if left on) and wipe jars clean.
Storage: Cool, Dark, & Dry
- Store sealed jars in a cool, dark, dry place (like a pantry or cellar) for up to 1 year.
- Once opened, refrigerate and use within 2-3 weeks.
Troubleshooting Apricot Jam Woes
Even with the best instructions, jam making can present challenges. It’s a learning process!
- Jam is Too Runny/Didn’t Set:
- Culprit: Not cooked long enough, not enough pectin (natural or added), wrong pectin type for recipe, not enough acid (lemon juice).
- Fix: You can re-process runny jam (reheat, add more pectin/acid if needed, re-test set, re-can).
- Jam is Too Stiff/Rubbery:
- Culprit: Overcooked, or too much pectin.
- Fix: Next time, cook for less time and test for set more frequently.
- Jam Tastes Burnt:
- Culprit: Heat too high, or not stirring enough, causing scorching on the bottom.
- Fix: Use a heavy-bottomed pot and stir constantly, especially as it thickens.
- Mold on Top of Jam:
- Culprit: Improperly sealed jar, or not enough sugar, or improper washing of butter. (Oops, wrong article!).
- Fix: Discard affected jam. This indicates spoilage. Ensure proper sterilization and sealing.
Frequently Asked Questions
- What ingredients do you need to make apricot jam? To make apricot jam, you typically need fresh apricots, sugar, lemon juice (for acid), and often added pectin as apricots are naturally low in pectin.
- How do you know when apricot jam is set? You know apricot jam is set when it reaches a temperature of 220°F (104°C) (at sea level) on a candy thermometer, or passes the cold plate/wrinkle test (a small dollop chilled on a cold plate wrinkles when pushed with a finger).
- Do apricots have enough pectin to make jam without added pectin? Apricots are naturally low in pectin, so while it’s possible to make jam without added pectin, it often requires a much longer cooking time to reach a set, which can result in a darker jam with a less fresh flavor. For a reliable set and brighter jam, added pectin is highly recommended.
- How long do you process apricot jam in a water bath? You process apricot jam in a boiling water bath for 10 minutes for half-pint or pint jars (adjust for altitude). This step creates a vacuum seal, making the jam shelf-stable.
- How long does homemade apricot jam last? Properly canned and sealed homemade apricot jam, stored in a cool, dark place, can last for up to 1 year. Once opened, refrigerate it and consume it within 2-3 weeks.
- Why is my apricot jam too runny? Apricot jam is often too runny because it wasn’t cooked long enough to reach the setting point, there wasn’t enough pectin (either natural or added), or there was insufficient acid (lemon juice) to activate the pectin.
- Can you use frozen apricots for jam? Yes, you can use frozen apricots for jam. Thaw them completely before cooking, and use them as you would fresh apricots. Frozen fruit might release more liquid, so you might need to simmer the jam slightly longer to reach the desired consistency.
Conclusion
So there you have it, my friend! The complete, sun-drenched guide on how to make apricot jam. No more settling for bland store-bought versions; you now have the power to create jars of pure, vibrant, tangy-sweet sunshine that will brighten any meal. It’s a surprisingly accessible project with incredibly rewarding results. Go forth, embrace the season, and fill your pantry with delicious, homemade goodness. You’ve totally got this! 🌞🍑✨