How to Make a Stunning Pink and White Cake (It’s Easier Than It Looks!)
There’s something so classic and dreamy about a pink and white cake, isn’t there? It’s the stuff of whimsical birthday parties, elegant baby showers, and general fairytale vibes. You see those perfect swirls, stripes, and marbled slices on Pinterest and probably think it requires some kind of advanced baking degree or a secret pact with a pastry chef.
I’m here to tell you that’s not the case. I’m here to let you in on the secret: creating a beautiful pink and white cake is a ridiculously fun art project, and you are about to become the artist. We’re not just talking about pink and white frosting; we’re talking about a cake that’s a surprise on the inside, too.
So, if you’re ready to create a showstopper that looks like it came from a fancy boutique bakery (but was actually born in your beautifully chaotic kitchen), let’s get our aprons on.
Why This Recipe is Awesome
If the pretty color scheme hasn’t already won you over, here’s why this cake is a total game-changer.
- It’s a Showstopper, Inside and Out: We’re not just slapping some pink frosting on a plain cake. Oh no. We are creating a beautiful pink and white marble cake on the inside, so every single slice is a unique and gorgeous surprise. The chorus of “oohs” and “aahs” when you cut into it is practically guaranteed.
- The “Wow” Factor is Deceptively Simple: The marble effect? It’s literally just blobbing two colors of batter in a pan. The elegant striped frosting? It’s a simple and magical trick using a bench scraper that will make you feel like a cake decorating wizard. You’ve absolutely got this.
- It’s the Perfect Celebration Cake: The flavor is a classic, crowd-pleasing vanilla that everyone loves, and the beautiful design is perfect for birthdays, bridal showers, anniversaries, or any occasion that calls for a touch of pretty.
Ingredients
To get that perfect, clean pink and white look, we’ll start with a classic white cake base. This uses only egg whites to ensure the “white” part of our cake is truly white, not yellowish.
For the White Cake Base (makes two 8-inch layers):
- 2 ½ cups cake flour, sifted
- 1 ½ cups granulated sugar
- 1 tablespoon baking powder
- ½ teaspoon salt
- ½ cup (1 stick) unsalted butter, softened
- 4 large egg whites, at room temperature
- 1 cup buttermilk, at room temperature
- 2 teaspoons clear vanilla extract (to keep the cake crumb bright white!)
- Pink gel food coloring

For the Simple Vanilla Buttercream:
- 1 ½ cups (3 sticks) unsalted butter, softened
- 5-6 cups powdered sugar, sifted
- ⅓ cup heavy cream or milk
- 2 teaspoons clear vanilla extract
- Pinch of salt
- Pink gel food coloring
Tools & kitchen gadgets used
You don’t need a professional pastry kitchen, but a few key tools will make the decorating process much smoother and more fun.
- A Stand Mixer or a powerful Hand Mixer
- Two 8-inch Round Cake Pans
- Parchment Paper
- Two Medium Mixing Bowls (for dividing the batter)
- A Turntable (Cake Decorating Stand) (this is a game-changer for smooth frosting)
- An Offset Spatula (both a large and small one are helpful)
- A Bench Scraper (the secret to the striped effect!)
- Piping Bags and Tips (optional, for decorating the top)
- A Wire Cooling Rack
Step-by-step instructions
This is a two-part art project: the marbled cake and the striped frosting. Let’s tackle it step-by-step.
Part 1: The Marbled Cake
- Prep and Mix: Preheat your oven to 350°F (175°C). Grease and flour your cake pans. Prepare the white cake batter: cream the butter and sugar, beat in the egg whites and vanilla, then alternate adding the dry ingredients and the buttermilk until just combined.
- Divide and Conquer: Now for the fun part. Divide the finished cake batter evenly between two medium bowls.
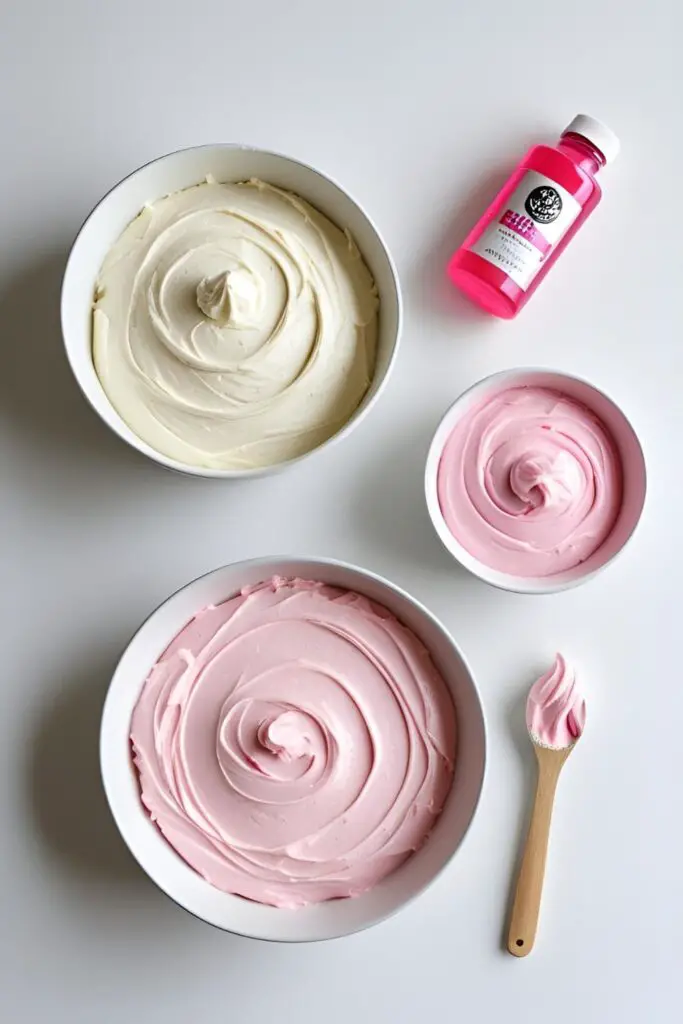
- Color Your World: Leave one bowl of batter white. To the second bowl, add a few drops of pink gel food coloring and stir gently until you have a beautiful, uniform pink.
- Create the Marble: Alternate large spoonfuls (or “blobs”) of the pink and white batter into your two prepared cake pans until all the batter is used up. It will look like a funky checkerboard.
- The Magic Swirl: Take a butter knife and gently drag it through the batter in a figure-eight or S-shaped pattern just once or twice. Do not overmix!
- Bake and Cool: Bake for 30-35 minutes, or until a toothpick inserted into the center comes out clean. Let the cakes cool in their pans for 15 minutes before inverting them onto a wire rack to cool completely.
Part 2: The Striped Frosting
- Make the Frosting: While the cakes cool, prepare a large batch of white vanilla buttercream by beating the butter until fluffy, then gradually adding the powdered sugar, cream, vanilla, and salt, and whipping until light and airy.
- The Crumb Coat: Once the cakes are cool, level them and stack them on your turntable with a layer of white frosting in between. Apply a thin, even layer of white frosting all over the cake. This is your crumb coat. Chill the cake in the fridge for 30 minutes until the frosting is firm.
- The Splotch Technique: Divide your remaining buttercream, leaving about two-thirds of it white and tinting the other third a pretty pink. Using a small spatula, apply random splotches or rough horizontal bands of the pink frosting directly onto your chilled, crumb-coated cake. It will look like a messy, abstract painting. This is correct.
- Cover It All Up: Now, take your remaining white frosting and gently cover the entire cake, on top of and all around the pink splotches. You want to completely encase the cake in a thick layer of white frosting.
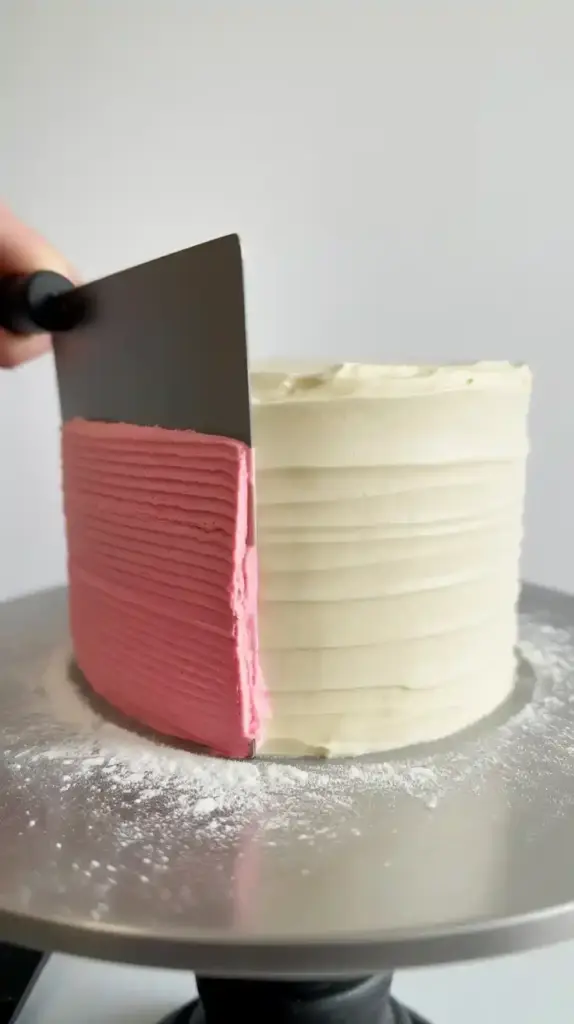
- The Big Reveal: This is the magic moment. Take your bench scraper and hold it vertically against the side of the cake. With a steady hand, spin your turntable, scraping away the excess white frosting. As you scrape, the beautiful pink stripes will magically appear from underneath!
- Finishing Touches: Smooth the top of the cake with your offset spatula. You can use any leftover pink and white frosting to pipe some pretty swirls on top. Add some sprinkles for a final flourish!
Calories & Nutritional Info
It’s a celebration cake! Let’s not ruin the fun with too much math, but if you’re curious…
- Serving Size: 1 slice (assuming the cake is cut into 16 slices)
- Estimated Calories: Around 450-550 kcal per frosted slice.
- This cake is a significant source of: Compliments from your friends and family.
Common Mistakes to Avoid
Avoid these common cake-tastrophes for a perfect pink and white masterpiece.
- Over-Marbling the Batter: I know it’s fun to swirl, but resist the urge! If you mix the two colors of batter together too much, you’ll lose the distinct marble pattern and just end up with a solid, light pink cake. One or two gentle figure-eight motions with a knife is all you need.
- Using Liquid Food Coloring: Liquid food coloring from the grocery store can add too much moisture, thinning out your batter and frosting. Use concentrated gel food coloring for a vibrant, beautiful pink without compromising the texture.
- Pressing Too Hard with the Bench Scraper: When creating the stripes, you’re trying to smoothly shear off the outer layer of white frosting, not scrape the whole cake bare. Use a light, steady hand and let the turntable do most of the work.
- Frosting a Warm Cake: I will say this in every recipe until the end of time. Do not frost a warm cake. You will have a melted, greasy, heartbreaking mess. Your cake must be completely, totally, 100% cool.
Variations & Customizations
Pink and white is just the beginning! This technique is a world of possibilities.
- Strawberry Pink and White Cake: For a flavor that matches the color, add ¼ cup of strawberry reduction (cooked-down and cooled strawberry puree) to your pink cake batter. Use a strawberry-flavored buttercream for the pink stripes.
- Pink and White Ombre Layers: Instead of marbling the batter, create an ombre effect with the layers themselves. Divide your batter into three, leave one white, tint one light pink, and one a darker pink. Bake three separate, thinner layers. The layered effect when you slice it is stunning.
- “Naked” Pink and White Cake: If the striped frosting seems like too much work, let the inside of the cake be the star! Make the pink and white marbled cake layers as directed. When assembling, just use a thin layer of white frosting between the layers and leave the beautiful marbled sides completely exposed.
FAQ Section

All your pink and white questions, answered.
1. How do you get a really vibrant pink color in a cake? The secret is gel food coloring. It’s much more concentrated than the liquid kind, so you only need a tiny amount to get a bright, beautiful color without making your batter or frosting watery.
2. What’s the best way to make a marble cake? The “alternate blob” method is the easiest and most effective. Drop alternating spoonfuls of your different colored batters into the pan, then give it one or two very gentle swirls with a knife. Less is more!
3. How do you make striped frosting on a cake? The easiest hack is to apply splotches of your accent color (pink) onto a chilled crumb coat, then cover the whole thing in your base color (white) and use a bench scraper to smoothly scrape away the outer layer, revealing the stripes underneath.
4. Can I use a box mix for this cake? Absolutely! For the best results, use a white cake mix (which uses egg whites only) to ensure your “white” batter is as white as possible.
5. How do I store a frosted cake? Store the cake in a cake carrier or a tall, airtight container. It will keep at room temperature for up to 3 days, or in the refrigerator for up to 5 days. Let it come to room temperature before serving for the best flavor and texture.

6. What flavors go well with a pink and white cake? Classic vanilla is the go-to. However, strawberry, raspberry, almond, or even a hint of rosewater would be delicious and would complement the romantic aesthetic.
7. Can I make this cake with other colors? Of course! This technique would be beautiful with blue and white, lavender and white, or even multiple pastel colors for a rainbow stripe effect.
Final Thoughts
And there you have it—a cake that’s as beautiful on the inside as it is on the outside. You’ve mastered the marble, you’ve conquered the stripes, and you’ve created a truly special dessert that looks like it took hours of painstaking work (but we know the secret, don’t we?).
Now go on, present your masterpiece, cut that first slice to reveal the gorgeous marbled interior, and prepare for a flood of well-deserved compliments. You’ve earned it.