How to Make a Stunning Fresh Flower Cake (Safely!)
Have you seen them? Those breathtaking cakes on Pinterest and Instagram, looking like they were plucked from a fairy’s garden in the middle of an enchanted forest, adorned with real, beautiful, fresh blooms? A fresh flower cake is the undisputed queen of celebrations—elegant, romantic, and effortlessly beautiful. It’s the cake that makes people gasp in the best way possible.
But before you go raiding your garden and jamming a fistful of pretty peonies directly into your buttercream, we need to have a little chat. A very important chat. Because there’s a right way to do this—a way that’s safe, stunning, and food-friendly—and a very, very wrong way that could, at best, taste like dirt and, at worst, you know, poison your guests. Don’t poison your guests.
So, are you ready to learn the secrets of the pros and create a jaw-dropping, floral masterpiece the safe way? Let’s play with flowers.
Why this recipe is awesome
If the sheer, breathtaking beauty isn’t enough to convince you, here’s why a fresh flower cake is a brilliant move.
- It’s Effortlessly Elegant: Let’s be real: the flowers do all the heavy lifting. A simple, beautifully baked cake is instantly transformed into a showstopping work of art with the addition of a few carefully placed blooms. It’s a shortcut to a cake that looks like it cost a fortune.
- Perfect for Any Special Occasion: Is there an event a fresh flower cake isn’t perfect for? Weddings, bridal showers, milestone birthdays, Mother’s Day, spring celebrations… the style is timeless, sophisticated, and always in good taste.
- Easier Than Intricate Piping: I don’t know about you, but my piped buttercream roses tend to look more like sad, lumpy cabbages. Arranging a few beautiful, real flowers is way easier and, frankly, looks a thousand times better than my shaky piping attempts. It’s nature’s hack for a stunning cake.
Ingredients
The cake itself should be a flavour that complements the light, airy, natural vibe of the flowers. A Lemon and Elderflower cake is a perfect, elegant choice.

For the Lemon & Elderflower Cake:
- 2 ½ cups all-purpose flour
- 2 teaspoons baking powder
- ½ teaspoon salt
- 1 cup (2 sticks) unsalted butter, softened
- 1 ½ cups granulated sugar
- 4 large eggs, at room temperature
- Zest of 2 large lemons
- ¼ cup elderflower liqueur (like St-Germain) or elderflower syrup
- ½ cup whole milk, at room temperature
For the Simple Swiss Meringue Buttercream:
- 5 large egg whites
- 1 ½ cups granulated sugar
- 2 cups (4 sticks) unsalted butter, cubed and softened
- 2 teaspoons vanilla extract
- Pinch of salt
For the “Decorations” (The Most Important Part!):
- Fresh, organic, pesticide-free, non-toxic flowers. (More on this in a second!)
Tools & kitchen gadgets used
Baking the cake is standard, but prepping the flowers requires a few special tools from the floral world.
- Standard Cake Baking Equipment: Stand mixer, two 8-inch round cake pans, spatula, wire cooling rack, etc.
- Cake Decorating Tools: Turntable, offset spatula, bench scraper.
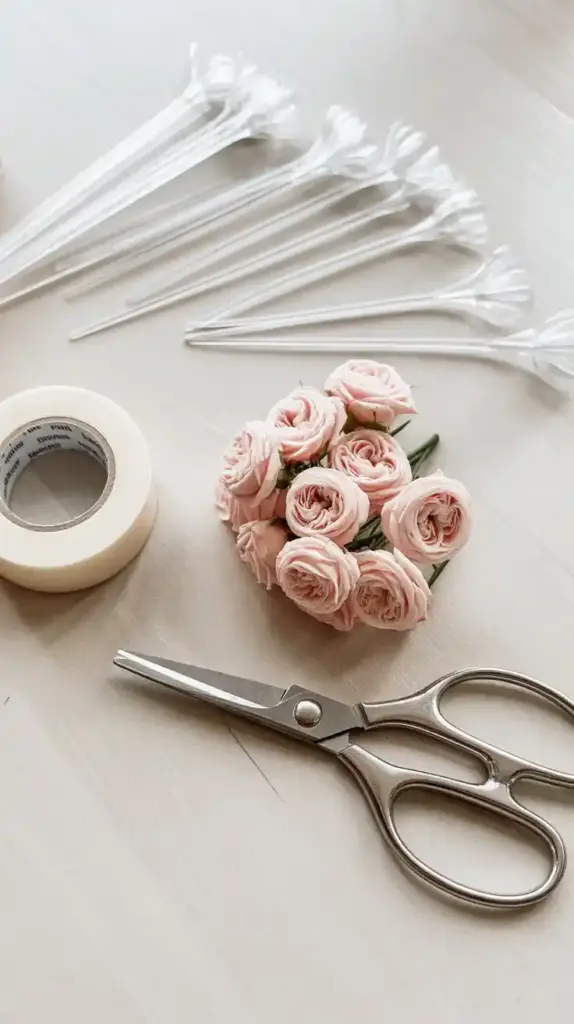
- Flower Prep Kit:
- Small, sharp scissors or pruning shears
- Floral Tape
- Floral Wire (optional, for smaller buds)
- Flower Pics or food-safe, clean drinking straws
Step-by-step instructions
This is a two-part mission: First, we bake the canvas. Then, we paint it with flowers.
Part 1: Baking the Cake
- Prep and Bake: Preheat your oven to 350°F (175°C). Grease and flour your cake pans. Cream the butter and sugar until light and fluffy, beat in the eggs and lemon zest, then alternate adding the dry ingredients and the milk/elderflower mixture. Bake for 25-30 minutes until a toothpick comes out clean.
- Cool Completely: Let the cakes cool in their pans for 15 minutes before inverting them onto a wire rack to cool completely. A warm cake is a fragile cake.
- Make the Buttercream: Prepare your Swiss meringue buttercream by heating the egg whites and sugar over a double boiler, whipping them into a meringue, and then beating in the butter until silky smooth.
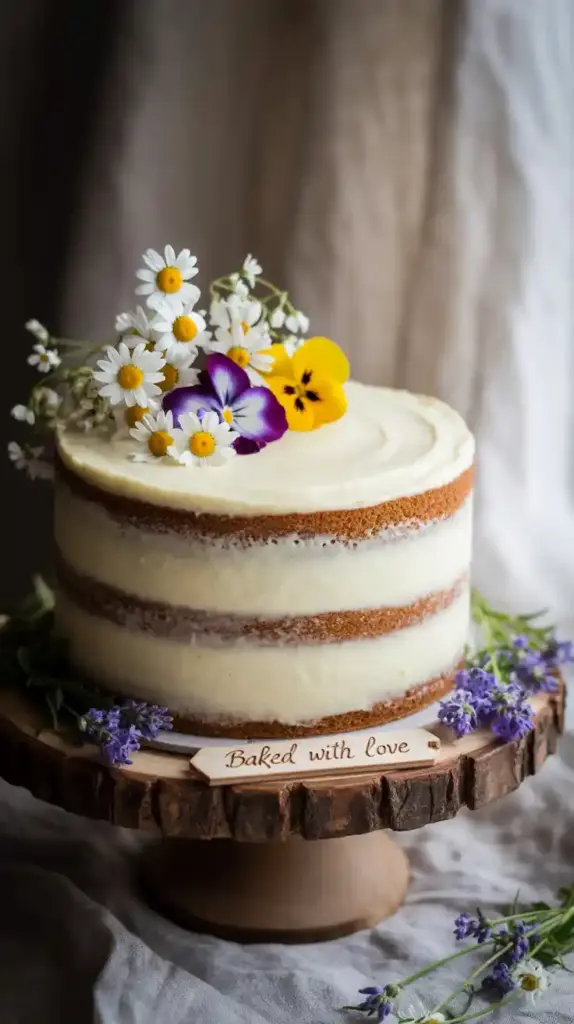
- Frost Your Canvas: Once the cakes are cool, level, fill, and frost your cake. I personally love a “semi-naked” or “naked” cake style for fresh flowers, where the frosting is scraped very thin to let some of the cake show through. It has a beautiful, rustic elegance.
Part 2: Preparing and Arranging the Flowers (The Important Part!)
Step 5: CHOOSE YOUR FLOWERS SAFELY! This is the most critical step. Not all flowers are safe to be near food. Some are poisonous. Before you buy or pick anything, you must consult a list of food-safe, non-toxic flowers.
- Safe Choices Include: Roses, Pansies, Carnations, Dahlias, Freesia, Violets, Marigolds, Chamomile, Lavender, and many herbs.
- DANGEROUS – AVOID THESE: Hydrangea, Calla Lily, Lily of the Valley, Daffodil, Poinsettia, Azalea, and Rhododendron.
- Your best bet is to source your flowers from a local organic farm, a trusted online retailer specializing in edible flowers, or a part of your own garden you know is 100% free of pesticides and chemicals.

Step 6: Prep and Clean the Blooms Once you have your safe, organic flowers, it’s time to give them a spa day. Gently rinse them in cool water to remove any dirt or tiny bugs. Let them air dry completely on a paper towel, or gently pat them dry.
Step 7: Trim and Wrap the Stems Now, decide which blooms you want to use and trim the stems down to about 2-3 inches. Here’s the golden rule: NEVER, EVER stick a bare flower stem directly into your cake. Stems have been in dirt and water, they can leak bitter sap, and they are not food.
- Take your floral tape and wrap each individual stem tightly, from the base of the flower all the way down to the cut end. The tape creates a food-safe barrier.
Step 8: Create a Barrier (The Extra Step for Pros) For an extra layer of protection, take your wrapped stem and insert it into a flower pic (a small, food-safe plastic vial) or a clean drinking straw that you’ve cut to size. You will then insert the straw/pic into the cake, not the flower stem itself. This ensures the flower is completely contained and never actually touches the cake.
Step 9: Arrange Your Masterpiece! Now for the fun part! Begin arranging your prepped flowers on the cake. A popular design is a crescent moon shape cascading down one side.
- Start with your largest “statement” blooms first to create the main shape.
- Fill in the gaps with smaller flowers and buds.
- Add some safe greenery (like rosemary or mint) for texture and contrast.
- Step back, admire your work, and feel like a floral genius.
Calories & Nutritional Info
This is for a slice of the cake itself. Please don’t eat the decorations.
- Serving Size: 1 slice (assuming cake is cut into 12 slices)
- Estimated Calories: Around 450-550 kcal.
- Note: The nutritional information does not include the flowers, as they are for decoration only and should be removed before serving.
Common Mistakes to Avoid
Please read this section carefully. Don’t be the person who makes a beautiful but hazardous cake.
- USING TOXIC OR POISONOUS FLOWERS: I’m saying it again because it is that important. Some of the most common and beautiful flowers (like hydrangeas and lilies) are toxic if ingested. Always, always, ALWAYS cross-reference with a food-safe flower list. When in doubt, leave it out. Do not poison your guests for the sake of a pretty picture.
- STICKING NAKED STEMS INTO THE CAKE: This is a huge food safety no-no. Flower stems can leak sap and have been in dirt, water, and who-knows-what-else. You must wrap every single stem that will go into or touch the cake.
- Using Pesticide-Laden Flowers: Those beautiful roses from the grocery store? They were likely grown with a heavy dose of pesticides and fungicides not meant for human consumption. Source your flowers from an organic, pesticide-free, food-safe supplier or an unsprayed section of your own garden.
- Overcrowding the Cake: The beauty of a fresh flower cake is often in its simplicity. Let the flowers breathe. A few well-placed, beautiful blooms are often far more elegant than a giant, heavy flower hedge sitting on top of your cake. Less is very often more.
Variations & Customizations

The cake flavor and flower choice can be mixed and matched endlessly!
- Classic Rose & Vanilla Bean: Go for timeless elegance with a classic vanilla bean butter cake and a simple white buttercream. Adorn it with only the most fragrant, beautiful, organic pink or red roses.
- Boho Wildflower Dream: Pair a rustic carrot cake or a simple spice cake with a tangy cream cheese frosting. Decorate it with a whimsical assortment of smaller, edible wildflowers like chamomile, cornflowers, pansies, and violas for a beautiful, bohemian look.
- Dramatic Dark Chocolate & Dahlia: Make a rich, dark chocolate cake and cover it in a decadent chocolate ganache. Adorn it with a single, large, dramatic (and food-safe!) dahlia or a few deep red carnations for a moody, high-contrast masterpiece.
FAQ Section
All your budding questions about fresh flower cakes, answered.
1. What fresh flowers are safe to put on a cake? A good list to start with includes roses, carnations, dahlias, pansies, violets, freesia, marigolds, chamomile, and lavender. Always double-check your specific flower against a reliable food-safe list online.
2. How do you prepare fresh flowers before putting them on a cake? Wash them gently, let them dry completely, and then wrap each stem individually and tightly with floral tape. For extra safety, insert the wrapped stem into a flower pic or a piece of a drinking straw before inserting it into the cake.
3. Do you really have to use organic flowers? Yes, it is strongly recommended. Conventional flowers from a florist or grocery store are often treated with pesticides and fungicides that are not safe for consumption or to be in close contact with food.
4. How long do fresh flowers last on a cake? It’s best to decorate the cake with fresh flowers on the day you plan to serve it. Most flowers will look fresh for several hours, but some delicate blooms can start to wilt. Keep the cake in a cool place until it’s time to serve.
5. Can you eat the flowers on the cake? This is a key distinction: “non-toxic” is not the same as “edible.” The flowers we’ve prepared are non-toxic, meaning they won’t harm you if they touch your food. Truly “edible” flowers (like pansies, violas, and some roses) can be eaten, but you should still advise guests to remove the decorative flowers before eating their slice.
6. How do you get flowers to stick to the side of a cake? You can use a generous dab of fresh buttercream on the back of the flower (if it’s a flat bloom like a pansy) or insert the prepared stem into the side of the cake at an angle.
7. Can I prepare the flower cake the day before? You can bake and frost the cake the day before, but it is best to add the fresh flowers as close to serving time as possible to ensure they look their freshest and don’t wilt.
Final Thoughts
And there you have it—a cake that is a true work of art, a feast for the eyes as well as the palate. You’ve successfully and safely combined the joy of baking with the beauty of nature to create something truly special and memorable. It’s a testament to the idea that the most elegant designs are often the most natural.
Now go on, take a million photos before anyone dares to make the first cut. You’ve earned this beautiful moment.