Tiny Cake, Big Impact: Your Hilariously Easy Guide on How to Make Bento Cake (Because Adulting is Hard Enough)
Okay, let’s get one thing straight. You’ve seen those adorable, palm-sized cakes popping up everywhere, right? The ones that look like a tiny hug in a box? That’s a bento cake, my friend, and today we’re diving headfirst into how to make bento cake without needing a degree from the “Too Cute to Eat” culinary institute. Forget towering layer cakes that threaten to topple over; we’re going small, manageable, and frankly, way less intimidating. So, if you’ve ever thought, “I want cake, but not a commitment,” then buckle up, buttercup, this is your jam.
Why These Pint-Sized Cakes Are Actually Genius (and Slightly Trendy)
Let’s be real, sometimes you just want a little something sweet without the guilt of a full-sized cake staring you down from the counter. Bento cakes are the answer! They’re perfectly portioned, which is great for, you know, not eating an entire cake in one sitting (no judgment if you do, though 😉). Plus, they’re ridiculously cute and a fantastic way to celebrate small wins, cheer up a friend, or just treat yourself because adulting is hard. And let’s not forget the “wow” factor. People will think you’re some kind of culinary wizard for creating these miniature masterpieces. Little do they know how deceptively easy they are. Shhh, our secret.
The A-Team: Ingredients for Your Adorable Mini Cake
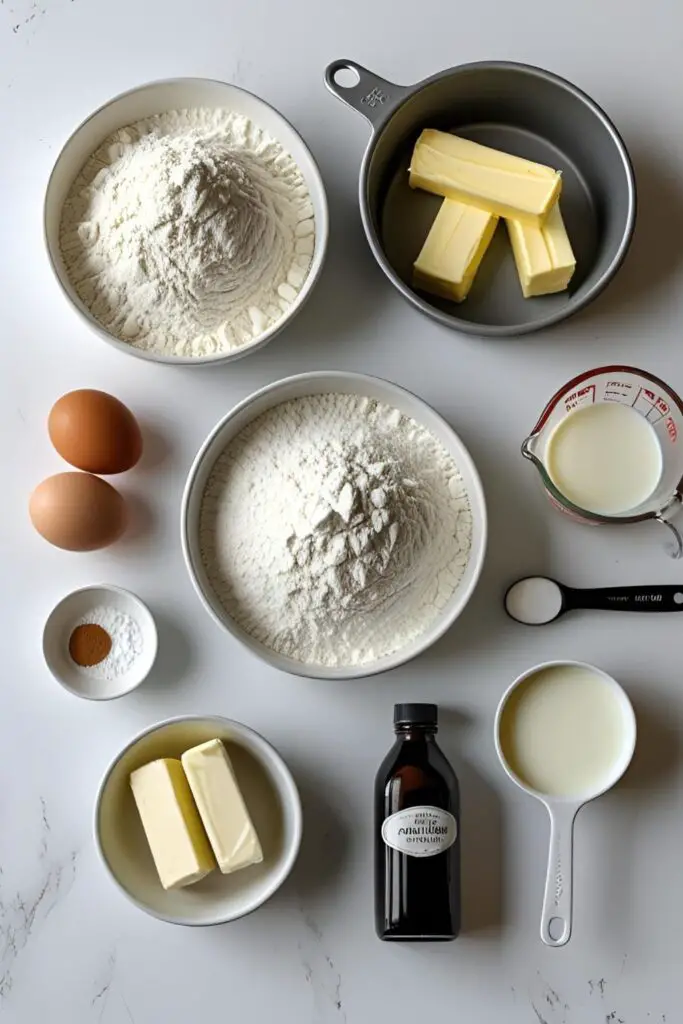
We’re keeping things simple here, using a basic vanilla cake recipe as our base. Feel free to swap in your favorite cake flavor later!
For the Cake:
- All-Purpose Flour: 1 ½ cups (the foundation of our tiny tower). Gluten-free blend works too!
- Granulated Sugar: ¾ cup (sweetness, obviously).
- Baking Powder: 1 ½ teaspoons (the magic that makes it fluffy). Ensure it’s not expired, nobody likes a flat disappointment.
- Salt: ¼ teaspoon (enhances flavor, trust the science).
- Unsalted Butter: ½ cup (1 stick), softened. Softened is key, not melted into a puddle of sadness. For dairy-free, use a good vegan butter stick.
- Large Eggs: 2 (the binders of our baked reality).
- Milk: ½ cup (adds moisture and richness). Dairy or non-dairy, your call.
- Vanilla Extract: 1 teaspoon (because everything deserves a little vanilla love).
For the Frosting (We’re Going Classic Buttercream):
- Unsalted Butter: ½ cup (1 stick), softened (again, softened!).
- Powdered Sugar: 2 cups (the sweet cloud of perfection).
- Milk: 2-3 tablespoons (for that smooth, spreadable consistency).
- Vanilla Extract: ½ teaspoon (more vanilla, more joy).
- Food Coloring (Optional): Gel food coloring gives the best vibrancy.
Your Bento Baking Toolkit: Kitchen Essentials
Time to gather your gear for this mini baking adventure!
- Mixing Bowls: You’ll need a couple, one for wet and one for dry ingredients.
- Electric Mixer: Handheld or stand mixer, both work fine. Your arm might get a little workout with a handheld one, just saying.
- Measuring Cups and Spoons: Accuracy is your friend in baking, usually.
- Rubber Spatula: For scraping bowls and gentle folding action.
- Round Cake Pan: A 6-inch round pan is ideal for bento cakes. You can bake one thicker layer and then slice it in half.
- Parchment Paper: To prevent sticking and make your life easier.
- Serrated Knife or Cake Leveler: For slicing the cake layer evenly.
- Small Offset Spatula or Butter Knife: For frosting your mini masterpiece.
- Piping Bags and Small Round Tips (Optional): For adding cute decorations. Ziploc bags with the corner snipped work in a pinch too!
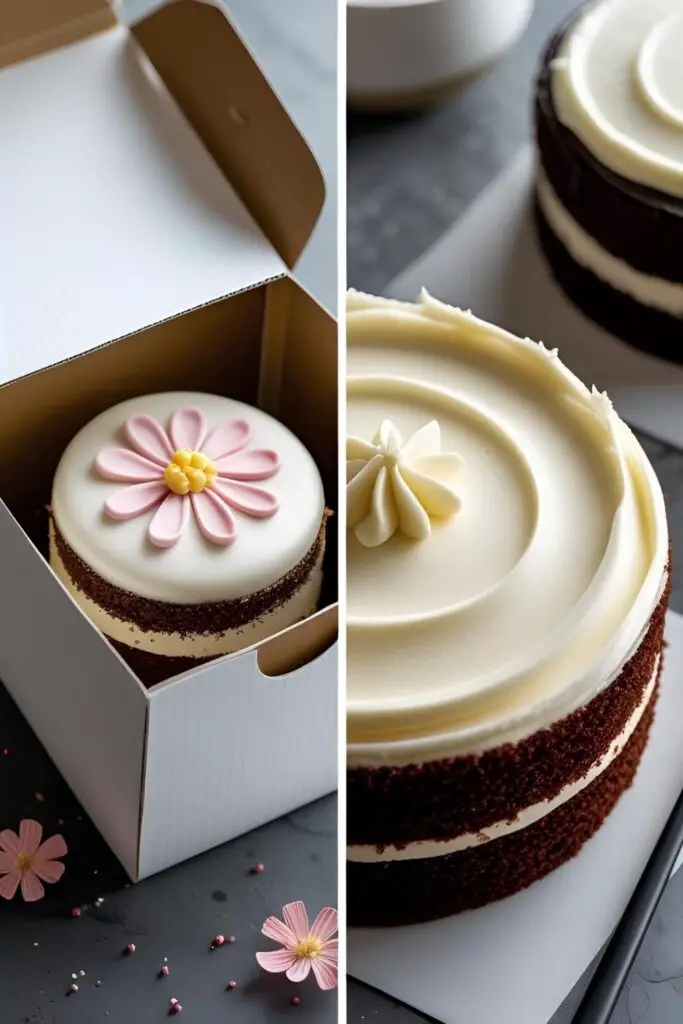
- Small Cardboard Boxes or Containers:** These are what make it a “bento” cake! You can find cute ones online.
Let’s Get Baking: Bento Cake Step-by-Step
Step 1: Preheat and Prep Your Tiny Stage
Preheat your oven to 350°F (175°C). Grease and flour your 6-inch round cake pan. For extra insurance against sticking, line the bottom with a circle of parchment paper.
Step 2: The Dry Squad Assembles

In a medium bowl, whisk together the all-purpose flour, granulated sugar, baking powder, and salt. Whisking helps distribute everything evenly, preventing any weird pockets of baking powder surprise.
Step 3: The Wet Wonders Unite
In a separate large bowl, cream together the softened butter and the dry ingredients using your electric mixer on low speed until the mixture resembles coarse crumbs.
Step 4: The Liquid Lineup Joins the Party
In a small bowl, whisk together the eggs, milk, and vanilla extract. Gradually add this wet mixture to the butter and flour mixture, beating on low speed until just combined. Then, increase the speed to medium and beat for 2 minutes until the batter is smooth. Resist the urge to overmix! Overmixing can lead to a tougher cake, and nobody wants a bento brick.
Step 5: Bake Your Little Heart Out
Pour the batter into your prepared cake pan and bake for 25-30 minutes, or until a wooden skewer inserted into the center comes out clean. Every oven is a bit different, so keep an eye on it!
Step 6: Cool Down, Tiny Star
Let the cake cool in the pan for about 10 minutes before inverting it onto a wire rack to cool completely. Completely cool is crucial before you even think about frosting. Warm cake + frosting = melty disaster.
Step 7: Slice and Conquer
Once the cake is completely cooled, use a serrated knife or a cake leveler to carefully slice it horizontally into two even layers. This is where your mini bento magic begins to take shape!
Step 8: Whip Up Some Buttercream Bliss

While the cake cools, let’s make the frosting. In a large bowl, beat the softened butter with an electric mixer until light and fluffy. Gradually add the powdered sugar, one cup at a time, beating on low speed until incorporated. Then, increase the speed to medium and beat until the frosting is smooth and creamy.
Step 9: The Milk Adjustment
Add the milk, one tablespoon at a time, until you reach your desired consistency. You want it spreadable but not too runny. Stir in the vanilla extract. If you’re using food coloring, now’s the time to add a few drops and mix well.
Step 10: Assemble Your Adorable Creation
Place one cake layer on a plate or a small cardboard round. Spread a generous layer of buttercream frosting evenly over the top. Carefully place the second cake layer on top.
Step 11: Frosting Fiesta!
Now, frost the top and sides of your little cake with the remaining buttercream. You can go for a smooth finish or add swirls and texture with your spatula. Remember, it’s bento-sized, so don’t stress too much about perfect perfection.
Step 12: Decorate and Delight (Optional, But Highly Encouraged)
This is where your creativity shines! Use piping bags with small tips to add borders, write messages, or create cute designs. Sprinkles, edible glitter, and small candies are also your friends here.
Step 13: Box It Up!
Carefully transfer your decorated bento cake into a small cardboard box or container. Now it’s ready to be gifted, transported, or devoured!
Tiny Cake, Not Tiny Calories: Nutritional Info

Alright, let’s peek at the numbers. Keep in mind this is a rough estimate for one serving (about half of the 6-inch cake, as bento cakes are often shared or enjoyed in a couple of sittings).
- Estimated Calories per Serving: 400-550 kcal (depending on frosting amount).
- Key Nutritional Notes:
- High in carbohydrates and sugars.
- Contains fats from the butter.
- Moderate amount of calories for its size, so maybe don’t eat three in a row… maybe. 😉
- Provides minimal protein and fiber. Consider it a treat!
Mini Mishaps, Major Laughs: Common Bento Blunders to Avoid
Don’t let these little cakes fool you; there are still opportunities for kitchen chaos! Here’s the lowdown on common mistakes:
- Not Softening the Butter: We’ve said it twice, we’ll say it again: softened butter is crucial for both the cake and the frosting. Cold butter will give you lumpy batter and stubbornly stiff frosting.
- Overbaking the Cake: Small cakes bake quickly! Keep a close eye on it to prevent it from becoming dry. A clean skewer is your best indicator of doneness.
- Frosting a Warm Cake: Seriously, just don’t. The frosting will melt into a sugary soup, and your adorable bento will look like it’s having a bad day.
- Making Runny Frosting: Add the milk to the frosting gradually. Too much liquid and your decorations will slide right off. Nobody wants a sad, melting bento.
- Unevenly Slicing the Cake Layers: Take your time when slicing the cake horizontally. Uneven layers will make your bento look a bit wonky. A cake leveler is a cheap tool that makes this much easier.
- Over-Decorating (Maybe?): While cuteness is key, sometimes less is more. Especially with such a small canvas, too many decorations can look cluttered. But hey, if you want a maximalist mini cake, go for it!
Remixing the Mini: Bento Cake Variations & Customizations
Want to put your own spin on these little delights? Here are a few ideas:
- Chocolate Lover’s Dream: Use a chocolate cake recipe instead of vanilla. For the frosting, melt some dark chocolate and fold it into your buttercream for a rich chocolate frosting. You can even add chocolate shavings for extra indulgence.
- Fruity Fun: Add a layer of your favorite jam or fruit curd between the cake layers for a burst of fruity flavor. Lemon curd, raspberry jam, or even a thin layer of sliced strawberries would be delicious.
- Coffee Kick: Add a tablespoon of instant coffee granules dissolved in a teaspoon of hot water to your cake batter and frosting for a coffee-flavored bento. Perfect for the caffeine enthusiast in your life (or yourself!).
Bento Brain Busters: Your FAQ Section
Let’s tackle those burning bento cake questions!
What size cake pan is best for a bento cake?
A 4-inch or 6-inch round cake pan is ideal for making bento cakes. A 6-inch pan allows you to slice it into two layers, which is a common bento cake construction.
How much frosting do I need for a bento cake?
The frosting recipe provided should be plenty for a single 6-inch, two-layer bento cake. You might have a little extra, which is never a bad thing, right? 😉
Can I make a bento cake in advance?
Yes! You can bake the cake layers a day in advance, wrap them tightly in plastic wrap, and store them at room temperature. You can also make the buttercream frosting a day ahead and store it in an airtight container in the refrigerator. Let it come to room temperature and re-whip before using. Assemble and decorate the cake on the day you plan to serve it.
How do I transport a bento cake?
The beauty of a bento cake is its size! Place the decorated cake carefully into a small, sturdy cardboard box or container. This will protect it during transport.
Can I use a different type of frosting?
Absolutely! Cream cheese frosting, ganache, or even a stabilized whipped cream would work. Just keep in mind the consistency and how well it will hold its shape for decorations.
Are bento cakes just small cakes?
Pretty much! The key difference is the size and the fact that they are often packaged in individual boxes, making them perfect for single servings or small gifts.
What are some popular bento cake designs?
The possibilities are endless! Simple piped borders, cute characters, minimalist designs with a single message, or even tiny edible flowers are all popular choices. Check out #bentocake on social media for tons of inspiration!
Final Tiny Thoughts, Big Flavors
Well, there you have it! You’re now officially equipped to tackle the world of bento cakes. Go forth and create these adorable little treats that are perfect for any occasion (or no occasion at all, because cake!). Don’t be afraid to experiment with flavors and designs. And hey, if your first attempt isn’t picture-perfect? Who cares! It’s still cake, and it’s probably still delicious. Now go get your mini baking on and spread some tiny, edible joy! You might just find you’re never satisfied with a regular-sized cake again. Just kidding… mostly. 😉