Ever dreamed of a dish that truly embodies comfort and tradition, steeped in history and flavor? Well, put down that regular chicken thigh recipes list, because we’re not making just any old chicken dinner today. We’re embarking on a journey to master how to make chicken lau lau, a beloved staple of Hawaiian plate lunch. This isn’t just cooking; it’s an experience, a connection to the rich culinary heritage of the Polynesian islands. And trust me, once you unwrap a perfectly steamed lau lau, you’ll understand why it’s a favorite.
What Exactly is Lau Lau? More Than Just a Bundle!
So, what exactly is lau lau? At its core, it’s a traditional Hawaiian dish consisting of meat (classically pork and sometimes butterfish, but today, often chicken or beef) and often a piece of taro stem, wrapped tightly in several layers of lu’au (taro) leaves, and then bundled again in non-edible ti leaves. These bundles are then slow-cooked, traditionally in an underground oven called an imu, but thankfully, we have modern alternatives that make how to make chicken lau lau accessible at home!
The magic of lau lau lies in the long, slow cooking process. The lu’au leaves break down into a creamy, spinach-like consistency, imparting a unique earthy flavor that’s both savory and slightly bitter in the best possible way. The meats become incredibly tender, infused with the flavors of the leaves and Hawaiian sea salt. It’s a true taste of Polynesian food history, a testament to ingenious cooking methods.
The Essential Ingredients: Hunting for Hawaiian Gold
Making authentic chicken lau lau recipe requires a few key ingredients that might not be in your everyday grocery store, especially if you’re on the mainland. But don’t despair! With a little effort (or some clever substitutions), you can bring this island flavor home.
- Chicken Thighs: While traditional lau lau often features fatty pork and butterfish, chicken lau lau recipe uses boneless or bone-in chicken thighs. Thighs are perfect because they stay moist and tender during the long cooking process, thanks to their fat content. You want roughly 1.5-2 pounds of chicken thighs for about 4-6 lau lau bundles.
- Lu’au (Taro) Leaves: This is the most crucial ingredient. These are the edible leaves of the taro plant (kalo in Hawaiian). You must cook lu’au leaves for a long time to break down calcium oxalate, which can cause an irritating, itchy sensation in your mouth and throat if consumed raw or undercooked. You’ll need about 12-15 large lu’au leaves. You can often find them fresh at Asian or Hawaiian specialty markets. If you truly cannot find them, some people substitute with collard greens or spinach, but the flavor will not be the same, and cooking times will differ significantly.
- Ti Leaves: These are the outer wrappers for the lau lau bundles. They are not edible but provide an aromatic, protective layer during steaming. You’ll need about 6-8 large ti leaves. These are harder to find outside Hawaii.
- Substitution Alert! If you can’t find ti leaves, don’t throw in the towel! You can use aluminum foil to wrap your bundles securely. It won’t impart the same subtle fragrance, but it will get the job done in terms of containment.
- Hawaiian Sea Salt: This coarse, mineral-rich salt is traditional. It adds a distinct flavor. If you don’t have it, a good quality coarse sea salt or kosher salt will work. You’ll need about 1-2 tablespoons, depending on your taste.
- Optional (but recommended) additions:
- Salt Butterfish (Black Cod): A small piece (1/4 to 1/2 pound) of salted butterfish adds incredible umami and richness. It’s truly what makes the lau lau recipe authentic. You’ll need to rinse it thoroughly to reduce saltiness before adding.
- Pork Fat: Small cubes of pork belly or fatback are often added for richness, especially if using leaner chicken.
- Taro Root Stems (Hā): Peeled and chopped taro stems can be added to the filling for extra texture and to honor the whole plant.
The Prep Work: Getting Those Leaves Ready (Crucial Step!)
This is arguably the most important part of how to make chicken lau lau, especially if you’re using fresh lu’au leaves. Proper preparation prevents that uncomfortable itch!
- Prepare Lu’au (Taro) Leaves:
- Wash the lu’au leaves thoroughly under cold water.
- Carefully cut off the thick stem that runs down the center of each leaf, and any other very thick veins. You can chop these stems into 1-inch pieces and add them to your filling later for extra flavor and texture if desired.
- Stack 3-4 leaves from largest to smallest for each bundle. This layering helps ensure even cooking and prevents tearing.
- Important: If you are at all worried about the itchiness, you can parboil the lu’au leaves for 20-30 minutes, then drain and cool them, before using them in your bundles. This helps break down the oxalates. However, traditional methods often rely solely on the long steaming process.
- Prepare Ti Leaves (If Using):
- Wash the ti leaves and pat them dry.
- Carefully remove the tough central rib from each ti leaf. This makes them pliable and easier to wrap. You can do this by folding the leaf in half along the rib and gently pulling the rib away.
- Prepare the Meats:
- Cut your boneless chicken thighs into 1-inch to 1.5-inch cubes. If using bone-in, ensure pieces are manageable.
- If using salt butterfish, rinse it thoroughly under cold water several times to remove excess salt. Cut into 1-inch pieces.
- If using pork fat, cut into 1/2-inch to 1-inch cubes.
- Season the Meats: In a bowl, toss the chicken (and any other meats/taro stems) with Hawaiian sea salt. Use your hands to ensure an even coating. This is your chance to get the flavor right before bundling!
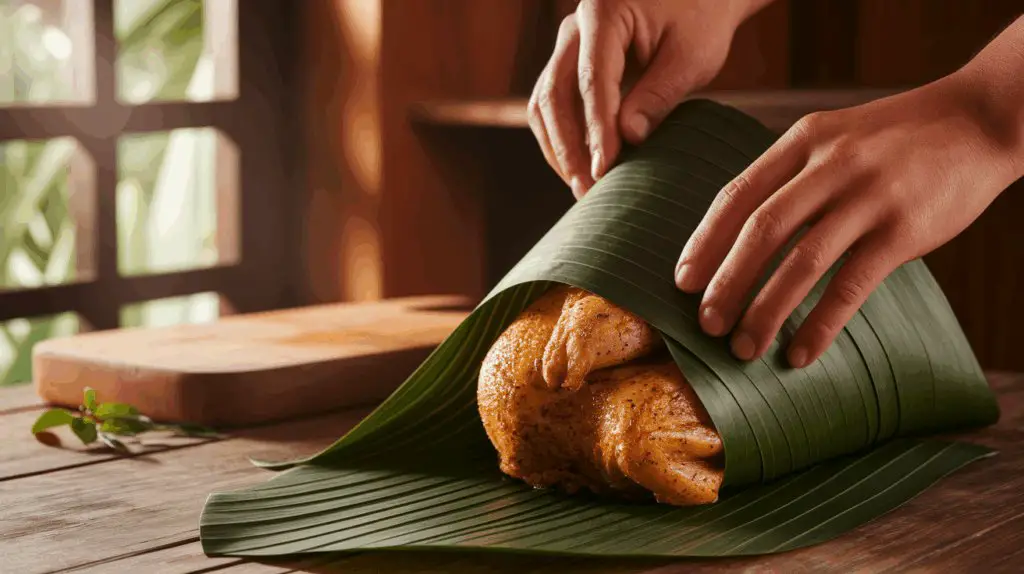
The Art of the Bundle: Assembling Your Lau Lau


This is where your inner artisan comes out! It’s like wrapping a special gift, but for your taste buds.
- Lay Out the Ti Leaves: On a clean flat surface, lay out two ti leaves in an “X” shape for each bundle. If using foil, place a square of heavy-duty foil (about 12×12 inches) down instead.
- Stack Lu’au Leaves: On top of the ti leaves (or foil), place a stack of 3-4 prepared lu’au leaves. Position the stem-ends facing you, forming a cup-like shape in the center.
- Add the Filling: Place about 1/4 to 1/2 of your seasoned chicken onto the center of the lu’au leaves. If using, add a piece of butterfish, a few cubes of pork fat, and a few chopped taro stems on top of the chicken.
- Wrap Securely (Inner Layer): Carefully fold the lu’au leaves up and over the filling, encasing it completely. You’re creating a small, edible packet. Overlap the leaves to seal it tightly.
- Wrap Securely (Outer Layer): Now, bring the ends of the ti leaves (or the corners of the foil) up and over the lu’au leaf bundle, forming a tight packet. Tie the ends of the ti leaves together with a piece of kitchen string to secure, or fold the foil tightly to seal. You want these bundles to be as compact as possible.
Cooking Your Lau Lau: The Patience Pays Off
This is where the magic of transformation truly happens. The long, gentle cooking breaks down those tough leaves and meats into incredibly tender, flavorful goodness.
The Traditional Way (Imu – Underground Oven):
Historically, lau lau (and other Polynesian food like kalua pig) were cooked in an imu. Hot rocks are placed in a pit, bundles of food (often wrapped in banana leaves before ti leaves) are placed on top, covered with more leaves and dirt, and slow-cooked for hours. This method imparts a smoky flavor. Unless you have an imu in your backyard, we’re probably not doing this one. But it’s cool to know the roots!
The Practical Home Methods:
- Steamer (Most Common at Home):
- Place a steamer rack in a large pot or Dutch oven. Add enough water to come just below the rack.
- Arrange your lau lau bundles on the steamer rack. Don’t overcrowd the steamer; ensure there’s enough space for steam to circulate. You might need to steam in batches depending on your pot size.
- Bring the water to a boil, then reduce heat to a simmer. Cover tightly.
- Steam for a minimum of 3 to 4 hours, or until the lu’au leaves are completely tender and dark green, almost like creamed spinach, and the meat is falling apart. Some prefer to steam for up to 6 hours for maximum tenderness. The cooking time for the leaves is key!
- Instant Pot Lau Lau Recipe (Faster Alternative!):
- This is a fantastic option if you’re craving lau lau but don’t have all day.
- Place a trivet or steamer rack in your Instant Pot. Add 1-2 cups of water to the inner pot.
- Arrange your lau lau bundles on the trivet/rack.
- Seal the lid and set to high pressure for 90-120 minutes (1.5 to 2 hours), depending on the size of your bundles and how tough your meat/leaves are.
- Allow for a natural pressure release (NPR) for at least 15-20 minutes, or until the pressure has fully released. This further tenderizes the meat.
Serving Your Lau Lau: The Hawaiian Plate Lunch Experience

Once your chicken lau lau is cooked to perfection, it’s time to enjoy! Carefully unwrap the ti leaves (or foil) – remember, these are not for eating! What you’re left with is a tender package of chicken, fish, and creamy lu’au leaves.
Traditionally, lau lau is served as part of a Hawaiian plate lunch. This usually includes:
- Two scoops of white rice: The classic accompaniment, perfect for soaking up all those delicious juices.
- One scoop of macaroni salad: A creamy, cool contrast to the savory lau lau.
- Lomi Lomi Salmon (optional): A refreshing side dish made with diced salmon, tomatoes, and onions.
- Poi (optional): A traditional Hawaiian staple made from pounded taro root, often purple and with a unique, slightly sour taste. It’s an acquired taste for some, but truly authentic!
This makes for a complete and incredibly satisfying meal, full of distinct Hawaiian dishes flavors.
Beyond Lau Lau: Other Hawaiian and Polynesian Delights

Once you’ve experienced the magic of lau lau, you might be curious to explore more Polynesian food and Hawaiian dishes. The islands offer a treasure trove of incredible flavors!
- Huli Huli Chicken: This is another famous Hawaiian dish! It’s grilled chicken (often thighs) marinated in a sweet and savory sauce typically made with soy sauce, brown sugar, ginger, garlic, and pineapple juice. The name “huli huli” means “turn turn” in Hawaiian, referring to turning the chicken on the grill. Learning how to make huli huli chicken or a baked huli huli chicken is a must for any fan of Hawaiian Bros Huli Huli Chicken Recipe or simply amazing grilled chicken. It’s a truly favorite recipes chicken for many.
- Kalua Pig: The star of many luaus, this is a whole pig slow-cooked in an imu until incredibly smoky and tender. It’s often shredded and served simply.
- Poke: Cubed raw fish (usually tuna or ahi) seasoned with soy sauce, sesame oil, onions, and other ingredients. A vibrant and fresh dish.
- Lomi Lomi Salmon: A refreshing “salad” made from diced salted salmon, tomatoes, and green onions.
- Loco Moco: A comfort food classic: white rice topped with a hamburger patty, a fried egg, and brown gravy. Talk about a hearty Hawaiian plate lunch!
- Chicken Luau Stew: While similar in name, chicken luau stew is different from lau lau. It’s a stew made with chicken and lu’au (taro) leaves, cooked down into a creamy, often greenish stew, usually with coconut milk. It’s very savory and unique. This is distinct from lau lau’s bundled presentation, and often much simpler to prepare if you find lu’au leaves fresh.
- Chicken Hekka: Another unique Hawaiian dish with Japanese influences. Chicken Hekka recipe Hawaii typically features chicken with various vegetables like shiitake mushrooms, carrots, bamboo shoots, and sometimes noodles, simmered in a savory broth. It’s like a stir-fry meets a stew, a definite comfort food for many locals. It has a different flavor profile than lau lau, often sweeter and less earthy.
- Homemade Chinese Food (Lo Mein): While not Hawaiian, many Hawaiian plate lunch spots also feature Chinese-influenced dishes due to the island’s diverse culinary history. If you’re looking for another comforting chicken noodle dish after mastering lau lau, consider learning how to make authentic chicken lo mein recipe. Whether it’s a plain lo mein recipe easy, chicken and vegetable lo mein, or a healthy chicken lo mein recipe, exploring lo mein recipes is another delicious path for Asian dinners.
Tips for Success & Troubleshooting Your Lau Lau
- Source Your Leaves: Finding fresh lu’au leaves is the biggest challenge. Check Asian markets, Polynesian specialty stores, or even online if you’re determined. If using collard greens or spinach as a substitute, remember their texture and flavor will be different, and their cooking time significantly shorter.
- Don’t Rush the Cooking: This is not a quick meal. The long steaming time is essential for both flavor and safety (breaking down oxalates in lu’au leaves).
- Salt is Key: Hawaiian sea salt is important for authentic flavor. Taste your seasoned meat before bundling (you can cook a tiny piece to test) to ensure it’s properly seasoned.
- Tight Bundles: Ensure your bundles are tightly wrapped to keep all the deliciousness contained during steaming.
- Reheating Lau Lau: Lau lau reheats well! Gently steam them again or microwave until heated through.
- Alternative Meats: While chicken is great, you can try beef luau recipe variations with beef chuck or short ribs, or even a mix of chicken and pork for traditional flavor.
Frequently Asked Questions
Q1: What are lu’au leaves and are they safe to eat? A1: Lu’au leaves are the edible leaves of the taro plant. They are safe to eat but must be cooked thoroughly for a long period (typically 3-6 hours) to break down calcium oxalate crystals, which can cause irritation if consumed raw or undercooked.
Q2: What’s the main difference between lau lau and luau stew? A2: Lau lau is a specific dish where meat and lu’au leaves are bundled and steamed in ti leaves (or foil). Luau stew (chicken luau stew or beef/squid luau) refers to a stew where the lu’au leaves are cooked down with meat and often coconut milk, served as a creamy stew rather than individual bundles.
Q3: Can I make lau lau in an Instant Pot? A3: Yes, an Instant Pot Lau Lau Recipe is a popular modern method. It significantly reduces cooking time, typically requiring 90-120 minutes on high pressure with a natural release, compared to 3-6 hours of traditional steaming.
Q4: What if I can’t find ti leaves for wrapping lau lau? A4: If you can’t find ti leaves, you can use heavy-duty aluminum foil to securely wrap your lau lau bundles. While it won’t impart the same subtle aroma, it effectively contains the ingredients for steaming.
Q5: What meat is traditionally used in lau lau? A5: Traditionally, lau lau often features fatty pork (like pork butt or belly) and salted butterfish (black cod). However, modern variations, including chicken lau lau, are very common.

Q6: What is Huli Huli Chicken? Is it related to lau lau? A6: Huli Huli Chicken is a popular Hawaiian grilled chicken dish with a sweet and savory marinade. It is a distinct dish from lau lau, though both are popular Hawaiian dishes and often found at local eateries or luaus.
Q7: How long do lu’au leaves need to cook to be safe? A7: Lu’au leaves need to cook for at least 3 hours (or 90-120 minutes in an Instant Pot) to ensure the calcium oxalate crystals are thoroughly broken down and the leaves become tender and safe to eat.
Conclusion
So there you have it, fellow culinary explorer! Mastering how to make chicken lau lau is a rewarding journey into the heart of Hawaiian cuisine. It’s more than just a meal; it’s a taste of history, patience, and incredible flavor. Whether you stick to the traditional steaming or embrace the convenience of an Instant Pot Lau Lau Recipe, the tender chicken and creamy lu’au leaves will transport you straight to the islands. Don’t be shy about seeking out those unique ingredients; the effort is absolutely worth it for this unforgettable Polynesian food experience. Mahalo and happy cooking! 🙂