How to Make Kimchi Step by Step: A Beginner’s Guide to Getting Funky
Ever stare at a jar of kimchi at the grocery store, note the eye-watering price, and think, “I’m a reasonably intelligent human, I could probably make that”? Well, guess what? You absolutely can. The word “fermentation” might sound like something you need a lab coat and safety goggles for, but I’m here to show you how to make kimchi step by step, and I promise it’s more like a fun, messy art project than a high-level science experiment. You’re about to become a microbial farmer, and your gut is going to thank you. Let’s get fermenty!
Why This Kimchi Recipe Is Your New Best Friend
Okay, so why should you dedicate an afternoon to a tub of spicy cabbage? Because homemade kimchi is a total game-changer. It’s a probiotic powerhouse, packed with good bacteria that make your digestive system do a happy dance. Plus, the flavor is on a whole other level compared to the stuff in the store. It’s fizzier, crunchier, and you get to control everything. Want it extra spicy? Go for it. Hate fish sauce? There’s a fix for that. You are the master of your own funk. It’s a culinary adventure that ends with you having a massive jar of a delicious, healthy, and versatile condiment that you can put on literally everything. IMO, that’s a major win.
Your Mission Briefing: The Ingredients
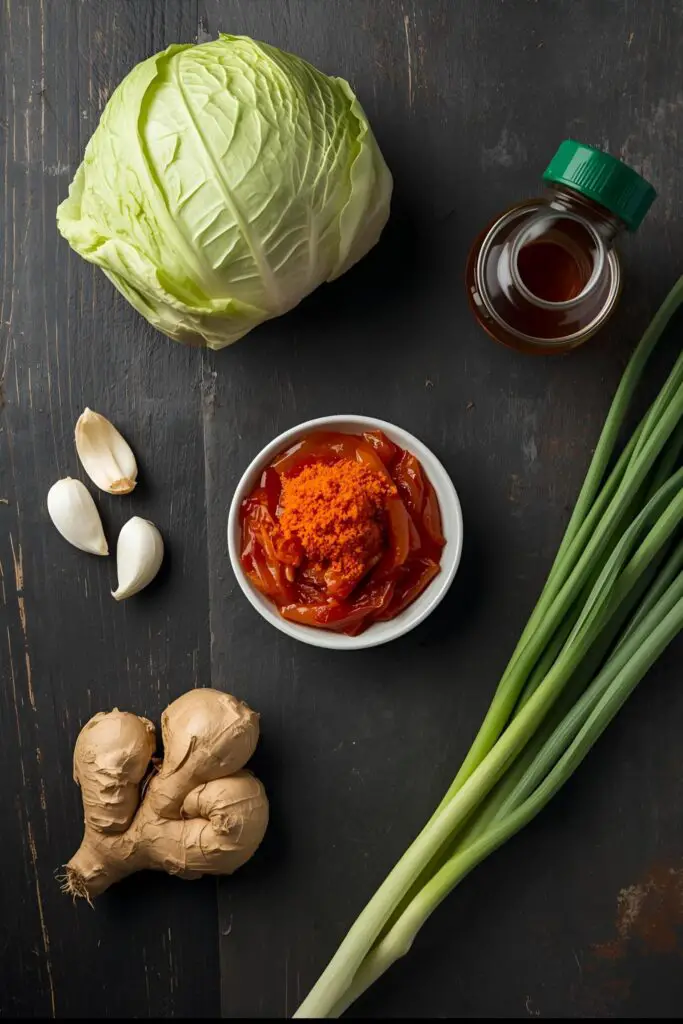
Don’t be intimidated by the list. Once you have the key players, the rest is just veggies.
For the Cabbage & Brine:
- Napa Cabbage: 1 large head (about 2-3 lbs). This is the classic, ruffly cabbage perfect for kimchi.
- Coarse Sea Salt (Non-Iodized): ¼ to ½ cup. This is critical. Iodized table salt will murder the good bacteria you’re trying to cultivate.
For the Magic Paste:
- Gochugaru (Korean Red Pepper Flakes): ¼ to ½ cup, depending on your spice tolerance. This is non-negotiable. It has a unique fruity, smoky heat that other chili flakes just can’t replicate.
- Garlic: 8-10 cloves, minced. Don’t be shy.
- Ginger: 1-inch knob, peeled and minced.
- Sugar: 1 tablespoon. Just a little something to feed the bacteria and balance the flavors.
- Fish Sauce: 3 tablespoons. This provides the iconic umami funk. For a vegan version, use soy sauce, miso paste, or vegan fish sauce.
- Daikon Radish: About ½ cup, peeled and julienned into matchsticks.
- Carrots: 1 medium, peeled and julienned into matchsticks.
- Scallions (Green Onions): 4-5 stalks, cut into 1-inch pieces.
Your Fermentation Station: Tools & Gadgets
You don’t need a science lab, but a few key items will prevent a kimchi catastrophe.
- A Very Large Bowl or Food-Safe Tub: Seriously, the biggest one you have. Cabbage is deceptively voluminous.
- Colander: For draining the cabbage.
- Cutting Board and Sharp Knife: For all that chopping.
- Food-Safe Kitchen Gloves: Do not skip these. Unless you want your hands to burn with the fire of a thousand suns after mixing the chili paste. You’ve been warned.
- Blender or Food Processor (Optional): Makes quick work of the garlic and ginger.
- Large Glass Jar with a Lid (at least ½ gallon): This will be your kimchi’s new home. A fermentation-specific jar with an airlock is cool, but a regular large jar works just fine.
Let’s Get This Kimchi Party Started: Step by Step

Alright, put on your apron (and your gloves!), and let’s do this.
H3: Step 1: Salt the Cabbage (aka Make It Cry)
Cut the napa cabbage in half lengthwise, then cut each half into rough 2-inch squares. Place all the cabbage in your giant bowl. Sprinkle the coarse sea salt all over the cabbage and toss it well with your hands. Now, add enough cold water to just cover the cabbage. Let it sit for 2-3 hours, tossing it every 30 minutes to ensure it salts evenly. The salt draws out the water, wilting the cabbage and preparing it for fermentation.
H3: Step 2: Make the Magic Paste
While the cabbage is doing its salty spa treatment, it’s time to make the flavor bomb paste. In a medium bowl, combine the gochugaru, minced garlic, minced ginger, sugar, and fish sauce. Mix it all together until it forms a thick, fragrant, slightly terrifying-looking red paste. Now, gently fold in your julienned daikon, carrots, and scallions. Set it aside and let the flavors get to know each other.
H3: Step 3: Rinse and Drain
After 2-3 hours, your cabbage should be wilted and pliable. Test a piece—it should bend easily without snapping. Now, you need to rinse it. Drain the salty water and rinse the cabbage under cold running water 2-3 times. This is super important to remove the excess salt. After the final rinse, let it drain in a colander for at least 15-20 minutes. You want it as dry as possible.
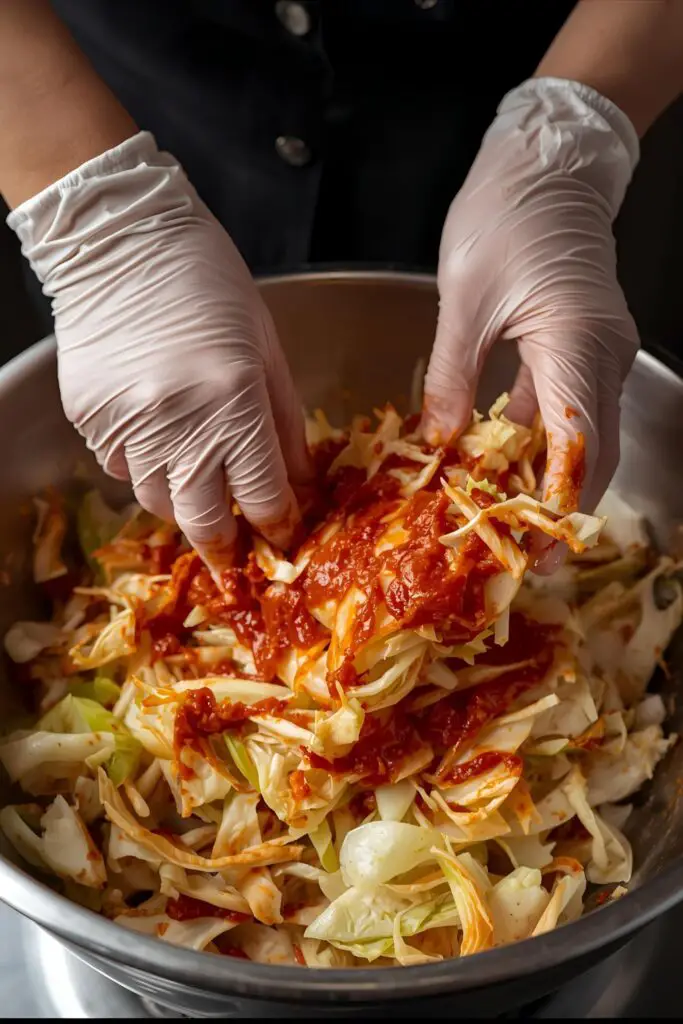
H4: Step 4: Get Messy and Mix It Up
This is the fun part. Put on your kitchen gloves. Transfer the drained cabbage to your (now clean) giant bowl. Plop the entire bowl of red paste on top. Now, get in there with your hands and massage the paste into every nook and cranny of the cabbage. Be thorough! Every leaf deserves to be coated in that spicy, delicious goodness.
H5: Step 5: Pack Your Jar (Tightly!)
Once everything is well-mixed, it’s time to pack your jar. Add the kimchi to the jar a handful at a time, pressing down firmly after each addition. You want to pack it in as tightly as possible to remove any air pockets. Leave at least 1-2 inches of headspace at the top of the jar, as the kimchi will expand and release liquid as it ferments. Pour any remaining paste/liquid from the bowl over the top.
H6: Step 6: The Waiting Game (Fermentation)

Loosely screw the lid on your jar—you want the fermentation gases to be able to escape. Place the jar on a plate or in a shallow bowl (to catch any potential overflow) and leave it on your counter at room temperature, out of direct sunlight.
Let it ferment for 1-5 days. The exact time depends on the temperature of your kitchen. Check it once a day, pressing down on the kimchi with a clean spoon to keep it submerged under the brine. You should start to see bubbles forming and a tangy, sour smell developing. This is a good sign! Your little bacteria friends are hard at work.
H7: Step 7: Taste and Refrigerate
After day 1, start tasting it daily. When it reaches a level of tanginess you enjoy, tighten the lid and move it to the refrigerator. The cold will dramatically slow down the fermentation process. Your kimchi is now ready to eat!
Calories & Nutritional Info: The Healthy Part
Kimchi isn’t just delicious; it’s ridiculously good for you. Here’s a quick look at what’s in a typical ½ cup serving:
- Calories: Approximately 25-30 kcal
- Carbohydrates: Around 5g
- Fiber: A good source, with about 2g
- Probiotics: Billions of them! Great for gut health.
- Vitamins: Packed with Vitamin A, Vitamin C, and Vitamin K.
It’s a low-calorie, high-nutrient flavor bomb. What more could you ask for?
Common Mistakes to Avoid: Your Kimchi Troubleshooting Guide
Save yourself from fermentation failure by dodging these common mistakes.
- Using the Wrong Salt: I’m saying it one more time for the people in the back: Do not use iodized table salt. It will inhibit the fermentation.
- Not Rinsing the Cabbage Enough: If you skip the rinsing or do a lazy job, you’ll end up with kimchi that’s way too salty to eat.
- Leaving Air Pockets in the Jar: Air is the enemy. It can invite mold and other unwanted guests. Pack that jar tightly!
- Filling the Jar to the Top: Your kimchi will produce liquid and expand. If you don’t leave headspace, you’ll have a kimchi volcano on your counter.
- Seeing Mold: If you see fuzzy, colorful mold (blue, green, black), something went wrong. Toss it and start over. A thin white film is usually harmless Kahm yeast, but fuzzy mold is a no-go.
Variations & Customizations: Make It Your Own

Once you’re a kimchi pro, you can start experimenting.
- Vegan Kimchi: This is an easy swap! Omit the fish sauce and use 3-4 tablespoons of soy sauce or a tablespoon of miso paste mixed with a little water to provide that savory, umami depth.
- White Kimchi (Baek Kimchi): Not a fan of spice? Try making white kimchi. It skips the gochugaru entirely and uses a mild, fruity brine, often with ingredients like Korean pear and jujubes. It’s refreshing and crunchy.
- Quick Cucumber Kimchi (Oi Sobagi): Don’t have days to wait? Make cucumber kimchi. Quarter cucumbers, salt them for about 30 minutes, then stuff them with a smaller batch of the same kimchi paste. It’s ready to eat right away or can be fermented for a day.
FAQ Section: All Your Funky Fermentation Questions
Let’s demystify some of the common questions about this process.
Q1: How do I know when my kimchi is ready to eat?
A: It’s all about taste! It’s ready when it has reached a level of sourness and tang that you personally enjoy. You should also see active bubbling in the jar.
Q2: Why isn’t my kimchi bubbling?
A: It might just be a little cold. Fermentation happens faster in warmer temperatures. Try moving your jar to a slightly warmer spot in your house. It could also just be a slow starter; give it another day.
Q3: Do I need to “burp” the jar?
A: If you’re using a standard jar with a regular lid, yes. It’s a good idea to open the lid once a day to release the built-up CO2 gas, especially during the first few days of active fermentation.
Q4: What’s the best way to store homemade kimchi?
A: In the refrigerator, in a tightly sealed glass jar. It will last for months, and the flavor will continue to deepen and get more complex over time.
Q5: Is it okay if the kimchi brine looks milky?
A: Yes, a cloudy or milky brine is a completely normal and healthy sign of lacto-fermentation. It means the good bacteria are thriving.
Q6: My kimchi is too salty! Can I fix it?
A: It’s difficult to fix once it’s fermented, which is why rinsing is so important. If it’s only slightly too salty, you can try adding some more unsalted daikon radish, which will absorb some of the salt.
Q7: Can I use a different type of cabbage?
A: While napa cabbage is traditional and has the best texture for this type of kimchi, you could experiment with savoy cabbage. Regular green cabbage can be used, but the texture will be much tougher.
Final Thoughts: Welcome to the Cult of Kimchi!
You did it! You took a humble cabbage and turned it into a living, breathing, gut-healthy jar of deliciousness. Your fridge now has a funky new resident that will make everything from eggs to rice bowls a million times better. Go ahead, open that jar, and take a whiff of your glorious creation. You’re officially a fermentation wizard. Now go put kimchi on everything!