How to Ice a Cake (Without Losing Your Mind or Your Frosting)
Let’s be real, baking a beautiful cake is only half the battle. The other, arguably more intimidating half, is transforming that humble stack of sponges into a show-stopping masterpiece. You’ve probably seen those perfectly smooth, razor-sharp edges on Instagram, making your own attempts look like they were decorated by a very enthusiastic, slightly clumsy toddler. “How do they do that?!” you wonder, as your frosting drags crumbs everywhere. Well, my friend, the struggle is real, but it’s also solvable. Today, you are going to learn how to ice a cake like a pro, conquering crumb coats, achieving smooth sides, and making your next creation truly shine. No more frosting-induced meltdowns, I promise.
Why This “Recipe” Is Awesome (It’s Your Secret Weapon for Cake Glory)
Why bother mastering cake icing? Because this “recipe” is your secret weapon for turning a humble cake into a work of art. A beautifully iced cake isn’t just about aesthetics; it’s about presentation, perceived skill, and pure deliciousness. Think about it:
- Elevated Presentation: A smooth, even coat of frosting makes even the simplest cake look incredibly professional and inviting.
- Flavor Perfection: A good crumb coat seals in moisture and prevents dry spots, making every bite taste better.
- Bragging Rights: Seriously, imagine serving a cake in Khulna that looks like it came from a high-end bakery. The “oohs” and “aahs” alone are worth the effort!
- Stress Reduction: Once you know the techniques, icing becomes less of a chore and more of a meditative, creative process. (Okay, maybe a slightly less stressful process 😉).
This isn’t just about frosting a cake; it’s about building confidence in your baking journey. You’ve baked the cake, now let’s give it the crown it deserves!
Ingredients: Your Frosting & Foundation
You’ve baked your cake (two layers, ideally, about 8-inches in diameter, fully cooled!). Now you need the star of the show.
- Your Favorite Frosting:
- Buttercream: About 3-4 cups for an 8-inch two-layer cake. This is my go-to for its stability and deliciousness.
- Cream Cheese Frosting: Also works wonderfully, just ensure it’s well-chilled if your kitchen is warm.
- Ganache: A luxurious choice for a sleek, shiny finish.
- Your Baked & Cooled Cake Layers: Seriously, COOLED. I can’t stress this enough.
Key Ingredient Notes (Don’t Ignore These!):
- Consistency is Key: Your frosting needs to be the right consistency. Too stiff, and it tears the cake. Too loose, and it slides off. It should be spreadable but firm enough to hold its shape. If it’s too stiff, add a tiny bit of milk or cream. Too soft, refrigerate it for a bit.
- Cake Temperature: Your cake layers must be completely cool. Warm cake + frosting = melted, crumbly disaster. No one wants that.
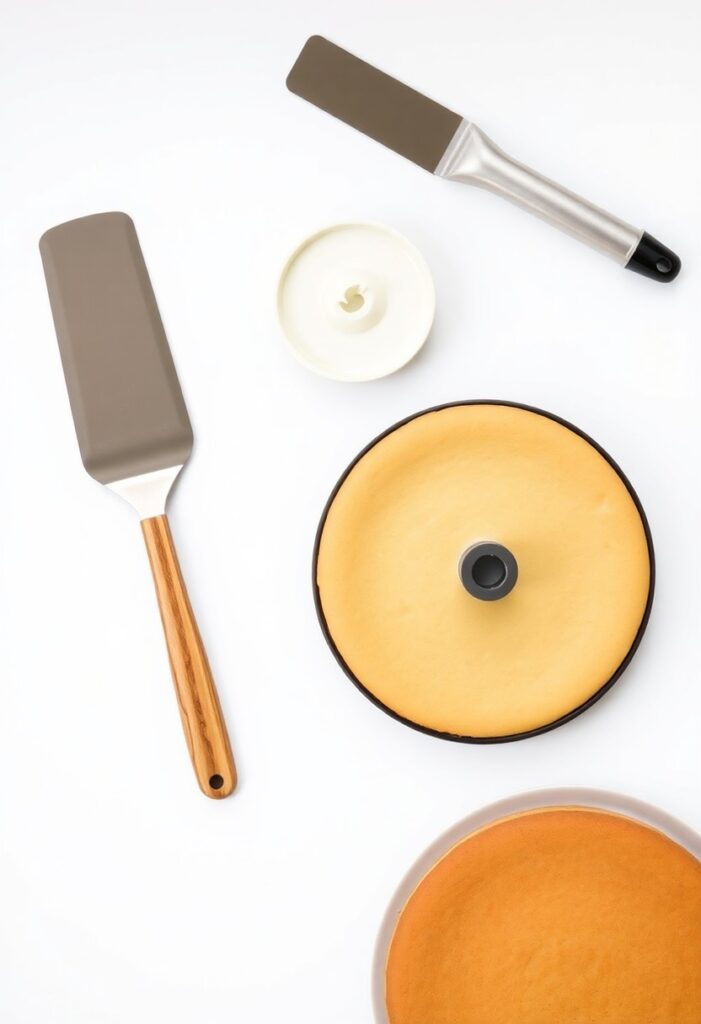
Tools & Kitchen Gadgets Used: Your Icing Arsenal

These tools make all the difference between a messy lump and a masterpiece.
- Offset Spatula (Small and/or Large): Your best friend for spreading frosting smoothly.
- Bench Scraper or Icing Smoother: Essential for achieving super smooth sides.
- Revolving Cake Turntable: Makes icing so much easier. It’s an investment, but worth it if you decorate cakes often.
- Cake Board or Cardboard Circle (same size as your cake): Provides a stable base.
- Piping Bag and Round Tip (Optional, for crumb coating or filling): Can help with even distribution.
- Small Bowl of Warm Water: For cleaning your spatula.
- Paper Towels: For wiping off excess frosting.
Step-by-Step Instructions: The Path to Silky Smoothness
This isn’t rocket science, but it does require a bit of patience. Take a deep breath, put on some tunes, and let’s get frosting.
Act 1: The Foundation – Leveling & Crumb Coating
- Level Your Cake (If Needed): If your cake layers have domed tops, use a serrated knife (or a fancy cake leveler) to carefully slice off the domes, creating flat, even layers. This makes stacking and icing infinitely easier. No judgment if you eat the scraps, BTW. 😉
- Assemble Your Base: Place a dollop of frosting on your cake board or serving plate. This acts as “glue.” Carefully center one cake layer on top of the frosting.
- Fill the First Layer: Scoop about ½ to ¾ cup of frosting onto the top of the first cake layer. Use your offset spatula to spread it evenly to the edges.
- Stack It Up: Gently place the second cake layer on top, making sure it’s centered. Press down lightly to secure it.
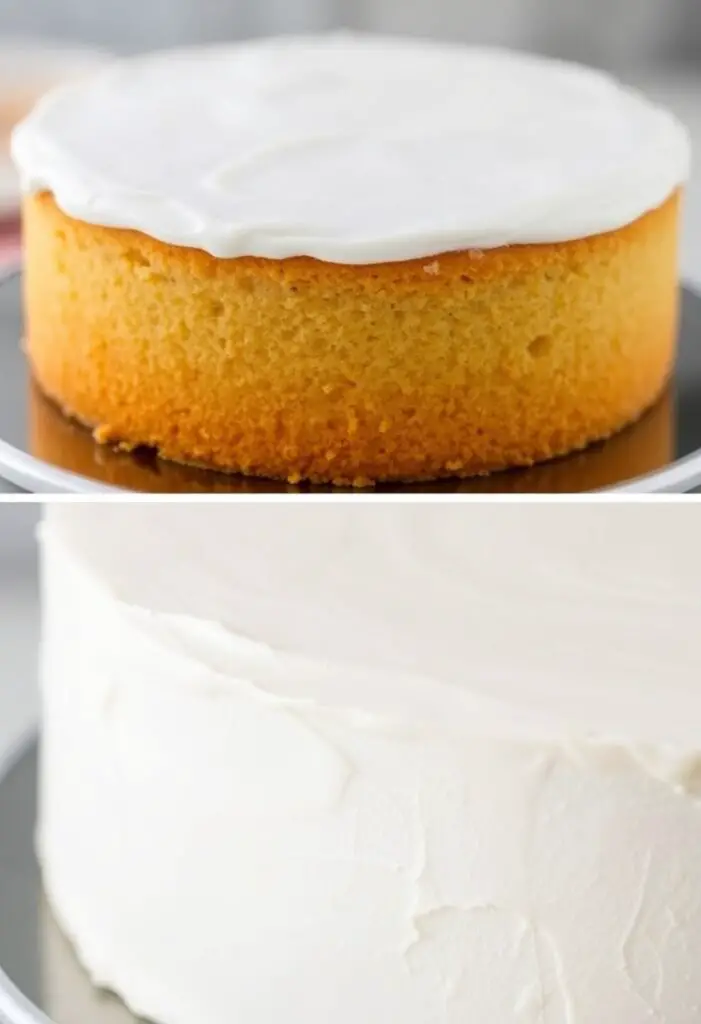
- The Mighty Crumb Coat: This is the game-changer, folks! Scoop a thin layer of frosting onto the top and sides of your stacked cake. Use your offset spatula to spread it as thinly and evenly as possible. Your goal is to trap all those pesky crumbs that want to make an appearance in your final coat. Don’t worry about perfection here; just get a thin, even layer.
- Chill Out: Place the crumb-coated cake in the refrigerator for 15-30 minutes. This firms up the crumb coat, locking those crumbs in place. Seriously, don’t skip this. It’s your secret weapon against crumb-ageddon.
Act 2: The Glamorous Final Coat
- Ready the Frosting: While your cake chills, give your remaining frosting a quick stir. If it’s too stiff, let it warm up slightly. If too soft, give it a quick chill. Remember, consistency is key!
- Top It Off (Generously!): Take your chilled, crumb-coated cake out of the fridge. Scoop a generous amount of frosting onto the top center of the cake. We’re talking a good, healthy dollop here, maybe 1-1.5 cups.
- Smooth the Top: Using your large offset spatula, gently spread the frosting from the center outwards, working towards the edges. Let the excess frosting hang over the sides. Keep rotating your turntable (if using) for even coverage.
- Frost the Sides: Now, for the sides! Apply generous dollops of frosting around the entire side of the cake. Use your offset spatula to spread it evenly around the sides, bringing the excess from the top down and smoothing it all out. Don’t be shy with the frosting; you can always scrape off the extra.
- The Side Scrape (Your Moment of Zen): Grab your bench scraper or icing smoother. Hold it perpendicular to the side of the cake, pressing gently but firmly against the frosting. Slowly rotate your cake turntable, keeping the scraper still. The scraper will remove excess frosting and create beautifully smooth sides. Wipe the scraper clean after each full rotation. Repeat until you achieve desired smoothness. This is surprisingly satisfying!
- Sharp Edges (The Grand Finale): Once the sides are smooth, you’ll have a slight “lip” of frosting around the top edge of the cake. Hold your clean offset spatula parallel to the top of the cake, with the edge just over the lip. Drag the spatula from the outside edge towards the center, cleaning the spatula after each swipe. Work your way around the entire cake. This creates those coveted sharp edges.
- Final Polish (Optional): If you’re going for mirror-smooth, chill the cake for another 15 minutes, then give it one last gentle scrape with your bench scraper.
- Decorate & Serve! Now comes the fun part: adding sprinkles, piping borders, or topping with fruit. You’ve earned it!
Calories & Nutritional Info (Per Slice, Estimated)
Let’s be honest, you’re not making cake for health benefits. This is pure, unadulterated joy. (This is a rough estimate for one slice of a typical 2-layer 8-inch cake, assuming 12 slices and a good amount of buttercream.)
- Estimated Calories per slice: ~350-500 calories (highly dependent on cake and frosting type!)
- Fat: ~20-35g
- Carbohydrates: ~40-60g
- Sugar: A delightful amount. TBH, don’t even look.
Common Mistakes to Avoid: Don’t Let Your Cake Crumble!
Steer clear of these icing pitfalls for a flawless finish.
- Warm Cake: This is the cardinal sin. Always ensure your cake is completely cool before even thinking about frosting it. Warm cake melts frosting and leads to a crumbly, messy situation.
- Skipping the Crumb Coat: You wouldn’t paint a wall without primer, would you? The crumb coat is your cake’s primer. It traps loose crumbs and provides a smooth base for your final coat. Do not skip it!
- Too Much Frosting at Once: Trying to apply all the frosting in one go leads to unevenness and frustration. Work in layers: filling, crumb coat, then a generous final coat.
- Dirty Spatula/Scraper: Every time your tool picks up crumbs, wipe it clean on a paper towel. A dirty tool just drags crumbs back onto your pristine frosting.
- Overworking the Frosting: Don’t keep fiddling with the same spot. Apply, smooth, move on. Too much fussing can make the frosting dull or lumpy.
Variations & Customizations: Your Cake, Your Canvas
This basic technique works for almost any cake!
- Ombre/Gradient Frosting: Divide your final frosting into 2-3 bowls. Tint each bowl a slightly different shade of the same color (e.g., light blue, medium blue, dark blue). Apply the darkest shade to the bottom, the medium in the middle, and the lightest on top, then blend with your bench scraper.
- Textured Frosting: Instead of aiming for perfectly smooth, use your offset spatula to create swirls, peaks, or rustic lines in the frosting. A fork can also create cool textures.
- Naked Cake: For a minimalist look, apply only a very thin layer of frosting – essentially just a crumb coat – and leave some of the cake layers peeking through. This is super trendy and looks effortlessly chic.
FAQ Section: All Your Icing Inquiries, Answered
You’ve got questions about this frosting finesse. I’ve got answers.
- Q: My frosting is too stiff to spread. What do I do? A: Add a tiny bit of milk or cream (½ teaspoon at a time) and mix until it reaches a spreadable consistency. You can also warm it gently in the microwave for literally 5-10 seconds, then stir well.
- Q: My frosting is too soft and keeps sliding off the cake. Help! A: Your kitchen might be too warm, or you added too much liquid. Pop the frosting (and maybe even the cake for a few minutes) into the refrigerator for 10-15 minutes to firm it up.
- Q: Can I use store-bought frosting for this? A: Yes, you absolutely can! Just make sure it’s at the right consistency. Store-bought frosting can sometimes be too soft, so you might need to chill it slightly or add a spoonful of powdered sugar to firm it up a bit.
- Q: How do I get those super sharp edges on top? A: The key is a firm, chilled crumb coat, applying enough final frosting to have an overhang, and then dragging your clean offset spatula from the outside edge towards the center of the cake, cleaning the spatula after each swipe.
- Q: What is a cake turntable and do I really need one? A: A cake turntable is a rotating stand that allows you to spin the cake while you’re decorating. While not strictly “necessary,” it makes smoothing the sides significantly easier and helps you achieve a much more even finish. IMO, it’s a game-changer!
- Q: My cake layers are uneven. What should I do? A: Use a long, serrated knife to carefully level the tops of your cake layers so they are flat. This makes stacking and achieving straight sides much easier.
- Q: How do I keep my workstation clean? A: Lay down parchment paper or wax paper under your cake board. This catches drips and crumbs. Also, keep that small bowl of warm water and paper towels handy to clean your tools frequently.
Final Thoughts: Go Forth and Frost with Confidence!

You’ve done it! You’ve navigated the crumb coat, mastered the smooth sides, and even aced those sharp edges. You are now officially a cake-icing wizard. Your cakes will never look sad and lumpy again (unless you want them to, for a rustic vibe, of course 😉). Go forth, create some beautiful, delicious cakes, and enjoy the astonished faces of your friends and family. Who knew such simple tools could lead to such cake glory?