You’re Too Good for Store-Bought: How to Make a Box of Chocolates
Let’s talk about that moment of pure, unadulterated disappointment. You’re gifted a fancy-looking box of chocolates. You eagerly open it, only to bite into a weird, vaguely fruity cream of unknown origin. Sound familiar? Life is too short for mediocre, mass-produced candy. Today, we’re taking matters into our own hands and learning how to make a box of chocolates that will put those store-bought versions to shame.
That’s right. You, yes you, are about to become a chocolatier. Forget mystery fillings and waxy coatings. We’re talking about creating decadent, melt-in-your-mouth truffles and treats that you can customize to your heart’s content. Is it a little ambitious? Maybe. Is it going to be ridiculously fun and delicious? Absolutely. Prepare to level up your gift-giving game and become the chocolate hero you were always meant to be.
Why Your Homemade Chocolates Reign Supreme
Still tempted to just grab a box from the checkout aisle? Let me enlighten you on why going DIY is the only way to go.
First, unbeatable flavor and quality. You control the ingredients, which means you can use high-quality chocolate and fresh cream. The difference in taste is astronomical. We’re talking rich, complex, and deeply satisfying, not just vaguely sweet.
Second, endless customization. Are you a dark chocolate fanatic? A salted caramel connoisseur? Do you believe everything is better with a hint of chili? You get to be the master of your chocolate destiny! Create flavors that you actually love, instead of playing Russian roulette with a store-bought assortment.
Finally, the “wow” factor is off the charts. Handing someone a beautiful box of chocolates that you made yourself? That’s a power move. It’s thoughtful, it’s impressive, and it says, “I care about you enough to melt chocolate and get my hands a little messy.” It’s the ultimate edible flex, perfect for holidays, birthdays, or just because.
Your Chocolatier Starter Pack: Ingredients
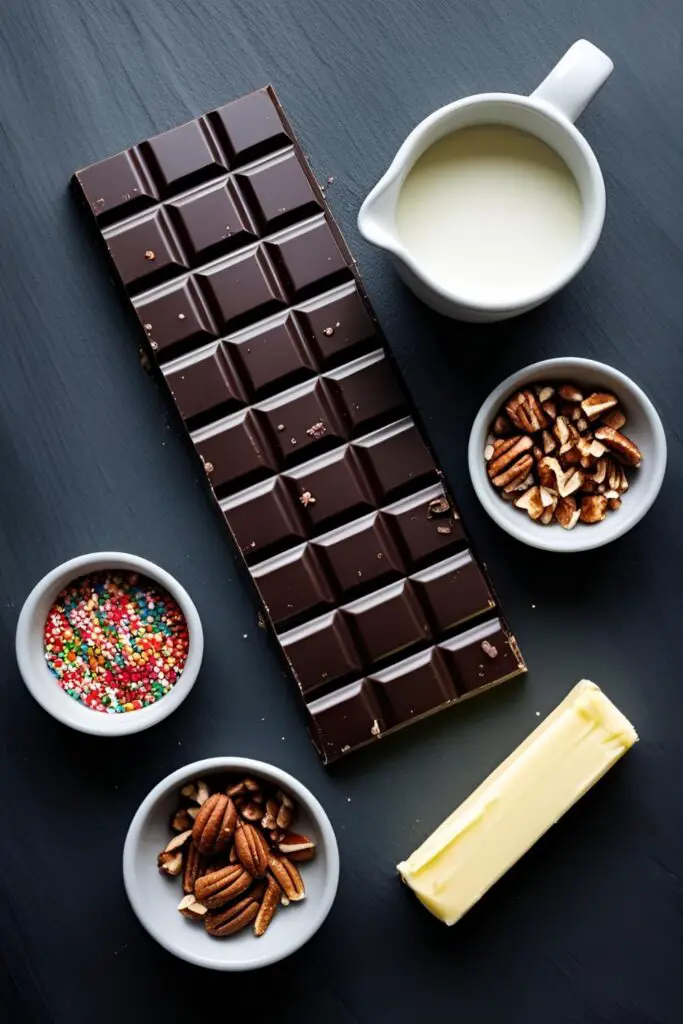

We’re going to focus on a classic, versatile chocolate truffle recipe that you can then customize in a million different ways.
For the Chocolate Ganache (The Heart of Your Truffles):
- 8 ounces (about 1 ¼ cups) high-quality semi-sweet or dark chocolate, finely chopped. Do not use chocolate chips; they contain stabilizers that prevent smooth melting. Use a good quality baking bar.
- 1/2 cup heavy cream.
- 1 tablespoon unsalted butter, at room temperature.
- 1 teaspoon vanilla extract.
- A pinch of salt.
For Coating & Customizing (The Fun Part!):
- Cocoa powder (unsweetened).
- Chopped nuts (pecans, almonds, pistachios).
- Sprinkles (any and all kinds!).
- Toasted shredded coconut.
- Melted chocolate (dark, milk, or white for dipping).
- Sea salt flakes.
Your Chocolate Workshop: Tools & Gadgets
You don’t need a professional candy kitchen, but these tools will make your life a whole lot easier.
- Heatproof Bowl: For making your ganache.
- Small Saucepan: For heating the cream.
- Whisk & Silicone Spatula: Essential for smooth ganache and scraping the bowl.
- Shallow Dish or Baking Sheet: Lined with parchment paper, for chilling the ganache.
- Small Cookie Scoop (about 1 tablespoon size): The secret to uniformly sized truffles.
- Parchment Paper: Your best friend for mess-free chilling and dipping.
- Dipping Tools or a Fork: For gracefully dipping your truffles in melted chocolate.
- An Empty Chocolate Box or a Pretty Gift Box with Mini Cupcake Liners: For presenting your masterpieces.
Let’s Get Rolling: Step-by-Step Instructions
Ready to transform into a candy-making wizard? Follow these steps, and you’ll be swimming in truffles in no time.
Step 1: Make the Ganache Place your finely chopped chocolate in a heatproof bowl. In a small saucepan, heat the heavy cream over medium heat until it just begins to simmer around the edges. Do not let it come to a rolling boil! Pour the hot cream directly over the chopped chocolate. Let it sit, undisturbed, for 5 minutes. This allows the hot cream to gently melt the chocolate.

Step 2: Whisk to Silky Perfection After 5 minutes, add the room temperature butter, vanilla extract, and a pinch of salt to the bowl. Start whisking from the center of the bowl, moving in small circles, gradually working your way out. The mixture might look separated at first (don’t panic!), but keep whisking, and it will magically come together into a smooth, glossy, beautiful ganache.
Step 3: Chill Out Pour the ganache into a shallow dish or a parchment-lined baking sheet and spread it out. This helps it cool faster and more evenly. Cover it with plastic wrap, pressing the wrap directly onto the surface of the ganache to prevent a skin from forming. Refrigerate for at least 1-2 hours, or until it’s firm enough to scoop.
Step 4: Scoop and Roll Once the ganache is firm, use your small cookie scoop to portion out the truffles. Roll each portion quickly between your palms to form a smooth ball. Your hands will get messy; embrace it. Place the rolled truffles on a parchment-lined baking sheet. If the ganache gets too soft, pop the truffles back in the fridge for 15 minutes to firm up again.
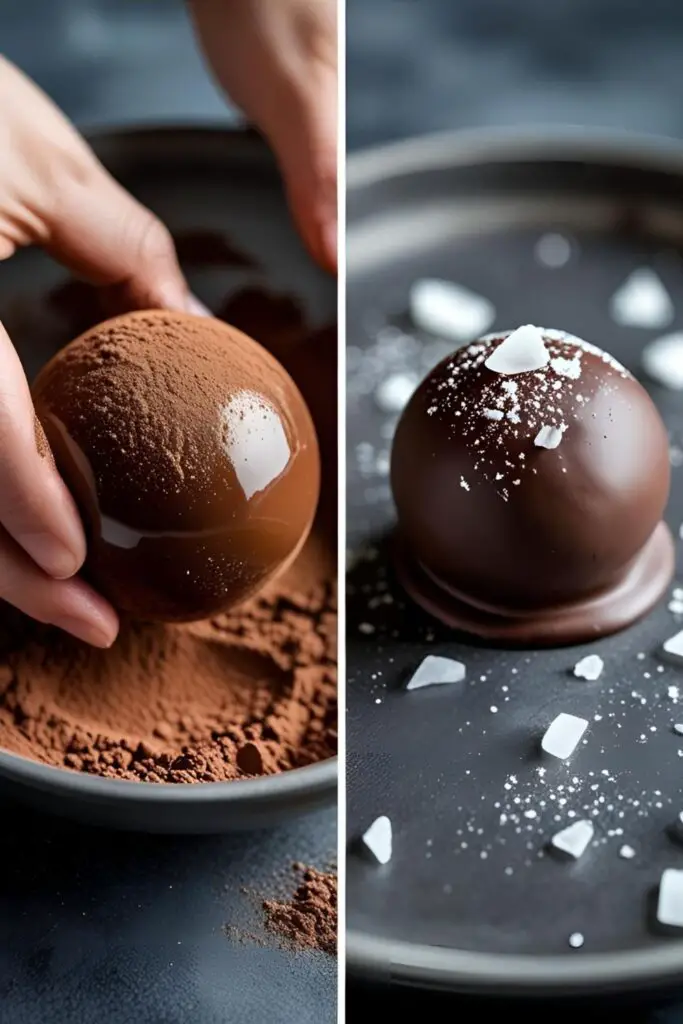
Step 5: The Coating Extravaganza This is where you create your assortment! Place your chosen coatings (cocoa powder, chopped nuts, sprinkles, etc.) in separate shallow bowls. Roll each truffle in a coating until it’s completely covered.
- For a dipped version: Melt your coating chocolate. Use a fork or dipping tool to dip a truffle into the chocolate, tap off the excess, and place it back on the parchment paper. You can sprinkle it with sea salt or other toppings while the chocolate is still wet.
Step 6: The Final Chill Place your finished, beautifully coated truffles back in the refrigerator for about 30 minutes to set completely.
Step 7: Box ’em Up! Arrange your stunning assortment of homemade chocolates in a beautiful box, using mini cupcake liners to keep them separated. Stand back and admire your handiwork. You are officially a chocolatier!
Nutritional Information (A Sweet Reality)
Let’s be clear, these are decadent treats made of chocolate and cream. They are a delicious indulgence.
- Calories: ~80-120 kcal per truffle (depending on size and coatings).
- Fat: A significant portion, thanks to the cream, butter, and chocolate.
- Sugar: Yes, it’s in there.
- Pure Joy: 100%.
- Note: This is an estimate. Enjoy them mindfully, or don’t. I’m not your boss.
Common Chocolate Catastrophes to Avoid
Don’t let your truffle dreams turn into a grainy nightmare.
- Using Chocolate Chips: I mentioned it before, but it’s the #1 mistake. Chocolate chips have less cocoa butter and contain stabilizers that resist melting smoothly, which can lead to a grainy or thick ganache. Use good quality baking chocolate bars.
- Boiling the Cream: If your cream is too hot, it can “break” or scorch the chocolate, causing it to seize up and become a clumpy mess. Heat the cream until it’s just simmering.
- Getting Water in Your Chocolate: Water is the mortal enemy of melted chocolate. A single drop can cause it to seize instantly. Make sure all your bowls and utensils are bone dry.
- Over-handling the Ganache: When you’re rolling the truffles, work quickly. The heat from your hands will melt the ganache, making it sticky and difficult to work with. If they get too soft, just chill them again.
Creative Customizations (Your Signature Collection)
This basic truffle recipe is your canvas. Now, go paint your masterpiece.
- Flavor Infusions: Add a teaspoon of instant espresso powder, a splash of liqueur (like Grand Marnier or Bailey’s), or a drop of peppermint or orange extract to the cream while it’s heating to infuse your ganache with flavor.
- Spicy Chocolates: Add a pinch of cayenne pepper or chili powder to the ganache for a surprising, delightful kick of heat.
- Nut Butter Center: Before rolling your scooped ganache, flatten it in your palm, add a small dollop of peanut butter or almond butter in the center, and then roll it into a ball for a hidden surprise.
Your Burning Questions Answered (FAQ)
1. How long do homemade chocolates last? Because they are made with fresh cream, they should be stored in an airtight container in the refrigerator. They will be at their best for up to one week.
2. Can I make these vegan? Absolutely! Use a high-quality dairy-free dark chocolate, full-fat canned coconut cream instead of heavy cream, and coconut oil or vegan butter instead of dairy butter.
3. Why did my ganache get oily or separate? This usually happens if the cream was too hot or if the ratio of fat to liquid is off. Sometimes, you can save it by whisking in a tablespoon of warm milk or continuing to whisk vigorously until it comes back together.
4. Can I freeze homemade truffles? Yes! Place them in a single layer in an airtight container. They can be frozen for up to 3 months. Let them thaw in the refrigerator to prevent condensation from forming on the surface.
5. What’s the easiest way to finely chop chocolate? Use a large, serrated knife. It will grip the chocolate and create small, even pieces and shards, which melt much more easily than large chunks.
6. My truffles aren’t perfectly round. Is that okay? Of course! Homemade chocolates are supposed to have a rustic charm. Don’t stress about perfection. They will be delicious no matter what.
7. Can I use white chocolate or milk chocolate for the ganache? Yes, but you’ll need to adjust the ratio. White and milk chocolate have more milk solids and sugar, so they are softer. A good starting point is a 3:1 ratio of chocolate to cream by weight (e.g., 9 ounces of white chocolate to 3 ounces of cream).
Final Thoughts
Look at you, with your beautiful, custom-made box of chocolates. You’ve officially graduated from candy consumer to candy creator. You’ve harnessed the power of chocolate and cream to make something truly special, and you didn’t have to decipher one of those confusing little paper maps to figure out which one has the weird cherry filling.
So go ahead, gift them to someone special, bring them to a party, or just hoard them all for yourself (I support this decision). You’ve earned it. And let’s be honest, after this, you’ll never look at a store-bought box of chocolates the same way again. Welcome to the delicious side. 🙂