How to Make Sweet Potatoes Perfectly Every Time (Roasted & Baked!)
How to Make Sweet Potatoes Perfectly Every Time (Roasted & Baked!)
Let’s be honest for a moment. You’ve been hurt before. You went to the trouble of buying a beautiful, vibrant sweet potato. You had dreams of roasting it into crispy, caramelized cubes with soft, fluffy interiors. But what came out of your oven was… a pan of sad, beige, slightly steamy logs. They were limp. They were soggy. They were a culinary disappointment of the highest order.
Well, your days of sad spuds are over. The era of soggy sweet potatoes ends today. We are going to wipe the slate clean and start fresh, because I am about to teach you how to make sweet potatoes perfectly, every single time. We’ll cover the two most essential, foolproof methods—perfectly caramelized roasted cubes and the classic, fluffy whole baked potato—and unlock their true, delicious potential.
Why Mastering the Sweet Potato Is a Life Skill
So, why should you dedicate your precious time to mastering a humble root vegetable? Oh, the reasons are plentiful.
First, it’s insanely versatile. Once you know these two basic methods, the possibilities are endless. Those perfect roasted cubes can be thrown into salads, grain bowls, tacos, or served as a simple, addictive side dish. The whole baked sweet potato is a perfect, healthy vessel for literally hundreds of toppings. This isn’t just one recipe; it’s the key to dozens of future meals.
Second, it’s both healthy AND incredibly delicious. Sweet potatoes are nutritional powerhouses, packed with Vitamin A, fiber, and antioxidants. And when you roast or bake them properly, their natural sugars caramelize, creating a deep, sweet, and savory flavor that needs very little help to be amazing. It’s a win-win for your taste buds and your body.
Finally, it’s minimal effort for maximum flavor. For both of these methods, the oven does 95% of the work. Your job is just a little bit of prep. You get to look like a kitchen hero who created a vibrant, delicious dish, and only you need to know that you spent most of the cooking time scrolling through your phone.
The (Refreshingly Simple) Ingredients List

The beauty of a perfect sweet potato is that it doesn’t need much help to shine.
- Sweet Potatoes: About 2 pounds for roasting, or 1 medium sweet potato per person for baking. Look for ones that are firm with smooth skin and relatively uniform in shape.
- Olive Oil or other high-heat oil: About 2-3 tablespoons for roasting, or 1 teaspoon per potato for baking. Avocado oil or coconut oil also work great.
- Salt: Coarse sea salt or kosher salt is perfect.
- Black Pepper: Freshly cracked, of course.
- Optional Spices: This is where you can get creative!
- Smoked paprika
- Garlic powder
- Cinnamon
- Chili powder
- Dried herbs like rosemary or thyme
The Essential Toolkit

You don’t need any fancy gadgets, just a few kitchen workhorses.
- A Good Chef’s Knife: For safely and evenly chopping your potatoes for roasting.
- A Large Baking Sheet: This is the key to crispy roasted potatoes. You need a big one!
- A Vegetable Peeler (Optional): If you’re not a fan of the skins.
- A Fork: Your official potato-poking device for the whole baked method.
- Parchment Paper or Aluminum Foil: For easy cleanup.
- A Large Mixing Bowl: For tossing your roasted potatoes with oil and spices.
Step-by-Step: Your Two Paths to Sweet Potato Perfection
We’re going to cover two foundational methods. Master these, and you can do anything.
Method 1: Perfect, Crispy Roasted Sweet Potato Cubes
This method is all about high heat and giving the potatoes plenty of space.
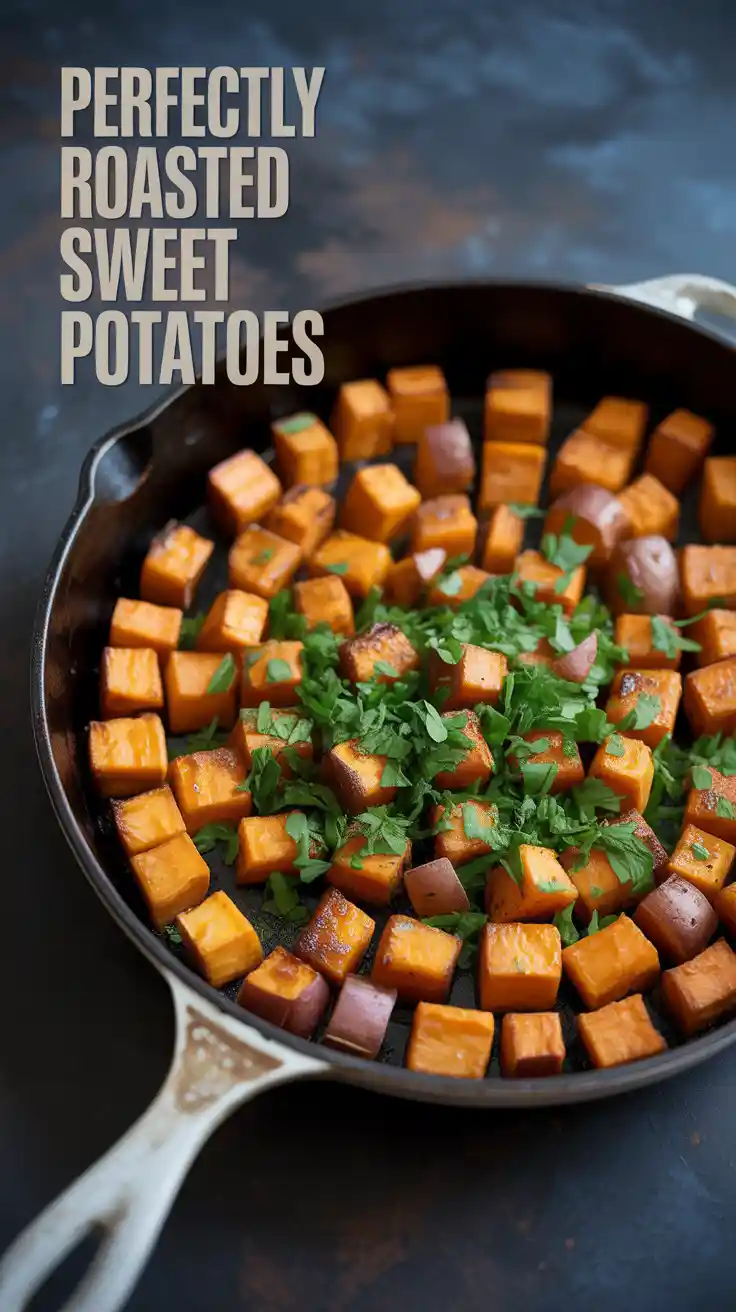
- Preheat and Prep: Preheat your oven to a blazing 425°F (220°C). Line a large baking sheet with parchment paper. Do not use a glass dish; a metal sheet is essential for good browning.
- Wash and Chop: Scrub your sweet potatoes well. You can peel them if you like, but the skin gets delightfully crispy, so I recommend leaving it on. Chop the potatoes into uniform, 1-inch cubes. The uniform size is key to even cooking.
- The Toss: In a large mixing bowl, toss the sweet potato cubes with the olive oil, salt, pepper, and any other spices you’re using. Make sure every single piece is lightly and evenly coated.
- THE MOST IMPORTANT STEP: Don’t Crowd the Pan! Spread the seasoned potato cubes onto your prepared baking sheet in a single, even layer. The pieces should have a little bit of breathing room and should not be touching. If they are crowded, they will steam and become soggy. Use two baking sheets if you have to. I am not kidding. This is the secret.
- Roast to Perfection: Roast for 20 minutes. Then, take the pan out, use a spatula to flip the potatoes over, and roast for another 10-15 minutes, until the cubes are tender on the inside and have delicious, crispy, caramelized brown spots on the outside. Serve immediately.
Method 2: The Classic Whole Baked Sweet Potato
This method is all about a slow, patient bake to create a fluffy, creamy interior.
- Preheat the Oven: Preheat your oven to 400°F (200°C).
- Scrub-a-Dub: Scrub your sweet potato thoroughly under running water and pat it completely dry.
- THE MOST IMPORTANT STEP: Poke it! Using a fork or a sharp knife, pierce the sweet potato skin 8-10 times all over. This allows steam to escape during baking. If you forget this step, you run the small but very real risk of your potato exploding in the oven. It’s rare, but do you really want to clean that up?
- Oil and Season: Rub the entire potato with about a teaspoon of olive oil and sprinkle generously with salt. The oil helps the skin get crispy and delicious.
- Bake Away: Place the prepared potato directly on the middle oven rack. You can place a baking sheet on the rack below to catch any potential drips.
- Bake Until Tender: Bake for 45 to 60 minutes. The timing will depend entirely on the size of your potato. You’ll know it’s done when the skin is puffy and a fork or knife can be inserted into the center with absolutely no resistance. It should be completely soft all the way through.
- Serve: Slice it open, fluff the inside with a fork, and top with a pat of butter, a dollop of sour cream, or any of your favorite toppings.
Calories & Nutritional Info (The Healthy Hero)

Sweet potatoes are a nutritional gift. Here’s a look at a standard serving (about 1 cup of cubes or 1 medium potato).
- Estimated Calories: Around 180-200 kcal.
- Vitamin A Powerhouse: A single serving provides well over 100% of your daily Vitamin A needs, which is fantastic for eye health and your immune system.
- Fiber-Rich: They are a great source of dietary fiber, which is important for digestion and keeping you feeling full.
- Complex Carbs: They provide sustained energy without the spike and crash of simple sugars.
Common Sweet Potato Sins to Avoid
Don’t let these simple mistakes ruin your beautiful orange spuds.
- The Soggy, Steamed Roast. This is the #1 crime against roasted vegetables, and it’s always caused by overcrowding the pan. When the potato pieces are too close together, they trap moisture and steam each other instead of roasting in the dry heat of the oven. Give them space! It is the most important rule of roasting.
- Forgetting to Poke the Potato. I’m saying it again because it’s that important. A sweet potato is a starchy pressure cooker. Poking holes allows the steam to escape safely. Don’t risk a potato explosion. It’s a messy, sad event.
- Not Using High Enough Heat for Roasting. To get that beautiful caramelization and those crispy brown edges on your roasted cubes, you need high heat (400°F or higher). A lower temperature will just slowly bake them, and you won’t get the texture you’re dreaming of.
- Cutting Uneven Pieces for Roasting. If you have a mix of giant chunks and tiny little bits on the same pan, the tiny bits will turn to charcoal before the giant chunks are cooked through. Try to keep your cubes roughly the same size and shape for even cooking.
Variations & Customizations
Once you’ve mastered the basics, you can take your sweet potatoes in a million different directions.
- Spicy-Sweet Roasted Cubes: For your roasted cubes, use a seasoning mix of smoked paprika, chili powder, and a tiny pinch of cayenne pepper along with your salt. The combination of spicy, smoky, and the natural sweetness of the potato is addictive.
- Savory Herb & Garlic Cubes: Toss your roasted cubes with garlic powder, dried rosemary, and dried thyme before they go into the oven. This creates a wonderful, savory side dish that pairs perfectly with roasted chicken or steak.
- The Fully “Loaded” Baked Sweet Potato: Treat your perfectly baked sweet potato like a blank canvas. Split it open and load it up with your favorite toppings: black beans, corn, salsa, and a dollop of Greek yogurt for a Tex-Mex vibe; or top it with chili and cheese for a hearty, comforting meal.
Your Burning Sweet Potato Questions, Answered
Let’s tackle some of the most common questions about this versatile vegetable.
Should I peel my sweet potatoes before roasting them?

This is purely a matter of personal preference! The skin is full of fiber and nutrients, and it gets wonderfully crispy and flavorful when roasted. I always leave it on. If you’re not a fan of the texture, feel free to peel them.
What’s the absolute best way to get my roasted sweet potatoes crispy?
The three keys are: 1) High Heat (425°F is great), 2) Don’t Crowd the Pan (give them space!), and 3) Pat them Dry before tossing with oil. For extra credit, a quick soak in water before drying can remove some surface starch, making them even crispier.
How long does it really take to bake a whole sweet potato?
It completely depends on its size and girth. A small, thin sweet potato might be done in 35-40 minutes, while a large, thick one could take over an hour. The only true test is when a fork meets zero resistance.
What’s the difference between a sweet potato and a yam?
In most US grocery stores, the things labeled as “yams” (with the reddish-brown skin and bright orange flesh) are actually just a different variety of sweet potato. True yams are a completely different root vegetable with a starchy, not sweet, flesh and a rough, bark-like skin. They are not interchangeable.
Can I “bake” a sweet potato in the microwave to save time?
Yes, it’s a great hack! Just scrub the potato, poke it all over with a fork, and microwave on high for 5-8 minutes, flipping it halfway through, until it’s soft. The skin won’t get crispy like it does in the oven, but the inside will be perfectly fluffy and cooked.
How should I store cooked sweet potatoes?
Let them cool completely, then store them in an airtight container in the refrigerator for up to 4-5 days. They are fantastic for meal prep!
What seasonings go best with sweet potatoes?
They are incredibly versatile! For a sweet profile, use cinnamon, nutmeg, and ginger. For a savory profile, use smoked paprika, garlic powder, onion powder, rosemary, and thyme. For a spicy kick, use chili powder and cayenne pepper.
Final Thoughts
You’ve done it. You have officially unlocked the secrets to the perfect sweet potato. No more soggy roasted logs. No more undercooked baked potatoes. No more fear of oven explosions. You are now the master of this humble, delicious, and incredibly versatile vegetable.

So go forth and roast. Bake them, cube them, load them up with toppings. You have the knowledge and the power to transform this simple pantry staple into something truly special. Your dinner plate will thank you.