Why Star Cookie Decorating Is Your New Favorite Hobby (Maybe)
Why should you spend precious moments meticulously dotting and swirling frosting on a humble star cookie? Let me illuminate the possibilities for you.
First, they’re incredibly versatile. Whether it’s a patriotic celebration, a celestial-themed party, or just because you feel like making something sparkly, star cookies fit the bill. They’re the chameleons of the cookie world!
Second, it’s a fantastic way to unleash your creativity. Seriously, that five-pointed canvas is just begging for your artistic touch. Will you go for simple elegance or over-the-top glittery goodness? The choice is yours, my friend!
Finally, decorated cookies make everyone happy. Who can resist a sweet, charmingly decorated treat? They’re perfect for gifting, party favors, or just making your own day a little bit brighter. Plus, let’s be honest, showing off your decorating skills is kind of fun.
The Cosmic Palette (Ingredients for Decoration)
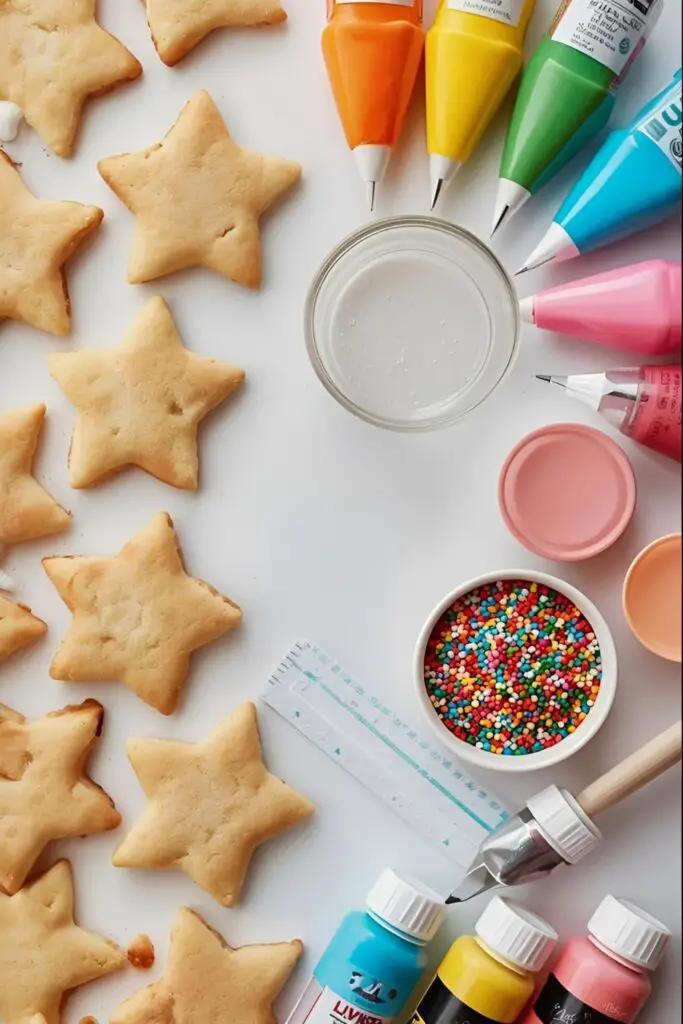
You’ve got your baked star cookies, now for the fun stuff! Here’s what you’ll need to transform them into miniature masterpieces.
- Royal Icing: The undisputed champion of cookie decorating. You can make your own (and if you’re feeling ambitious, go for it!), or store-bought royal icing works perfectly well for a stress-free experience.
- Gel Food Coloring: For creating a rainbow of stellar shades. Gel is your best bet for vibrant colors without thinning the icing too much.
- Sprinkles: Because what’s a decorated cookie without a little sparkle? Go wild with star shapes, edible glitter, nonpareils, the whole cosmic shebang!
- Edible Glitter or Luster Dust (Optional): For that extra touch of celestial shimmer.
- Piping Bags: Disposable or reusable, whichever you prefer.
- Piping Tips (Optional): Round tips in various sizes are great for outlining, flooding, and adding details. If you’re a piping newbie, don’t feel pressured to use them right away – snipping the end of a piping bag works just fine for basic decorating.

Substitution Notes:
- Royal Icing: In a pinch, you could use a thick glaze made from powdered sugar and milk, but royal icing dries hard, which is ideal for stacking and packaging.
- Food Coloring: Liquid food coloring can be used, but be mindful that it can thin your icing, and you might need more to achieve vibrant colors.
Your Decorating Starship (Tools & Kitchen Gadgets)
Here’s what you’ll need to navigate this decorating mission.
- Small Bowls: For dividing and coloring your royal icing.
- Spatulas or Small Spoons: For stirring and transferring icing.
- Piping Bags (Disposable or Reusable).
- Piping Tips (Optional): A variety of round tips (sizes 1-5 are a good starting point).
- Couplers (Optional): To easily switch piping tips on the same bag.
- Toothpicks or a Scriber Tool: For popping air bubbles and guiding icing.
- Cookie Drying Rack: For allowing your decorated cookies to dry completely.
- Small Scissors: For snipping the tips of piping bags.
Step-by-Step to Stellar Cookies
Ready to transform those plain stars into dazzling delights? Let’s get started!
Step 1: Prepare Your Royal Icing
If you’re using store-bought royal icing, give it a good stir to ensure it’s smooth. If you’re making your own, you know the drill! Divide the icing into several small bowls, depending on how many colors you want to use.
Add a few drops of gel food coloring to each bowl and stir until you achieve your desired shades. Remember, a little goes a long way! You can always add more color, but you can’t take it away.
Step 2: Piping Bag Prep
Spoon your colored royal icing into your piping bags. If you’re using piping tips, insert the tip into the bag and secure it with a coupler (if using) or simply push it down into the bag. Snip off the very end of the piping bag, just enough for the icing to flow out when you gently squeeze. If you’re not using tips, just snip a tiny hole in the corner of the bag.
Step 3: Outlining (The Cosmic Boundary)

Using a slightly thicker consistency of royal icing (if you’ve made different consistencies), outline the edges of your star cookies. This creates a border that will contain the thinner “flood” icing. Be steady with your hand, and don’t worry if it’s not absolutely perfect – practice makes progress! Let the outlines dry for a few minutes (about 10-15) before moving to the next step. This prevents the flood icing from bleeding over the edges.
Step 4: Flooding (Filling the Stellar Space)
Now, if you want a smooth, even base of color, you’ll need to “flood” your cookies. This involves using a slightly thinner consistency of royal icing. Gently pipe the thinner icing within the outlined area. Use a toothpick or scriber tool to gently spread the icing and pop any air bubbles. Work relatively quickly before the icing starts to set.
Step 5: Adding Details (Constellations of Fun!)
While the flood icing is still wet, now is the perfect time to add wet-on-wet decorations! You can pipe dots of different colored icing and drag a toothpick through them to create swirls or marbled effects. Get creative!
If you want to add sprinkles or edible glitter, now’s also the time! Gently sprinkle them over the wet flood icing so they adhere nicely.
If you prefer to add details with thicker icing, you’ll need to wait for the flood icing to dry completely (this usually takes several hours, or even overnight). Once dry, you can pipe borders, dots, lines, or any other design your heart desires on top of the solid base.
Step 6: The Waiting Game (Drying Time)
Once your star cookies are decorated to your satisfaction, place them on a cookie drying rack and let the royal icing dry completely. This is crucial! Don’t try to stack or package them before they are fully dry, or you’ll end up with smudged, sad-looking stars. Patience, my friend, patience.
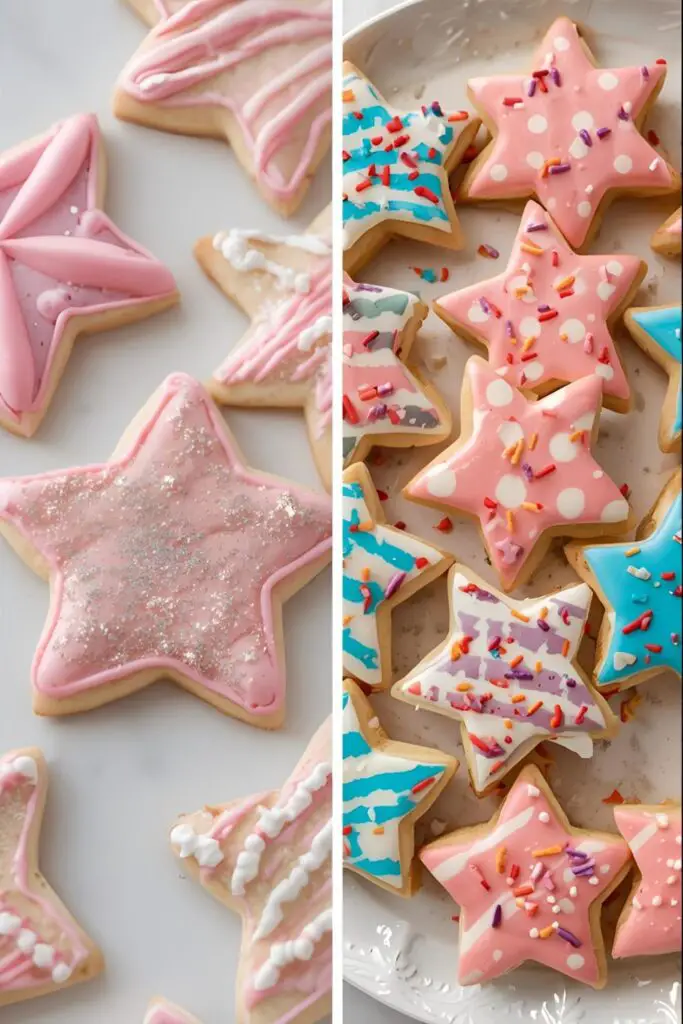
Step 7: Admire Your Stellar Creations

Once dry, your beautifully decorated star cookies are ready to be enjoyed, gifted, or displayed in all their sparkly glory!
Calories & Nutritional Info (They’re Treats, Not Training Fuel)
Let’s be real, decorated sugar cookies are a sugary delight. The exact calorie count will depend on the size of your cookies and the amount of icing and sprinkles you use, but here’s a general idea.
- Serving Size: 1 decorated star cookie (approx. 3-4 inches)
- Estimated Calories: 100-180
- Main Components: Sugar, refined carbohydrates, and a bit of fat.
- Nutritional Notes: Best enjoyed as a special treat. The joy they bring is probably worth a few calories, right? 😉
Common Mistakes to Avoid (Don’t Let Your Stars Fall From the Sky)
- Icing That’s Too Thick or Too Thin: This is the Goldilocks of cookie decorating. Too thick and it’s hard to pipe smoothly. Too thin and it runs everywhere. Practice makes perfect, and don’t be afraid to adjust with tiny amounts of water or powdered sugar.
- Not Letting the Outline Dry: If you flood before the outline has set, your colors will bleed together, creating a muddy mess. Give it those precious few minutes to dry.
- Overcrowding Your Cookies: Don’t try to cram too many decorations onto one cookie. Sometimes, simple elegance shines brightest (pun intended!).
- Touching Wet Icing (We’ve all been there): Resist the urge to poke and prod at the wet icing! You’ll leave fingerprints and smudges. Let it dry undisturbed.
- Melting Icing in a Warm Room: Royal icing can melt or become too runny in a warm environment. Keep your decorated cookies in a cool, dry place while they dry.
Variations & Customizations (Let Your Imagination Soar)
Stars are just the beginning! Here are a few ways to take your cookie decorating to the next level.
1. Galaxy Stars
Use a dark blue or black flood icing and, while it’s still wet, add swirls of white, silver, and a touch of pink or purple. Sprinkle with edible glitter to create a stunning galaxy effect.
2. Patriotic Stars
For a 4th of July or other patriotic celebration, use red, white, and blue royal icing. You can create stripes, polka dots, or even tiny stars within the larger star.
3. Holiday Sparklers
Around the holidays, use green, red, silver, and gold icing and sprinkles. You can even add tiny edible pearls or drag a toothpick through green flood icing to create a simple “wreath” effect inside the star.
FAQ Section: Your Star Cookie Decorating Questions, Answered
Let’s illuminate some common queries about decorating these stellar treats.
1. What kind of cookies work best for decorating with royal icing? Sturdy sugar cookies are the classic choice. They hold their shape well during baking and provide a good canvas for decorating.
2. Can I use store-bought frosting instead of royal icing? While you could, store-bought frosting doesn’t dry hard like royal icing, so your decorations will be more prone to smudging. Royal icing provides a much cleaner and more professional finish.
3. How long does royal icing take to dry completely? It usually takes anywhere from 6-8 hours to fully dry, depending on the thickness of the icing and the humidity in your environment. It’s often best to let them dry overnight.
4. How do I store decorated star cookies? Once the royal icing is completely dry, store the cookies in an airtight container at room temperature. They can last for a week or two.
5. Can I make royal icing ahead of time? Yes! Store it in an airtight container in the refrigerator for up to a week. When you’re ready to use it, bring it to room temperature and re-mix it to get a smooth consistency.
6. My piping bag keeps clogging. What am I doing wrong? Make sure your powdered sugar in your royal icing is finely sifted to avoid lumps. Also, ensure you’re not cutting too small of a hole in your piping bag tip.
7. What’s the best way to clean reusable piping tips? Rinse them immediately after use with hot, soapy water. Use a small brush to remove any stubborn icing. Make sure they are completely dry before storing them.
Final Thoughts
Well, there you have it! You’re now armed with the knowledge to transform those humble star cookies into dazzling constellations of deliciousness. So grab your icing bags, unleash your inner artist, and get ready to create some truly stellar treats. Remember, even if your first few attempts aren’t perfect, every cookie is a learning opportunity (and still tastes pretty darn good). Now go forth and make those stars shine!