How to Decorate a Cake for Beginners (A Foolproof Guide to Smooth Frosting!)
How to Decorate a Cake for Beginners (A Foolproof Guide to Smooth Frosting!)
You’ve seen them. Those impossibly perfect cakes on social media, with sides so smooth you could check your reflection in them and edges so sharp they could cut glass. Then you remember your last attempt at frosting a cake—a lumpy, crumb-filled, slightly lopsided disaster that looked less like a celebration and more like it had survived a natural disaster. The gap between expectation and reality can be a cruel, buttercream-smeared place.
But what if I told you that a beautiful, professional-looking cake is not the result of magic, a secret family curse, or a deal with a pastry devil? What if I told you it’s just a simple, learnable technique? Today, my friend, you’re going to learn how to decorate a cake, and you’re going to unlock the one simple secret that the pros use to achieve that flawless finish. Prepare to have your mind blown.
Why Learning This Skill Is a Total Game-Changer
This isn’t a recipe; it’s a superpower. Mastering the basics of cake decorating will fundamentally change your baking life. Here’s why you need this skill in your arsenal.
First, it transforms your baking from “homemade” to “wow, you made that?!” A delicious cake is one thing, but a delicious cake that also looks stunning? That’s next-level. This is the skill that elevates your creations from a tasty snack to the undisputed centerpiece of any party or celebration.
Second, it’s surprisingly therapeutic. There is something incredibly satisfying about the process of taking a naked cake and turning it into a smooth, beautiful work of art. The rhythmic turning of the cake, the smooth glide of a spatula, the final, perfect finish—it’s like edible art therapy. Cheaper than a therapist, and you get to eat the results.
Finally, it builds incredible baking confidence. Nailing a smooth frosting finish is a huge accomplishment. It demystifies the process and makes you realize that those “professional” techniques are totally within your reach. Once you conquer this, you’ll feel like you can tackle any baking project.
Your “Ingredients” for a Beautiful Cake

We’re not talking about flour and sugar here. We’re talking about the key components you need to start your decorating journey.
- A Fully Cooled Cake: You’ll need a baked and completely, utterly, 100% cooled layer cake. A slightly chilled cake is even better. We’ll be working with two 8-inch or 9-inch round layers for this guide.
- A Sturdy Buttercream Frosting: You need a good amount of a sturdy, smooth frosting. A classic American buttercream, a Swiss meringue, or an Italian meringue buttercream are all perfect. A thin glaze or a soft whipped cream frosting won’t work for this smooth-finish technique. You’ll need about 4-5 cups.
- Optional Decorations: This is the fun part! Sprinkles, a chocolate drip, fresh fruit, or more piped frosting details.
The Decorator’s Essential Toolkit

Having the right tools is the difference between a frustrating mess and a joyful success. These are the non-negotiables for a smooth finish.
- A Cake Turntable: This is the #1 most important tool. It allows you to spin the cake, keeping your hands steady while creating a perfectly smooth finish. It’s a total game-changer.
- An Offset Spatula: A long, thin spatula with a bent handle. It’s like an extension of your hand and is perfect for applying and smoothing frosting on the top and sides. Having a large and a small one is ideal.
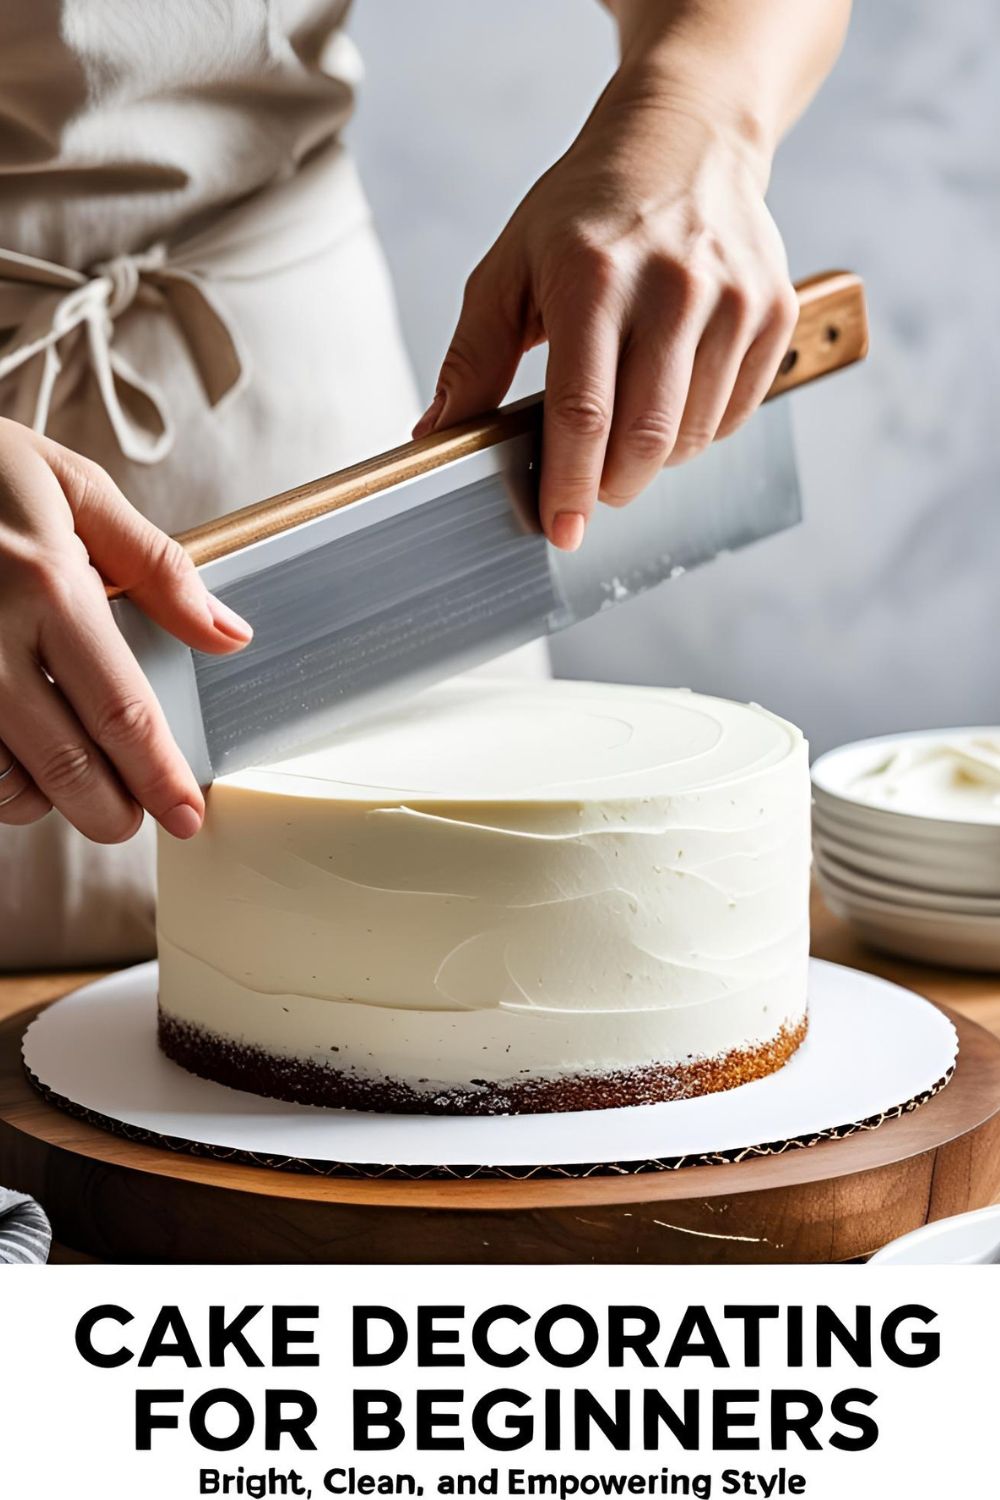
- A Bench Scraper (or Icing Smoother): This is the secret weapon. A tall, flat piece of metal or plastic that creates those flawlessly smooth sides.
- A Long Serrated Knife or a Cake Leveler: For the crucial first step of leveling your cake layers.
- Cardboard Cake Circles: These thin cardboard rounds, the same size as your cake, provide a stable base for building and moving your cake.
- Piping Bags and Tips (Optional): If you want to add decorative borders or swirls at the end.
Step-by-Step: From Naked Cake to Stunning Masterpiece
This is the process the pros use. We’ll break it down into simple, manageable stages. Don’t be intimidated!
Phase 1: The Foundation
- Level Your Cakes: Your baked cake layers probably have a domed top. We must vanquish the dome! Once your cakes are completely cool, use a long serrated knife or a cake leveler to carefully slice off the top, creating a perfectly flat surface. A flat foundation is the key to a stable, non-lopsided cake. (Feel free to eat the scraps. This is the baker’s tax.)
- Secure the Base: Place a small dollop of frosting in the center of your cardboard cake circle, then place your first cake layer on top. This “glues” the cake to the board. Now place this on your cake turntable.
Phase 2: The Filling and Stacking
- The Filling: Scoop about a cup of frosting onto your first cake layer. Use your offset spatula to spread it into a smooth, even layer right to the edges. If you’re using a different filling, like jam or custard, pipe a border of stiff buttercream around the edge of the cake layer first to create a “dam” that will keep the softer filling from oozing out.
- Stack It Up: Carefully place your second leveled cake layer, top-side-down, on top of the filling. Placing it upside down gives you a perfectly flat, crumb-free surface to work with. Gently press down to make sure it’s secure.
Phase 3: The Secret Weapon – The Crumb Coat
- What is a Crumb Coat? This is the most important secret of cake decorating. A crumb coat is a thin, messy layer of frosting that you apply all over the cake to trap any loose crumbs.
- Apply It: Scoop some frosting onto the top of the cake and use your offset spatula to spread it thinly over the top and down the sides. It doesn’t have to be pretty! Scrape off any excess with your bench scraper. The goal is to create a thin, almost see-through layer that locks in all the crumbs.
- THE MANDATORY CHILL: Carefully place your crumb-coated cake in the refrigerator for at least 30-45 minutes, or until the frosting is firm to the touch. This is not optional. This step ensures that no pesky crumbs will get into your beautiful final coat of frosting.
Phase 4: The Flawless Final Coat
- Apply Generously: Once your crumb coat is firm, apply a much thicker, more generous layer of frosting all over the top and sides of the cake. Be liberal with it—it’s easier to scrape frosting off than it is to add more later.
- Smooth the Sides: Take your bench scraper. Hold it straight up and down, perpendicular to the turntable, with the bottom edge just touching the turntable surface. Gently press it against the side of the cake. Now, hold your scraper hand steady and use your other hand to spin the turntable in one smooth, continuous motion. This will scrape off the excess frosting and create a beautifully smooth side. Scrape the excess frosting from your bench scraper back into the bowl and repeat until you’re happy.
- Smooth the Top: You’ll now have a “crown” or lip of frosting around the top edge of your cake. Take your small offset spatula, hold it parallel to the cake top, and gently swipe the excess frosting from the outer edge towards the center of the cake in one smooth motion. Wipe your spatula clean between each swipe.
Congratulations. You have just frosted a cake like a professional.
Design Principles & Pro Tips (The “Nutrition” of Decorating)
This isn’t about calories; it’s about the core principles that guarantee success.
- Cold is Your Best Friend: A cold, firm cake is a stable cake. It’s easier to handle, produces fewer crumbs, and won’t melt your frosting. Always work with a fully cooled or even chilled cake.
- Frosting Consistency Matters: Your buttercream should be smooth, creamy, and easily spreadable, like the texture of a thick mayonnaise. If it’s too stiff, it will tear your cake. If it’s too soft, it won’t hold its shape.
- Even Pressure is Key: When you’re using your bench scraper, the goal is to apply gentle, even pressure and let the turntable do all the work.
Common Decorating Disasters to Avoid

Don’t let these simple mistakes ruin your beautiful creation.
- Frosting a Warm Cake. This is the cardinal sin of cake decorating. I don’t care how impatient you are. If you try to put buttercream on a warm cake, it will melt into a greasy, heartbreaking, soupy puddle of sadness. Your cake must be completely, utterly, unquestionably cool.
- Skipping the Crumb Coat. Thinking you can achieve a perfect, crumb-free finish in one go is the kind of reckless optimism that leads to disaster. You will get crumbs in your final coat. It will look messy. It will mock you. The crumb coat is not optional. It is the law.
- Using a Flimsy, Soft Frosting. A thin glaze or a very soft, un-stabilized whipped cream will not work for this smooth-finish technique. You need a sturdy buttercream that can hold its shape.
- Building on a Wobbly Foundation. If your cake layers are domed and uneven, you’re trying to build a beautiful skyscraper on a lumpy hill. It will be lopsided and unstable. Level your cake layers!
Easy Decorating Ideas Beyond the Smooth Finish
Now that you have a perfectly frosted canvas, you can get creative!
- The Rustic “Swoopy” Finish: The easiest and most forgiving technique. Instead of using a bench scraper, simply use the back of a spoon or your small offset spatula to press into the frosting and create beautiful, rustic swoops and swirls all over the cake.
- The Sprinkle Explosion: The most joyful decoration. Place your frosted, chilled cake on a baking sheet to catch the mess. Take handfuls of your favorite sprinkles and gently press them onto the sides and top of the cake.
- The Elegant Chocolate Drip: A simple but incredibly impressive look. Make a simple chocolate ganache (equal parts chocolate and hot cream). Let it cool until it’s slightly thickened but still pourable. Gently spoon the ganache around the top edge of your chilled cake, letting it drip artfully down the sides.
Your Burning Decorating Questions, Answered
Let’s tackle some of the most common beginner questions.
How do I get my frosting really perfectly smooth?
The secret combo is a turntable, a bench scraper, and chilled cake. For an extra-sharp finish, you can heat your metal bench scraper under hot water, wipe it completely dry, and then do one final, smooth spin around the cake.
Why are there so many crumbs in my frosting?
You either skipped the crumb coat, or you didn’t chill your crumb-coated cake for long enough, allowing the crumbs to mix into your final layer.
Can I decorate a cake with whipped cream?
Yes, but it’s much softer and more difficult to get a perfectly smooth finish. It’s best to use a stabilized whipped cream (with added gelatin or cream cheese) and to keep the cake refrigerated at all times.
How do I fix a lopsided cake after I’ve stacked it?
If it’s just slightly off, you can often use your frosting to create an illusion of evenness by adding a little extra on the lower side. If it’s very lopsided, it means your layers weren’t level to begin with. Prevention is the best cure here!
How far in advance can I decorate a cake?
A buttercream-covered cake can be decorated 1-2 days in advance. Store it in the refrigerator to keep it firm and fresh, then let it sit at room temperature for an hour or so before serving.
What’s the easiest way to write on a cake?

For beginners, the easiest way is to practice on a piece of parchment paper first. Use a piping bag with a small, round piping tip (like a Wilton #3).
My buttercream is too stiff/too runny. How do I fix it?
If it’s too stiff, beat in a tiny bit of milk or cream, one teaspoon at a time. If it’s too runny (usually because the butter was too soft), you can try chilling it in the fridge for 20 minutes to firm it up, or beat in more sifted powdered sugar.
Final Thoughts
You did it. You took a couple of naked cake layers and, through the beautiful magic of technique and a little bit of patience, you transformed them into a stunning work of art. You are no longer just a baker; you are a cake decorator. You are an artist. You have conquered the crumb coat and you have mastered the smooth finish.
So go forth. Be creative. Cover your next cake in sprinkles or elegant swirls. And never again be intimidated by those perfect-looking cakes online. You know the secret now.