How to Cook Frozen Shrimp (And Have Dinner Ready in 15 Minutes)
It’s 6 PM. You’re staring into the abyss of your refrigerator, and it’s a wasteland of sad-looking vegetables and questionable leftovers. Dinner feels like an impossible task. But wait! You remember that bag of frozen shrimp you bought weeks ago, a solid, icy block of good intentions. Is it too late? Do you have to wait hours for it to thaw? Nope. I’m here to tell you that bag of frozen shrimp is your secret weapon, your ticket to a ridiculously fast and delicious meal. Today, you are going to learn how to cook frozen shrimp like a pro, turning that freezer staple into a gourmet-quality dinner in about 15 minutes flat.
Why This Method Is Awesome (It’s Your Weeknight Savior)
Let’s be real, remembering to thaw things ahead of time is a skill possessed by only the most organized among us. This guide is for the rest of us. This method is awesome because:
- It’s Incredibly Fast: We’re talking from-frozen-solid-to-on-your-plate in about 15 minutes. It’s faster than waiting for a food delivery service in Khulna, I promise.
- It Guarantees Perfect Texture: Forget rubbery, tough shrimp. We’re using a quick-thaw method and a fast-sear that results in plump, juicy, and perfectly tender shrimp every single time.
- It Debunks the “Fresh is Best” Myth: Fun fact! Most “fresh” shrimp you see at the grocery store was previously frozen anyway. Buying frozen means the shrimp were likely flash-frozen at sea, locking in that fresh-from-the-ocean flavor. You’re basically a seafood connoisseur.
- It’s Versatile: Once you master this basic thaw-and-cook method, you can use it for countless recipes.
To showcase this magic, we’re going to make the ultimate fast and fancy meal: a 10-Minute Garlic Butter Shrimp that tastes like it came from a nice restaurant.
Ingredients: Your 10-Minute Ticket to Glory

This is for our star recipe, the Garlic Butter Shrimp. It’s simple, elegant, and packed with flavor.
- 1 pound large frozen raw shrimp, peeled and deveined
- 3 tablespoons unsalted butter
- 1 tablespoon olive oil
- 4-6 cloves garlic, minced (don’t be shy!)
- ¼ teaspoon red pepper flakes (optional, for a little kick)
- ¼ cup chicken or vegetable broth (or dry white wine)
- Juice of ½ a lemon (about 1 tablespoon)
- 2 tablespoons fresh parsley, finely chopped
- Salt and black pepper to taste
A Very Important Note on Your Shrimp:
- For the best results, buy shrimp that is already peeled and deveined. It saves you a ton of time and hassle. Raw is better than pre-cooked for this recipe, as pre-cooked shrimp will get tough and rubbery when you heat it again.
Tools & Kitchen Gadgets Used: Your Speedy Seafood Station
- A Large Skillet (12-inch is great, non-stick or stainless steel works)
- A Large Bowl
- A Colander
- Tongs
- A Garlic Press (makes mincing a breeze)
- Paper Towels
Step-by-Step Instructions: From Ice Block to Masterpiece

This is a two-act play: the thaw, and the sizzle. Both are incredibly fast.
Act 1: The 5-Minute Thaw Down (The Life-Changing Hack)
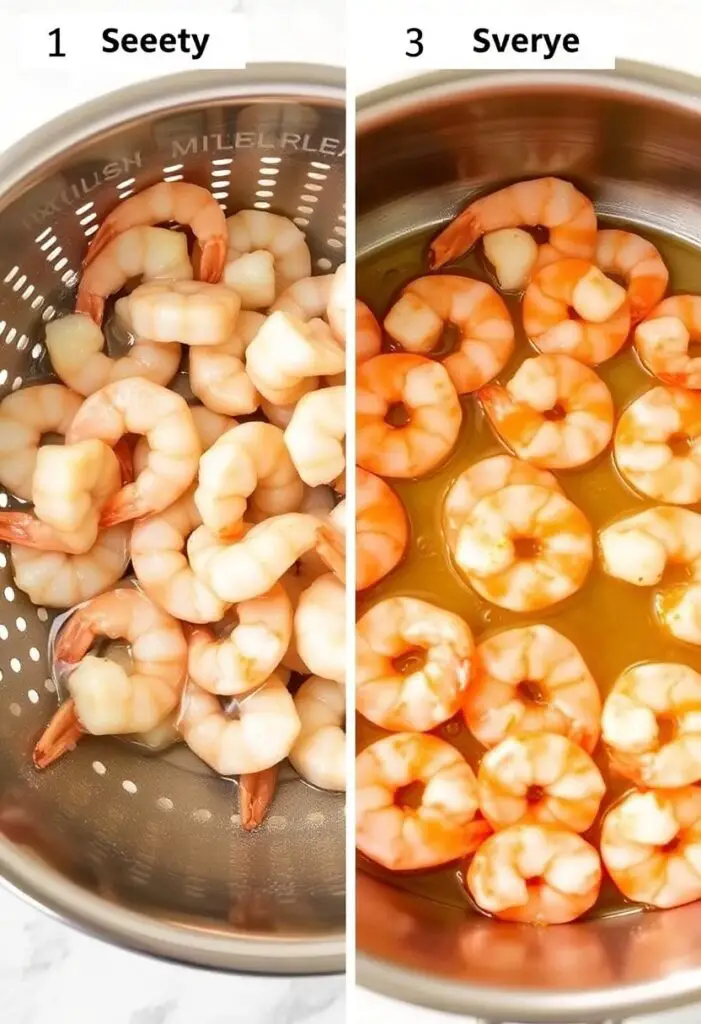
- Free the Shrimp: Open your bag of frozen shrimp and place the icy block into your colander.
- The Cold Water Trick: Place the colander in the sink and run cold tap water over the shrimp. Use your hands to gently break apart the shrimp as they start to thaw.
- Keep It Moving: Continue to run the cold water over them, tossing them occasionally in the colander, for about 3-5 minutes. They will thaw incredibly quickly. Do not use hot water! Hot water will start to cook the outside of the shrimp, leading to an uneven, rubbery texture.
- Pat Them Bone Dry: Once the shrimp are fully thawed, you must pat them completely dry with paper towels. A dry shrimp will get a beautiful sear; a wet shrimp will steam and become tough. This is a non-negotiable step for perfect texture.
Act 2: The 10-Minute Sizzle (Garlic Butter Shrimp)
- Heat the Pan: Place your large skillet over medium-high heat. Add the butter and olive oil.
- Sauté the Aromatics: Once the butter is melted and foamy, add the minced garlic and red pepper flakes (if using). Sauté for about 30 seconds, stirring constantly, until fragrant. Be careful not to burn the garlic!
- Sear the Shrimp: Add your dry, thawed shrimp to the hot pan in a single layer. Do not overcrowd the pan; cook in batches if you need to. Season with a pinch of salt and pepper.
- Cook for 1-2 Minutes Per Side: Shrimp cook in a flash! Cook them for about 1-2 minutes on the first side, until they start to turn pink and opaque. Flip them with your tongs.
- Deglaze and Finish: Once you flip the shrimp, immediately pour in the chicken broth or white wine and the lemon juice. Let it bubble and sizzle for another 1-2 minutes, until the shrimp are completely pink, opaque, and curled into a “C” shape.
- The Grand Finale: Remove the skillet from the heat. Stir in the fresh parsley. Taste the sauce and add more salt and pepper if needed. Serve immediately.
Calories & Nutritional Info (Per Serving, Estimated)
This is a light, healthy, and satisfying meal. (This is for one serving of the garlic butter shrimp, assuming 4 servings.)
- Estimated Calories per serving: ~250-300 calories
- Protein: ~20-25g (An excellent lean source!)
- Fat: ~15g
- Carbohydrates: <5g
Common Mistakes to Avoid: Don’t Commit These Shrimp Sins!
Avoid these pitfalls for perfect, plump shrimp every time.
- Thawing with Hot Water or the Microwave: This is the fastest way to ruin your shrimp. It cooks them unevenly and makes them rubbery before they even hit the pan. Only use cold water.
- Not Drying the Shrimp: A wet shrimp will steam in the pan, resulting in a pale, tough, and sad little crustacean. Pat them bone dry for a perfect sear.
- The Biggest Crime: Overcooking. Shrimp go from perfectly tender to rubbery bouncy balls in about 30 seconds. As soon as they are opaque and curled into a “C” shape, they are done. If they curl into a tight “O” shape, they are overcooked.
- Overcrowding the Pan: If you pile all the shrimp in at once, you’ll lower the pan’s temperature and they will steam instead of sear. Give them space!
Variations & Customizations: Your Shrimp, Your Adventure
Once you’ve mastered the basic technique, the possibilities are endless.
- Spicy Cajun Shrimp: After thawing and drying the shrimp, toss them with 1-2 teaspoons of Cajun seasoning before adding them to the pan. Serve over rice.
- Creamy Tuscan Shrimp: After sautéing the garlic, add a splash of white wine, some sun-dried tomatoes, and a handful of spinach. Let the spinach wilt, then stir in a ½ cup of heavy cream or coconut cream. Let it bubble, then add the shrimp to cook through.
- Quick Shrimp Tacos: Season the thawed, dry shrimp with chili powder and cumin. Sauté with some sliced onions and peppers. Serve in warm tortillas with your favorite taco toppings.
FAQ Section: All Your Frozen Shrimp Questions, Answered
You have questions about this freezer-aisle hero. I have the answers.
- Q: Can I cook the shrimp directly from frozen without thawing? A: You can, but it’s not ideal. It’s much harder to get an even cook and a good sear. The quick-thaw method is so fast (literally 5 minutes) that it’s always worth doing. If you absolutely must, you can add them frozen to a soup or a sauce, but the texture won’t be as good.
- Q: What is the absolute best way to thaw frozen shrimp? A: The cold running water method described above is the fastest. The absolute best quality method is to let them thaw overnight in a covered bowl in the refrigerator.
- Q: How do I know for sure when my shrimp is cooked? A: Look at the color and shape. Raw shrimp is translucent and gray. Cooked shrimp is pink and opaque. It will also curl from a straight shape into a nice “C” shape. A tight “O” shape means it’s overcooked.
- Q: Should I buy shrimp that’s raw or pre-cooked? Shell-on or peeled? A: For cooking, raw shrimp is always best, as pre-cooked shrimp will get rubbery when reheated. Peeled and deveined is the biggest time-saver you can buy. Shell-on has more flavor, but you have to peel them yourself.
- Q: What is that black line in the shrimp? A: That’s the shrimp’s digestive tract. While it’s not harmful to eat, it can have a gritty texture. “Deveining” is the process of removing it. Most peeled shrimp you buy will already be deveined.
- Q: How do I store leftovers? A: Store leftover cooked shrimp in an airtight container in the refrigerator for up to 2 days. Be careful when reheating—do it gently and just until warm to avoid making it rubbery.
- Q: Can I use this method for other frozen seafood, like scallops? A: Yes! The quick-thaw and pat-dry method works perfectly for other small, quick-cooking seafood like scallops or small fish fillets.
Final Thoughts: You Are Now a Freezer-to-Fabulous Pro
You’ve done it. You have unlocked the true potential of that humble bag of frozen shrimp. You are now a master of the 15-minute meal, a champion of the weeknight dinner, a true freezer-to-fabulous pro. So go forth, embrace the convenience, and never again be intimidated by a block of icy seafood. A delicious, elegant dinner is always just a few minutes away.