How to Cook a Whole Chicken (So Good It’ll Make You Brag)
Let’s be real: staring down a whole, raw chicken can feel a bit…intimidating. It’s got bones, it’s got skin, it’s got a mysterious cavity (that you’ll probably forget to check for giblets, no judgment). You might be thinking, “Isn’t it easier to just buy a rotisserie chicken from the supermarket?” And sure, it is. But is it better? Absolutely not. Today, we’re going to demystify the noble art of how to cook a whole chicken, transforming it into a juicy, tender, golden-skinned masterpiece that will make you feel like a culinary god. And honestly, it’s way easier than you think.
Why This Roast Chicken Is Awesome (It’s a Flavor, Budget, and Meal Prep MVP)
So, why put in the (minimal) effort to roast a whole bird when the grocery store beckons? Because this method offers a trifecta of awesomeness:
- Insane Flavor & Juiciness: We’re talking crispy, deeply golden skin and meat that practically melts off the bone. No dry breasts allowed!
- Budget-Friendly Brilliance: Whole chickens are often way cheaper per pound than buying individual cuts. You get more bang for your buck, FYI.
- Meal Prep MVP: One perfectly roasted chicken can become dinner tonight, then sandwich meat, salad toppers, or even chicken stock for tomorrow. It’s the gift that keeps on giving.
- Impress Your Guests (or Yourself!): There’s something undeniably impressive about placing a perfectly roasted whole chicken on the table. Your family will think you slaved all day, but we both know better. 😉
This isn’t just about cooking; it’s about reclaiming your kitchen confidence and discovering the pure joy of a perfectly roasted bird.
Ingredients: Your Golden Chicken Brigade
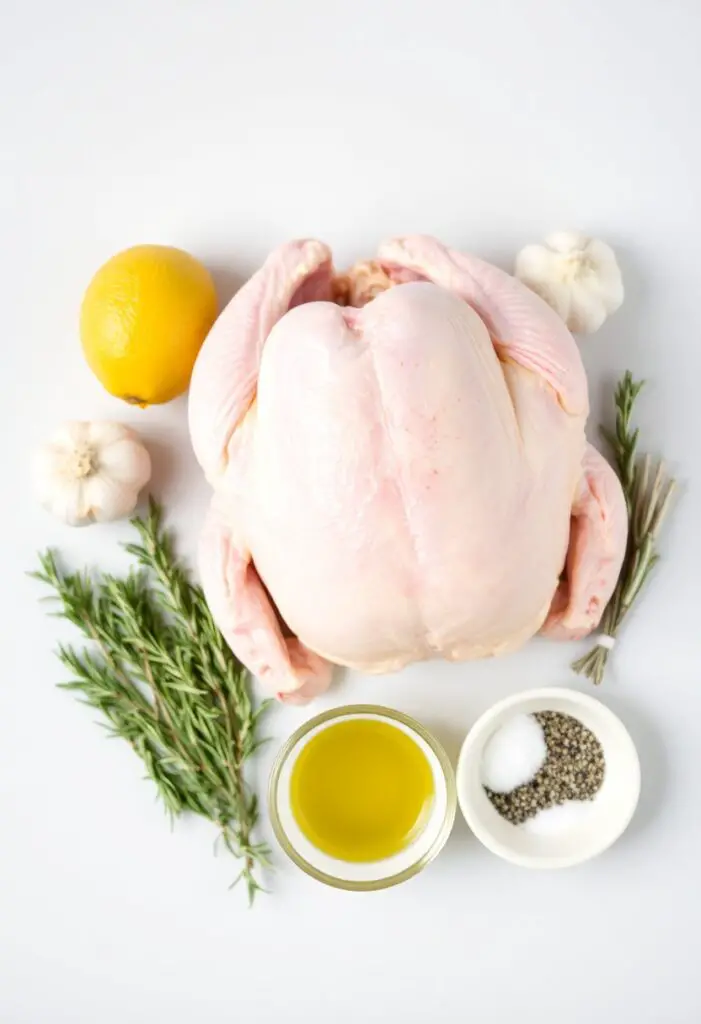
Keep it simple, let the chicken shine.
- 1 whole chicken, 3-4 pounds (giblets and neck removed from cavity, if included)
- 2 tablespoons olive oil (or melted butter)
- 1 tablespoon kosher salt
- 1 teaspoon black pepper
- 1 teaspoon garlic powder
- ½ teaspoon smoked paprika (optional, but adds great color and flavor)
- 1 lemon, halved
- ½ head of garlic, cut in half horizontally (don’t even bother peeling!)
- A few sprigs of fresh rosemary or thyme (optional, but lovely aromatics)
- Optional for a veggie base: 1 large onion, roughly chopped; 2 carrots, roughly chopped; 2 celery stalks, roughly chopped
The Secret to Success: The Bird Itself
- Go for a fresh, plump chicken. If it’s frozen, make sure it’s fully thawed. And seriously, check that cavity for the giblets. No one wants an extra surprise in their gravy.
Tools & Kitchen Gadgets Used: Your Roasting Command Center
You probably have most of these already!
- Roasting Pan with a Rack (Or a large oven-safe dish with a wire rack that fits inside. This lifts the chicken for even cooking and crispy skin.)
- Sharp Knife or Kitchen Shears (For spatchcocking, if you choose that path.)
- Cutting Board
- Small Bowl (For mixing seasonings.)
- Paper Towels
- Pastry Brush (For applying oil, if you’re fancy.)
- Tongs (For maneuvering the hot bird.)
- Instant-Read Meat Thermometer (Your absolute best friend for perfectly cooked chicken!)
- Aluminum Foil (For resting the chicken.)
Step-by-Step Instructions: The Journey to Roasted Perfection

Follow these steps, and prepare for glory (and delicious smells).
Act 1: The Prep Work (It’s All About That Dry Skin)
- Pat It Dry (Seriously!): Remove the chicken from its packaging. Reach into the cavity and remove the giblets and neck. Seriously, don’t forget this. Pat the entire chicken, inside and out, thoroughly dry with paper towels. This is CRITICAL for crispy skin. A wet bird steams, a dry bird roasts.
- Seasoning Blend: In your small bowl, mix together the kosher salt, black pepper, garlic powder, and smoked paprika. This is your flavor power-up.
- Rub Down: Drizzle the olive oil (or melted butter) all over the chicken, then use your hands to rub it evenly over the skin. Now, sprinkle your seasoning blend generously over the entire chicken, rubbing it into every nook and cranny. Don’t forget the underside!
- Aromatics: Stuff the lemon halves, garlic halves, and fresh herbs into the chicken’s cavity. These infuse incredible flavor from the inside out.
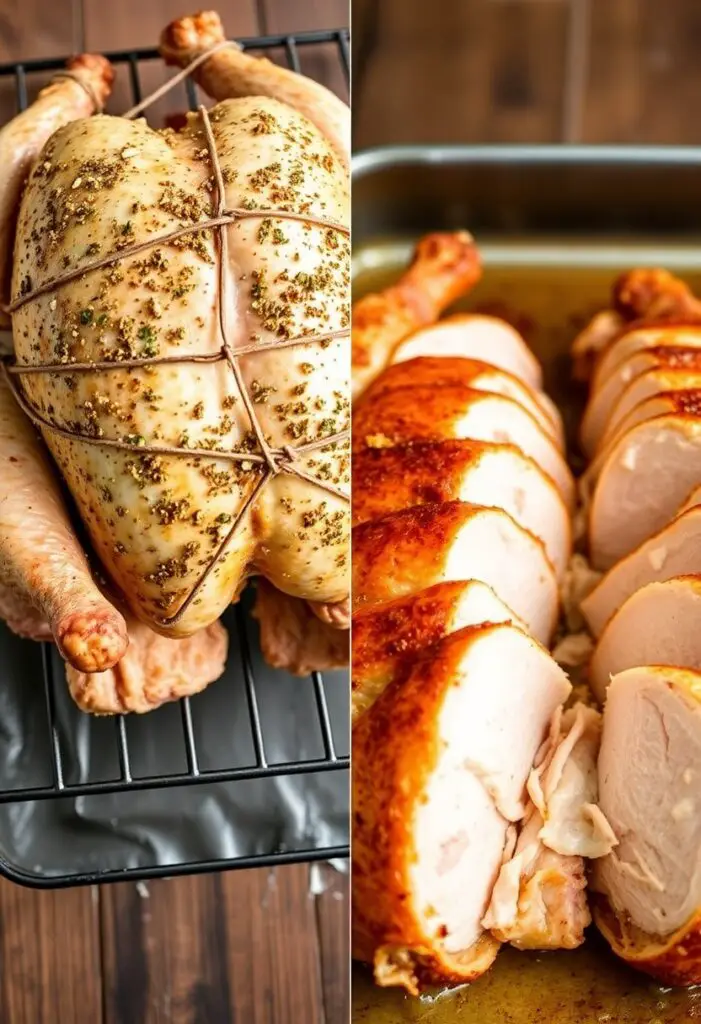
- Truss (Optional, but Recommended): You can gently tuck the wing tips under the chicken (they burn easily) and tie the legs together with kitchen twine. This helps the chicken cook more evenly and looks prettier. It’s not strictly necessary, but it’s a pro move.
Act 2: The Roast (Set It and Forget It… Mostly)
- Preheat Perfection: Preheat your oven to a glorious 425°F (220°C). This high heat is key for that initial skin crisping.
- Veggie Base (Optional): If using, scatter the chopped onion, carrots, and celery in the bottom of your roasting pan. Place the wire rack on top.
- Chicken on the Rack: Place the seasoned chicken, breast-side up, on the wire rack in the roasting pan. The rack keeps the chicken elevated, allowing air to circulate and ensuring crispy skin all around.
- Initial Blast: Roast the chicken at 425°F (220°C) for 20-25 minutes. This high heat kickstarts the browning.
- Lower the Heat: After 20-25 minutes, reduce the oven temperature to 375°F (190°C). Continue roasting for another 45-60 minutes, or until a meat thermometer inserted into the thickest part of the thigh (without touching the bone!) reads 165°F (74°C).
- Golden Goddess: If the skin isn’t as golden as you’d like in the last 10 minutes, you can crank the heat back up to 400-425°F (200-220°C) or even use the broiler for a minute or two (watch it like a hawk, it can burn fast!).
Act 3: The Rest & Carve (Patience, Young Grasshopper)
- The Sacred Rest: This is another CRITICAL step. Once the chicken reaches 165°F, remove it from the oven and transfer it to a clean cutting board. Tent it loosely with aluminum foil and let it rest for 10-15 minutes. Seriously, just walk away. This allows the juices to redistribute throughout the meat, resulting in an incredibly juicy bird. Cutting it too early is a crime against juiciness.
- Carve It Up: After resting, carve the chicken into pieces. It will be so tender, it practically falls apart.
- Serve & Bask: Serve your magnificent roasted chicken with a side of pan drippings (if you made them) and bask in the glory.
Calories & Nutritional Info (Per Serving, Estimated)
This is wholesome, satisfying goodness. (Estimates vary based on chicken size, skin consumption, etc. This assumes about 4 servings from a 3-4lb bird.)
- Estimated Calories per serving: ~400-550 calories
- Protein: ~40-50g (lean muscle builder!)
- Healthy Fats: Good fats from the skin and meat (if you eat the skin, which you should!).
- Vitamins & Minerals: A good source of B vitamins, phosphorus, and selenium.
Common Mistakes to Avoid: Don’t Ruin Your Bird!
Even the simplest things can go wrong. Learn from my (and others’) past mistakes!
- Not Drying the Skin: Repeat after me: Drier skin equals crispier skin! Seriously, pat it down like you’re preparing it for a beauty pageant.
- Forgetting the Giblets: I’ve done it. My friend did it. Don’t be us. Check that cavity. You don’t want a surprise liver in your gravy.
- Not Seasoning Enough: Chicken is bland if you don’t season it well. Be generous, especially with salt. It creates flavor and helps with crisping.
- Skipping the Rest: Cutting into the chicken too soon is like opening a dam. All those beautiful, flavorful juices will flood your cutting board, leaving you with dry meat. Patience, grasshopper.
- Overcooking: This is the ultimate sin. A dry breast is a sad, sad thing. Use a meat thermometer! Seriously, it’s your best friend.
Variations & Customizations: Your Chicken, Your Rules
Once you master the basic roast, the world is your oyster (or, you know, your chicken).
- Spatchcocked Chicken (Butterflied): This involves cutting out the backbone so the chicken lays flat. It cooks much faster and more evenly, resulting in unbelievably crispy skin. Just Google “how to spatchcock a chicken” for a quick tutorial. It sounds scary, but it’s easy with good kitchen shears!
- Herbed Lemon Garlic Chicken: Add extra minced fresh rosemary, thyme, and finely chopped garlic to your olive oil and seasoning rub. You can even add some lemon zest.
- Spicy Peri-Peri Inspired Roast: Mix your olive oil with a generous amount of peri-peri seasoning, a pinch of cayenne, garlic powder, and paprika. Rub it all over the chicken for a fiery kick.
FAQ Section: All Your Chicken Questions, Answered
You’ve got questions about this majestic bird. I’ve got answers.
- Q: What temperature should a whole chicken be cooked to? A: A whole chicken is safely cooked when it reaches an internal temperature of 165°F (74°C) in the thickest part of the thigh, without touching the bone.
- Q: How long does it take to cook a whole chicken? A: For a 3-4 pound chicken, typically around 1 hour to 1 hour and 15 minutes using this method (20-25 mins at 425°F, then 45-60 mins at 375°F). Always go by temperature, not just time!
- Q: Should I brine my chicken? A: Brining can definitely add moisture and flavor, especially if you tend to overcook chicken. However, with this method and proper resting, it’s often not necessary. If you want to try it, a simple salt and sugar brine works wonders.
- Q: What can I do with the pan drippings? A: Oh, the pan drippings are liquid gold! You can spoon them directly over the carved chicken, or you can use them to make an incredible gravy. Just skim off excess fat, deglaze the pan with some chicken broth or wine, and thicken with a cornstarch slurry.
- Q: My chicken breast always dries out, but the thighs aren’t done! Help! A: This is a common problem! Different parts of the chicken cook at different rates. Trussing the chicken (tying the legs together) helps. Also, you can try spatchcocking for more even cooking. And of course, don’t overcook to thermometer readings higher than 165°F.
- Q: Can I stuff the chicken with stuffing? A: You can, but it significantly increases cooking time, and the stuffing needs to reach 165°F for safety. IMO, it’s better to cook stuffing separately to avoid a dry chicken or undercooked stuffing. Stick to aromatics like lemon and herbs inside the cavity.
- Q: How do I store leftover roasted chicken? A: Once completely cooled, carve any remaining meat off the bones and store it in an airtight container in the refrigerator for up to 3-4 days. You can also freeze it for up to 3 months. Don’t toss those bones! Make chicken stock!
Final Thoughts: You Are Now a Roast Chicken Master
You’ve faced the whole chicken, and you’ve conquered it. You’ve created a juicy, crispy, flavor-packed masterpiece that will fuel your week and impress everyone who tastes it. Go forth, my friend, and roast with confidence! The days of boring, dry chicken are officially over. TBH, you’ll never look at a store-bought rotisserie chicken the same way again.