How to Color Gum Paste Like a Pro (Without Staining Everything You Own)
You did it. You spent hours crafting the most delicate, paper-thin petals for a sugar rose that would make a real rose jealous. It’s a masterpiece of engineering, a testament to your patience. There’s just one problem: it’s stark, boring white. And now you’re staring at it, holding a tiny pot of food coloring, paralyzed by the fear of turning your pristine creation—and your hands, and your countertop—into a Pollock-esque disaster. Sound familiar? Today, we’re going to demystify how to color gum paste, and I promise it’s way easier and less messy than you think.
Forget buying a dozen different tubs of pre-colored paste. We’re about to unlock the secret to creating any shade your heart desires, from the palest pastel to the most vibrant, punchy hue. Get ready to become the color-mixing virtuoso of the cake decorating world.
Why Mastering This Technique Is a Power Move
So, why not just buy the pre-colored stuff and call it a day? Where’s the fun in that? Here’s why you need this skill in your baker’s toolkit.
First, you get unlimited creative freedom. Want a very specific shade of periwinkle to match the party invitations? Need a muted sage green that doesn’t scream “Christmas”? When you mix your own colors, you’re the artist. You have total control to create custom shades that you’ll never find in a store.
Second, it looks so much more professional. Achieving deep, rich colors or soft, realistic gradients instantly elevates your sugar art from “homemade” to “how’d-you-do-that?!” Your sugar flowers will look more lifelike, and your cake toppers will have that polished, expert finish.

Finally, it’s way more economical. A few good-quality gel colors and a big tub of white gum paste will last you way longer and cost you far less than buying individual containers of every color under the sun. It’s just smart baking.
The ‘Ingredients’ (aka Your Coloring Arsenal)
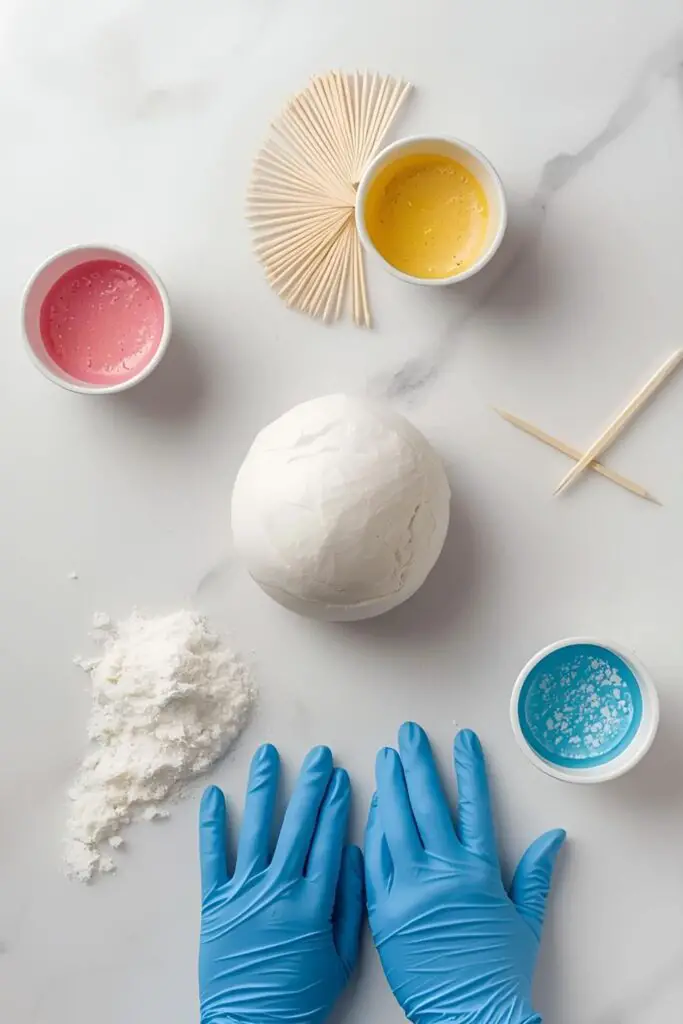
This isn’t a recipe you eat, but you still need the right stuff. Think of this as your art supply list.
- White Gum Paste: You can use your favorite store-bought brand (like Wilton or Satin Ice) or a trusty homemade recipe. This is your blank canvas.
- GEL Food Coloring: I cannot stress this enough—you must use gel coloring. The concentrated gel adds intense color without adding extra liquid, which would turn your paste into a sticky, unusable nightmare.
- Vegetable Shortening: A little dab of this on your hands and work surface is the secret to preventing sticking and making kneading a dream. It’s like magic.
- Cornstarch or Powdered Sugar: For dusting your work surface if things get a little tacky.
Tools & Kitchen Gadgets Used
You don’t need a fancy studio, just a few key items to keep things clean and controlled.
- Food-Safe Disposable Gloves: Unless you want to sport multi-colored Smurf hands for three days, these are your best friend. Non-negotiable, IMO.
- Toothpicks: The perfect tool for adding a tiny, controlled amount of gel color. Never, ever squeeze the color directly onto the paste.
- Non-stick Silicone Mat or Parchment Paper: To protect your countertops and provide a smooth, clean surface to work on.
- Plastic Wrap: Gum paste’s mortal enemy is air. You’ll need this to wrap your paste the second you’re not actively working with it.
- Airtight Bags or Containers: For storing your beautifully colored gum paste for future projects.
Step-by-Step Instructions: Let’s Make Some Magic
Ready to transform that pale lump of paste into a vibrant work of art? Let’s dive in.
Step 1: Suit Up and Prep Your Station
First things first: put on your gloves. Seriously. Rub a very thin layer of vegetable shortening onto your gloved hands and onto your non-stick mat. This creates a barrier that stops the gum paste from sticking to everything it touches.
Step 2: Condition the Gum Paste
Take the amount of white gum paste you want to color and begin kneading it on your prepared mat. Work it for a minute or two until it’s soft, smooth, and pliable. This “wakes up” the paste and makes it ready to accept the color evenly.
Step 3: The Moment of Truth – Adding Color

Dip the tip of a clean toothpick into your gel food coloring. You only need a tiny amount—think a small speck. Now, streak that color across the surface of your kneaded gum paste. Don’t poke a hole; just wipe the color off the toothpick and onto the paste.
Step 4: Knead, Fold, and Repeat
Now, start kneading the color into the paste. Fold the gum paste over onto itself, press down, turn it, and repeat. At first, it will look streaky and marbled (which is a cool effect in itself!). Just keep kneading until the color is completely uniform and there are no streaks left. This can take a few minutes of solid kneading.
Step 5: Assess and Deepen the Color
Hold up your colored paste. Is it the shade you want? Remember two things:
- It’s always easier to add more color than to take it away. If it’s too light, simply repeat Step 3 with another tiny speck of color.
- The color will deepen as it rests. Like buttercream, the color will develop and become more intense after about 30-60 minutes. So, it’s best to aim for a shade slightly lighter than your final goal.
Step 6: Store It Right
Once you’ve achieved your perfect color, immediately wrap the gum paste tightly in plastic wrap, squeezing out all the air. Then, place the wrapped ball into an airtight bag or container. This prevents it from drying into an unusable rock.
Calories & Nutritional Info

Let’s have a little chat about this. Are you supposed to eat gum paste?
- Serving Size: 1 decorative flower
- Estimated Calories per Serving: Who cares? You’re not supposed to eat it.
- Nutritional Note: Gum paste is technically edible but not intended for consumption. It’s made of sugar, but it dries rock-hard and has the texture of chalk. Think of it as a beautiful, sugary craft supply. Make your cake pretty with it, then remove the decorations before serving. Problem solved.
Common Mistakes to Avoid (The Gum Paste Hall of Shame)
I’ve been there, done that, and stained the t-shirt. Learn from my cautionary tales.
- The Liquid Coloring Catastrophe: I know I keep saying it, but someone is going to try it. Do not use liquid food coloring. It will add too much moisture and turn your firm, workable gum paste into a sticky, weeping, unusable blob of despair.
- The “Hulk Smash” Color Squeeze: Squeezing a giant blob of gel color onto your paste because you’re impatient is a one-way ticket to a color that’s way too dark and hands that are stained for a week (even through cheap gloves). Use a toothpick. Less is more.
- Forgetting to Grease Up: If you don’t use that thin layer of shortening on your gloves and mat, the gum paste will stick, tear, and make you want to throw it against the wall. A little grease makes the whole process smooth and frustration-free.
- Leaving It Exposed to Air: Gum paste has one mission in life: to dry out. If you walk away for five minutes to answer a text and leave it uncovered, you’ll come back to a crusty, cracked mess. When in doubt, wrap it up.
Variations & Customizations (Beyond Basic Kneading)

Once you’ve mastered the basics, you can get really fancy with your coloring techniques.
- Coloring with Petal Dust: For hyper-realistic sugar flowers, this is the pro method. You create the flower in white or a very pale base color, let it dry completely, and then use soft, dry paintbrushes to apply colored petal dust. This allows you to add shading, depth, and delicate details that you can’t get with kneading alone.
- The Marbled Effect: This one is super easy and looks incredibly chic. Simply add your streaks of color with a toothpick, but only knead it a few times—just enough to create beautiful swirls and veins of color. This is perfect for a faux-marble look on cake tiers or decorations.
- Painting on Gum Paste: Once your gum paste shape is dry, you can paint on it! Mix gel food coloring with a few drops of a clear, high-proof spirit like vodka or lemon extract (the alcohol evaporates quickly). Use food-safe paintbrushes to paint fine details, patterns, or messages.
FAQ: Your Gum Paste Coloring Conundrums, Solved
What is the absolute best food coloring for gum paste?
Gel, gel, and more gel. High-quality, concentrated brands like Americolor, Chefmaster, or Wilton are fantastic because you need very little to get a deep color. For super dark colors like black or red, it’s worth buying the specific “Super Black” or “Red Red” formulas, as they are designed to get deep shades without affecting the paste’s texture.
My gum paste got super sticky after I added color. What did I do?
This can happen if you add a little too much gel color. The fix is easy: just knead in a tiny bit of cornstarch or powdered sugar until it returns to a smooth, non-sticky consistency. Add it sparingly!
How do I get a deep black or red without using a whole bottle of coloring?
Getting deep, dark colors from a white base is tough. The pros use a secret: start with a dark base. To get a true black, start by coloring your gum paste with brown or even by kneading it into chocolate-flavored paste first. Then, add your black gel color. You’ll get a deep, rich black using way less coloring.
Can I color fondant the same way?
Yes, you can! The exact same method of using gel coloring and kneading it in works perfectly for fondant. Fondant is a bit softer and stickier by nature, so you’ll definitely want to use that shortening and have some cornstarch on hand.
How long does colored gum paste last?
If you store it properly (tightly wrapped in plastic and in an airtight container), your colored gum paste can last for several weeks at room temperature. Just give it a good re-knead to soften it up before you use it again.
Why are my hands still stained after wearing gloves?
You probably used cheap, thin gloves that tore or were permeable. Invest in slightly thicker, better-quality disposable food-safe gloves. It’s worth the extra dollar to not have questionable stains on your hands for days.
Can I mix gel colors to create custom shades?
Absolutely! This is where the real fun begins. Mix a little blue and red for purple, yellow and red for orange, or get fancy and mix pink with a tiny speck of brown for a trendy dusty rose. The color wheel is your playground.
Final Thoughts
You are now officially a gum paste coloring expert. No longer will you be intimidated by a pot of white paste. You have the power to create any color in the universe to match any theme, mood, or whim. You are an artist, a creator, a sugar-crafting rockstar.
So go on, break out that tub of gum paste and those gel colors. Make something vibrant and beautiful. Create those lifelike flowers, those funky cake toppers, that perfect shade of teal you’ve been dreaming of. And the next time someone asks how you got such a perfect color, just wink and say, “Oh, you know. Magic.”