How to Make a Checkerboard Cake Without a Special Pan (Yes, Really!)
Have you ever seen a picture of a checkerboard cake and thought, “Wow, that’s literal magic”? That moment when it’s sliced, revealing a perfect, surprising pattern of alternating colors? It’s a total showstopper. Then you look up how it’s made and discover it requires a “special pan” with weird ring-thingies. And who, exactly, owns one of those? That’s where the dream usually dies. But not today. Today, we’re rebelling against single-use kitchen gadgets. I’m going to teach you how to make a checkerboard cake without a special pan, using tools you almost certainly already have.
Get ready to feel like a brilliant, resourceful baker and a bit of a kitchen wizard. We’re about to turn two boring, single-colored cakes into one mind-blowing, edible illusion. Your friends are going to think you’re a dessert genius. Let them.
Why This Baking Hack Is an Absolute Game-Changer
So, why go through the trouble of cutting and reassembling cake layers when you could just, you know, not? Because the payoff is HUGE, my friend.
First, the “WOW” factor is off the charts. Seriously. The look on people’s faces when you cut that first slice and reveal the hidden checkerboard pattern is priceless. It’s a guaranteed jaw-dropper at any birthday party, potluck, or bake-off.
Second, you don’t need to buy a special pan! Let’s be honest, that checkerboard pan set is a classic “buy it once, use it never” gadget that will just languish in the back of your cupboard, judging you. This method uses standard round cake pans that you already own. It’s resourceful, it’s clever, and it’s free.

Finally, it’s a ridiculously fun project. It feels less like baking and more like a satisfying, edible craft. If you love a good DIY project, this cake is calling your name. It’s your chance to play with your food in the most impressive way possible.
The “Ingredients” for Your Edible Illusion
For this trick, you’ll need two distinct cake batters and a good amount of frosting to act as our delicious “glue.”
- One Batch of Vanilla or White Cake Batter: This will make one 8-inch or 9-inch round cake layer. You can use your favorite from-scratch recipe or one standard-sized (15.25 oz) box of white or yellow cake mix.
- One Batch of Chocolate Cake Batter: This will also make one 8-inch or 9-inch round cake layer. Again, use your go-to scratch recipe or one standard-sized box of chocolate cake mix.
- A Generous Batch of Frosting: You’ll need enough to fill and frost a two-layer cake (about 4-5 cups). A simple vanilla or chocolate buttercream is perfect. It needs to be sturdy enough to hold the rings together.
A quick note: For the cleanest look, make sure your two cake batters are similar in density. Using two box mixes is a great way to ensure this!
The Magician’s Tools & Gadgets
Here’s where the magic happens. No special pan, just a few common household items.
- Two 8-inch or 9-inch Round Cake Pans: They must be the same size.
- Cardboard or Sturdy Cardstock: A thin cereal box or poster board works perfectly.
- A Ruler and a Pencil.
- A Compass OR Various Sized Round Objects for Tracing: Think bowls, lids, or biscuit cutters.
- A Sharp Paring Knife or an X-Acto Knife: For precise cutting.
- The Usual Baking Suspects: Mixing bowls, a mixer, spatulas, etc.
- A Cake Stand or Serving Platter: To present your masterpiece.
- An Offset Spatula: For a smooth, professional frosting finish.
Step-by-Step: The Ultimate Checkerboard Hack
Ready to feel like a baking genius? Follow these steps, and you’ll be amazed at what you can create.
Step 1: Bake Your Cakes
First, prepare your two cake batters. Bake one full vanilla cake and one full chocolate cake in your two identical round cake pans according to the recipe or box directions.

Let the cakes cool in their pans for about 15 minutes, then turn them out onto a wire rack to cool completely. This is crucial. A warm cake will crumble and break during the cutting phase. For best results, chill the cooled cake layers in the fridge for at least an hour to make them extra firm and easy to handle. Once cooled, use a long, serrated knife to level the tops so they are perfectly flat.
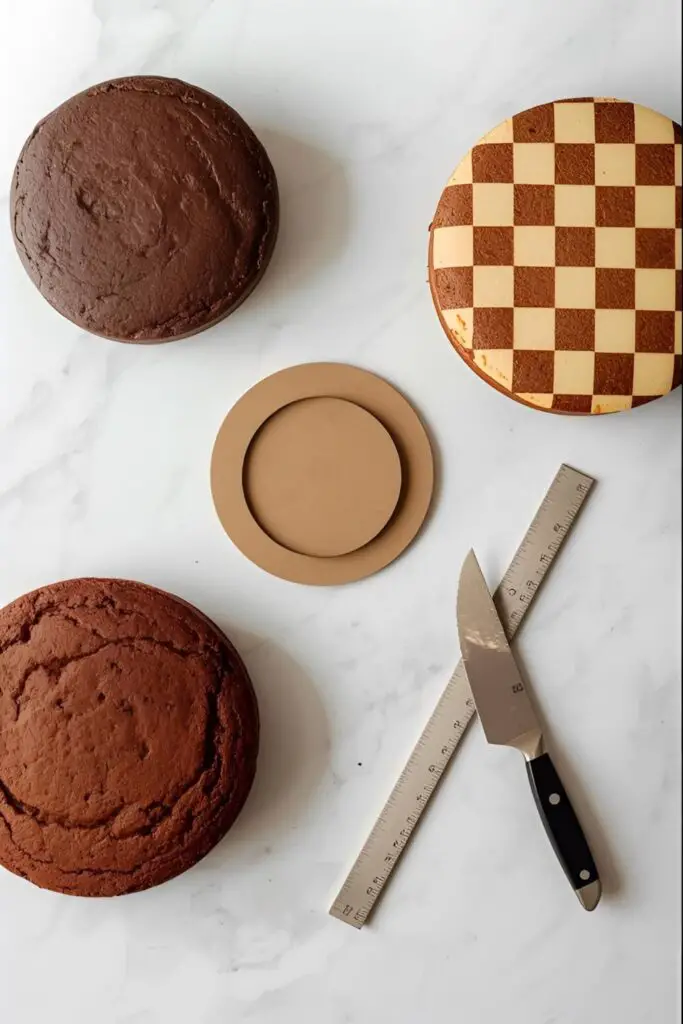
Step 2: Create Your Magic Templates
This is the secret! We’re making our own guides. For an 8-inch cake, you’ll need to cut two circles from your cardboard: one that is 5 inches in diameter, and one that is 2.5 inches in diameter. (For a 9-inch cake, use a 6-inch and a 3-inch circle). A compass is great for this, but tracing around bowls or lids works just as well.
Step 3: Cut the Cake Rings
Place your chilled chocolate cake layer on a flat surface. Center the 5-inch cardboard template on the cake and, using your sharp paring knife, carefully cut all the way through the cake. Remove the template. Now, center the 2.5-inch template inside the circle you just cut and cut again.
You should now have three separate pieces: a small center circle, a middle ring, and an outer ring. Carefully separate them. Repeat this exact process with the vanilla cake layer. You will now have a set of three chocolate rings and three vanilla rings.
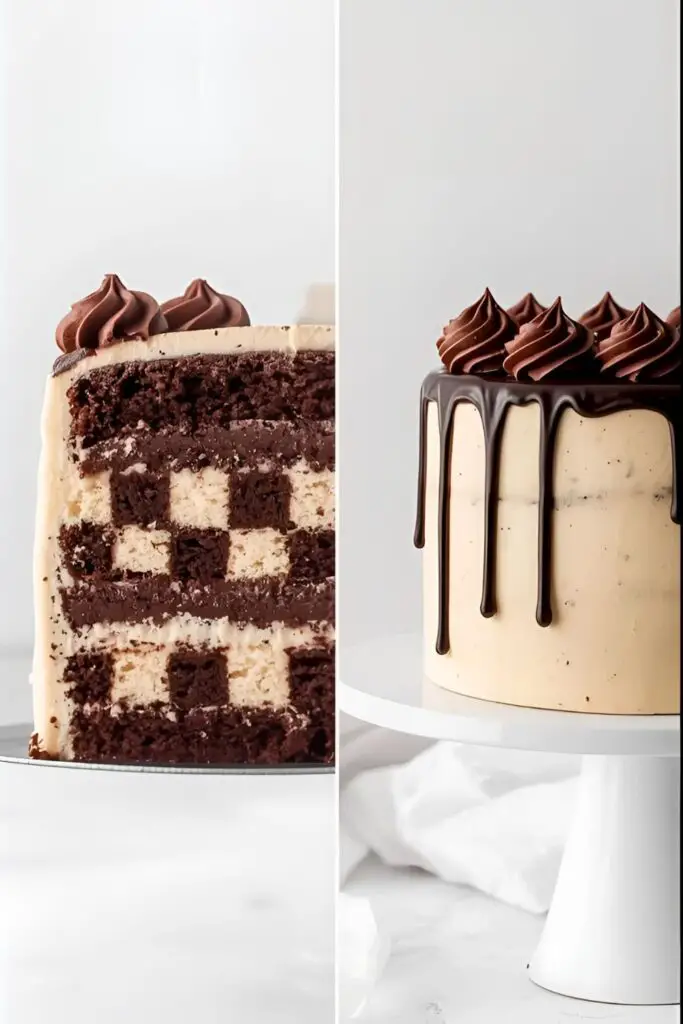
Step 4: The Great Cake Swap
Now for the fun part! We’re going to reassemble the layers, alternating the colors. A thin layer of frosting between the rings helps them stick together.
- Layer #1: Start with the outer chocolate ring. Spread a very thin layer of frosting on the inside edge. Gently place the middle vanilla ring inside it. Spread another thin layer of frosting on the inside edge of the vanilla ring, and place the small chocolate circle in the center. Voilà! One checkerboard layer is complete.
- Layer #2: Do the opposite. Start with the outer vanilla ring, glue in the middle chocolate ring with frosting, and finish with the small vanilla circle in the center.
Step 5: Stack and Frost
Place your first reassembled layer (let’s say, the one with the chocolate outer ring) onto your cake stand. Spread a generous layer of frosting over the top.

Carefully place the second reassembled layer on top, making sure it’s centered. Now, frost the entire outside of the cake. Start with a thin “crumb coat” to trap any loose crumbs, chill the cake for 20 minutes, and then apply your final, beautiful layer of frosting.
Step 6: The Grand Reveal
You’ve done it! The outside looks like a normal, delicious cake. The real magic is hidden inside. For the cleanest slices, use a long, sharp knife, and wipe it clean between each cut. Slice into your creation and prepare for the oohs and aahs.
Calories & Nutritional Info (It’s Cake. Let’s Be Real.)
This will vary wildly based on your cake and frosting recipes, but here’s a ballpark figure for a slice of this magnificent creation.
- Serving Size: 1 slice (1/12th of the cake)
- Estimated Calories: 400-550
- Main Ingredient: Pure, unadulterated joy (and sugar, butter, flour…).
- Recommendation: Enjoy every single bite. You earned it.
Common Mistakes to Avoid (Save Yourself the Tears)
- Cutting Warm Cakes: I cannot stress this enough. If you try to cut rings from a warm or even room-temperature cake, it will be a crumbly, heartbreaking disaster. Your cakes MUST be completely cool and firm, preferably chilled.
- Wobbly, Uneven Rings: You tried to freehand it, didn’t you? While I admire your confidence, using cardboard templates is the key to a clean, professional-looking checkerboard pattern.
- Forgetting the “Frosting Glue”: A thin layer of frosting between the rings isn’t just for flavor; it’s what holds your masterpiece together. Don’t skip it!
- The Color Mix-Up: When stacking your two reassembled layers, double-check that the patterns are opposite. If the bottom layer starts with a chocolate ring on the outside, the top layer must start with a vanilla ring on the outside.
Variations & Customizations (Play Your Own Game)
The chocolate-and-vanilla combo is a classic, but why stop there?
1. The Rainbow Surprise
Use a single batch of white cake batter. Divide it into two bowls and use food coloring to create two vibrant, contrasting colors—like pink and yellow, or your favorite team’s colors! The reveal will be even more surprising.
2. Flavor Pairings Galore
Think beyond chocolate and vanilla! How about a lemon cake paired with a raspberry cake for a sweet and tangy checkerboard? Or a strawberry and chocolate combination? The possibilities are endless!
3. The Neapolitan Checkers
For the truly ambitious baker. Make three smaller, thinner cake layers: one chocolate, one vanilla, and one strawberry. Cut them into rings and assemble a three-layer checkerboard cake. This is next-level baking wizardry.
FAQ: Your Checkerboard Queries, Answered
Let’s clear up some common questions about this clever technique.
1. Is this method actually harder than using the special checkerboard pan? It’s more hands-on, for sure. But IMO, it gives you more control, a cleaner result, and saves you from buying a gadget you’ll likely never use again.
2. My cake rings broke when I tried to move them! What did I do wrong? Your cake was probably too warm or too delicate. Chilling the layers in the fridge for at least an hour makes them much sturdier and easier to handle.
3. I have 9-inch pans, not 8-inch. What size should my circle templates be? For 9-inch cakes, a good rule of thumb is to make your templates 6 inches and 3 inches in diameter. This will give you three rings of equal 1.5-inch thickness.
4. How do I get my cake layers perfectly flat on top? The best way is to use a long, serrated bread knife to carefully slice off the domed top of each cooled cake layer before you start cutting the rings.
5. What kind of frosting works best for this cake? A good, sturdy American buttercream or a Swiss meringue buttercream is ideal. You need something that will act as a reliable “glue” between the rings and hold up well on the outside of the cake.
6. Can I use box cake mixes? Absolutely! In fact, using one box of chocolate mix and one box of yellow or white mix is one of the easiest ways to ensure your batters have a similar consistency, which helps them bake up to a similar height.
7. How far in advance can I make this cake? You can bake the cake layers a day in advance and keep them well-wrapped in the fridge. It’s best to assemble and frost the cake on the day you plan to serve it for maximum freshness.
Final Thoughts
You did it! You’ve officially outsmarted the kitchen gadget industry and mastered a technique that looks like pure baking sorcery. You are now the keeper of the checkerboard cake secret. Wield this power wisely.
So go forth and bake this incredible cake. Watch the jaws drop. Gracefully accept the compliments. And when someone asks, “How did you do that?! Did you use a special pan?” just give them a wink and say, “Nope. It’s magic.”