How to Build a Dessert Charcuterie Board (Your Ultimate Sweet Spread)
Let’s face it: traditional charcuterie boards are great and all, with their fancy cheeses and cured meats. But sometimes, a girl just wants sugar, am I right? Imagine a board, but instead of prosciutto, it’s piled high with chocolate. Instead of olives, it’s fresh berries. Instead of artisanal crackers, it’s cookies. Your sweet-tooth dreams are about to come true, because today, we’re diving into how to build a dessert charcuterie board that will make your guests’ eyes widen and their diets vanish faster than a free sample at Costco. This isn’t just dessert; it’s an edible work of art, a choose-your-own-adventure of sugary delights.
Why This Board Is Awesome (It’s a Sweet Feast for the Eyes and Belly!)
So, why bother with a dessert charcuterie board when you could just, you know, put out a bowl of candy? Because this isn’t just about the sugar; it’s about the experience, the aesthetics, and the sheer joy of abundance. This board is awesome because:
- It’s Visually Stunning: Seriously, these boards are Instagram gold. You arrange a beautiful display of treats, and suddenly, you’re a domestic god/goddess.
- Something for Everyone: Got a chocolate lover? A fruit fiend? Someone who only eats gummies? This board has it all, catering to every craving without you having to bake 17 different desserts.
- Minimal Effort, Maximum Impact: You don’t have to cook a single thing (unless you want to, you overachiever). It’s all about strategic shopping and artful arrangement.
- It Encourages Grazing and Mingling: Guests can casually pick and choose, making it perfect for parties, movie nights, or even just a ridiculously indulgent Tuesday in your Khulna home.
You’re not just serving dessert; you’re creating a moment. A sweet, glorious, sugar-fueled moment.
Ingredients: Your Sweet & Savory Symphony

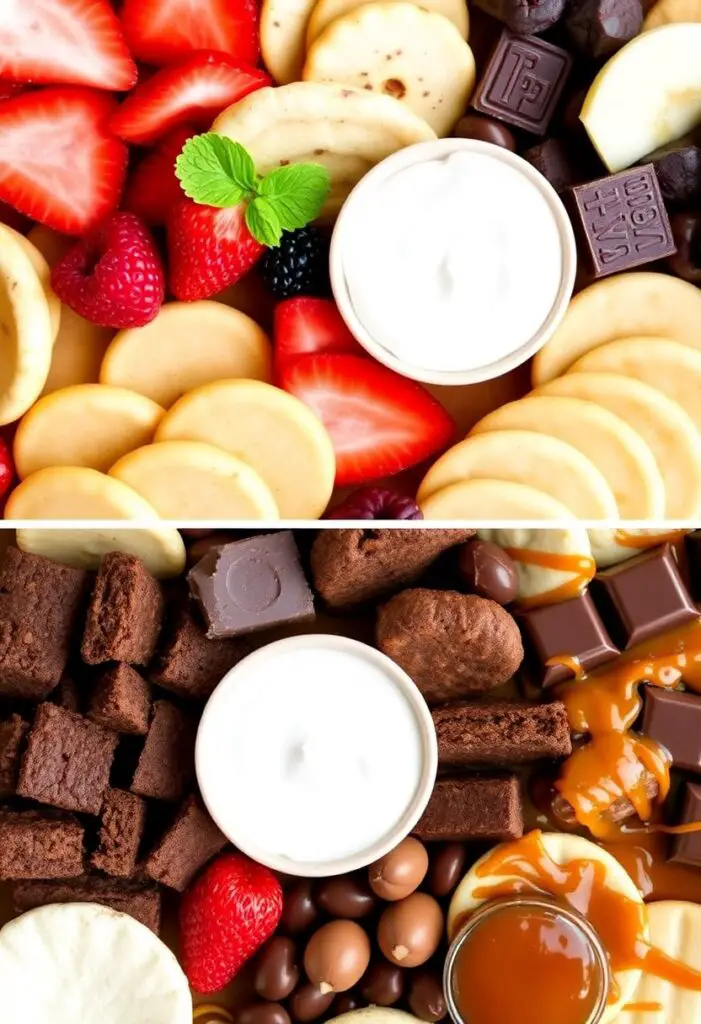
Think variety, texture, and color. Aim for a mix of sweet, tart, crunchy, and creamy. Here’s a blueprint for a killer board that serves 6-8 people. Feel free to scale up or down!
The “Star” Sweets (Pick 3-4):
- Mini Cupcakes or Brownie Bites: Store-bought is perfectly fine. Don’t be a hero.
- Cookies: A variety! Chocolate chip, shortbread, macarons, wafers.
- Small Pastries: Mini tarts, cream puffs, éclairs, or even just fancy-looking cookies.
- Candies: Gummy bears, chocolate-covered pretzels, sour candies, caramels, truffles.
The Dippers (Pick 2-3):
- Fresh Fruit: Strawberries, raspberries, blueberries, grapes, sliced kiwi, orange segments.
- Pretzels Rods or Twists: The salty crunch is crucial for balance!
- Marshmallows: Regular or flavored.
- Graham Crackers: A classic.
The Dips (Pick 2):
- Chocolate Hummus or Nutella: Smooth, rich, and delicious.
- Fruit Dip: Cream cheese-based or yogurt-based.
- Caramel Sauce: Store-bought is perfectly acceptable.
- Peanut Butter or Almond Butter: For the nut butter fanatics.
The “Unexpected” Savory/Crunch (Pick 1-2):
- Mini Cheese Cubes or Slices: A mild cheddar or a creamy brie works well to cut through the sweetness.
- Assorted Nuts: Almonds, pecans, pistachios.
- Small Crackers: Simple butter crackers or water crackers.
Pro-Tip on Ingredient Quantity:
- Don’t overthink it, but aim for a “little bit of a lot of things.” You want variety without overwhelming the board or your guests.
Tools & Kitchen Gadgets Used: Your Board Building Arsenal

This is less about cooking, more about assembling with style.
- A Large Serving Board or Tray: Wood, slate, marble – anything flat and food-safe.
- Small Bowls or Ramekins: For dips and smaller candies/nuts.
- Small Spoons or Spreaders: For the dips.
- Parchment Paper or Wax Paper: (Optional, but makes cleanup easier!)
- Small Tongs or Toothpicks: (Optional, for serving.)
Step-by-Step Instructions: The Art of Sweet Arrangement
This isn’t rocket science, but there’s a method to the madness for maximum visual appeal.
- Choose Your Board: Grab your large serving board or tray. Lay down parchment paper if you want easier cleanup later (highly recommended, IMO).
- Place Your Bowls/Dips First: This is your anchor! Arrange your small bowls or ramekins for dips (chocolate hummus, caramel, etc.) and any smaller, looser items (nuts, candies) onto the board. These are the fixed points.
- Anchor with Larger Items: Next, place your largest items – the mini cupcakes, brownie bites, or larger cookies. Space them out nicely.
- Fan Out the Fruit: Arrange your fresh fruit in colorful clusters. Berries are great for filling gaps. Slice larger fruits (like kiwi or oranges) for visual interest.
- Add the Cookies & Pastries: Fill in more space with your cookies and pastries. Stack them, lay them flat, or lean them against each other to create different heights and textures.
- The Crunchy Bits: Now, strategically place your pretzels, graham crackers, and any nuts or small crackers. These add much-needed textural contrast.
- Fill the Gaps: This is where the magic happens! Use smaller candies (gummies, truffles), extra berries, or even some sprigs of fresh mint or rosemary (for visual pop, not eating, unless you’re weird like that) to fill any empty spaces. You want the board to look abundant and overflowing.
- Add Spoons/Spreaders: Don’t forget the small spoons or spreaders for your dips. No one likes sticky fingers (unless they’re your own, then it’s fine).
- Present with Pride: Step back and admire your masterpiece! You’ve officially created dessert heaven.
Calories & Nutritional Info (Per Serving, Estimated)
Let’s be honest, you’re not eating this for the nutrition. You’re eating it for the joy.
- Estimated Calories per serving: Wildly varies, but probably ~400-800+ calories.
- Sugar: A lot.
- Fat: A decent amount.
- Joy Factor: Off the charts.
Common Mistakes to Avoid: Don’t Ruin Your Sweet Masterpiece!
Even something this fun has rules. Break them at your peril.
- Lack of Variety: A board with just cookies is just… a plate of cookies. Mix textures, flavors, and colors!
- Over-reliance on One Flavor: Too much chocolate? Too much sour? Balance is key. Add some fruit or a savory element to break it up.
- Not Enough Dips: Dips are the glue that brings a lot of these elements together. Don’t skimp.
- Forgetting the Savory Element: A little bit of cheese or pretzels cuts through the sweetness beautifully and makes the board feel more balanced and interesting.
- Not Filling the Board: A sparse board looks sad. Crowd it! An overflowing board looks abundant and inviting. It’s a visual trick, TBH.
- Placing Liquids Directly on the Board: Unless your board is sealed and you enjoy sticky messes, use small bowls for all your dips and sauces.
Variations & Customizations: Your Sweet Dream, Your Rules
The beauty of a dessert board is its infinite adaptability!
- Holiday Themed Board: For Christmas, think peppermint bark, gingerbread cookies, red/green candies, and cranberries. For Halloween, think candy corn, ghost-shaped cookies, and orange/black sprinkles.
- Kids’ Party Board: Focus on colorful candies, mini cookies, fruit skewers, and maybe some fun animal crackers. Think bright and playful!
- Adult-Only Indulgence: Include boozy truffles, chocolate-covered espresso beans, maybe a small bowl of whiskey caramel sauce, and some sophisticated dark chocolate squares.
- “Deconstructed Cake” Board: Feature slices of pound cake or angel food cake, various berries, whipped cream, chocolate sauce, and sprinkles. Guests can build their own mini cake.
FAQ Section: All Your Board-Building Brain Busters
You’ve got questions. I’ve got (sweet) answers.
- Q: How much food do I need for a dessert charcuterie board? A: A good rule of thumb is about 3-4 pieces of each item per person, plus dips. Err on the side of more rather than less.
- Q: What kind of board should I use? A: Any large, flat, food-safe surface works! Wood cutting boards, slate slabs, marble cheese boards, or even a large platter.
- Q: Can I make a dessert charcuterie board ahead of time? A: Mostly, yes! You can arrange all the non-perishable items (cookies, candies, nuts) several hours in advance. Add fresh fruit and dips closer to serving time to keep them fresh.
- Q: How do I keep fruit fresh on the board? A: Add fresh fruit as close to serving time as possible. For cut fruit like apples, toss them in a little lemon juice to prevent browning. Berries hold up well for a few hours.
- Q: What are some good non-sweet items to include for balance? A: Small cubes of mild cheddar cheese, salty pretzels, unsalted nuts (like almonds or pistachios), or even some simple butter crackers can provide a welcome savory counterpoint.
- Q: How do I transport a dessert board to a party? A: Assemble the board on a sturdy tray. For longer distances, keep items separate in containers and assemble at your destination. Cover loosely with plastic wrap for short trips.
- Q: Can I do a theme for my dessert board? A: Absolutely! Themed boards are fantastic. Think colors (e.g., all red for Valentine’s Day), holidays, or even specific flavor profiles (e.g., a “tropical” board with mango, pineapple, coconut treats).
Final Thoughts: You Are Now a Dessert Board Boss
You’ve done it. You’ve transformed a simple collection of sweets into a glorious, abundant, jaw-dropping spectacle. Your dessert charcuterie board is not just food; it’s an experience. So go forth, gather your sweet treasures, and create a masterpiece that will be devoured, admired, and definitely photographed. Your dessert game just got a major upgrade!