Why These Cookies Reign Supreme (and Can Cost a Pretty Penny)
Why are royal icing cookies often a bit pricier than your average bake sale offering? Let me break it down for you – it’s not just about the sugar.
First, the labor involved is significant. Each cookie is essentially a tiny canvas that requires individual attention. We’re talking about baking, making icing (in multiple consistencies, no less!), meticulously decorating, and then waiting for it all to dry. It’s a labor of love… and time.
Second, the ingredients matter. While the base ingredients are simple (flour, butter, sugar), the quality of these ingredients, especially the vanilla and the meringue powder for the icing, can impact the final cost. Plus, those fancy sprinkles and edible glitters aren’t exactly free.
Finally, the artistry is real. Skilled cookie decorators spend years honing their craft. Their ability to create intricate designs, perfect lines, and stunning color combinations is a genuine skill, and you’re paying for that expertise. Think of it as edible art – would you expect a Picasso for a dollar? (Okay, maybe a slightly smaller scale here, but you get the idea.)
The Cookie Calculation (Ingredients for DIY)
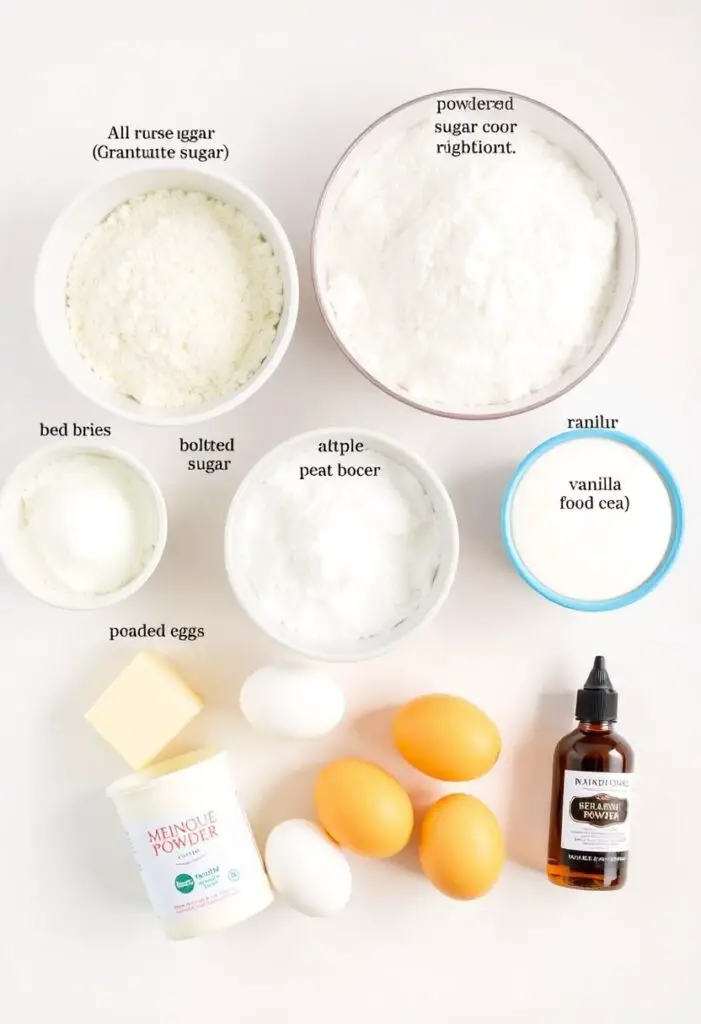
Thinking of taking matters into your own sticky little hands? Here’s what you’ll need for the cookie base and that magical royal icing.
For the Sugar Cookies:
- All-Purpose Flour: 3 cups
- Unsalted Butter: 1 cup (2 sticks), softened (but not too soft, you don’t want an oily mess)
- Granulated Sugar: 1 cup
- Large Eggs: 2
- Pure Vanilla Extract: 1 teaspoon (go for the good stuff, your taste buds will thank you)
- Baking Powder: 1 teaspoon
- Salt: ½ teaspoon
For the Royal Icing:
- Powdered Sugar: 4 cups (that’s a LOT of sugar, FYI)
- Meringue Powder: 3 tablespoons (this is the magic ingredient that makes it dry hard)
- Warm Water: About 5-7 tablespoons (add gradually, you don’t want soup)
- Gel Food Coloring: Assorted colors (gel is way better than liquid for vibrant colors without extra liquid)

Substitution Notes:
- Butter: Margarine can work in a pinch, but butter provides better flavor and texture.
- Vanilla: Almond or lemon extract can offer a different flavor profile.
- Meringue Powder: Fresh egg whites can be used, but meringue powder is more stable and safer. If using egg whites, ensure they are pasteurized and adjust the liquid accordingly.
Your Cookie Command Center (Tools & Kitchen Gadgets)
Time to gather your baking arsenal.
- Large Mixing Bowls: For creaming butter and sugar, and for mixing the dough.
- Electric Mixer (Handheld or Stand Mixer): Saves your arm from a serious workout.
- Measuring Cups and Spoons: Precision is key in baking.
- Rubber Spatulas: For scraping down bowls and folding ingredients.
- Rolling Pin: For achieving that perfect cookie thickness.
- Parchment Paper or Silicone Baking Mats: Prevents sticking and makes cleanup easier.
- Cookie Cutters: In whatever shapes your heart desires!
- Baking Sheets: At least two, so you can have one batch baking while you prep the next.
- Small Bowls: For mixing icing colors.
- Spatulas or Small Offset Spatulas: For flooding cookies with icing.
- Piping Bags (Disposable or Reusable) and Piping Tips: For outlining and adding fine details.
- Toothpicks or a Scriber Tool: For popping air bubbles and guiding icing.
- Drying Rack: For allowing the iced cookies to dry completely.
Step-by-Step to Sweet Success (and Maybe Saving a Few Bucks)
Alright, let’s get baking and icing! Prepare for a marathon of sugar and artistic expression.
Step 1: Bake Those Beauties
Cream together your softened butter and granulated sugar in a large bowl until light and fluffy. Beat in the eggs one at a time, then stir in the vanilla extract.
In a separate bowl, whisk together the flour, baking powder, and salt. Gradually add the dry ingredients to the wet ingredients, mixing on low speed until just combined. Don’t overmix! Overmixing leads to tough cookies, and nobody wants a jaw workout.
Divide the dough in half, flatten each half into a disc, wrap in plastic wrap, and chill in the refrigerator for at least 1 hour. This makes the dough easier to roll and prevents the cookies from spreading too much.

Preheat your oven to 375°F (190°C). Roll out one disc of chilled dough on a lightly floured surface to about ¼-inch thickness. Use your cookie cutters to cut out your desired shapes. Place the cookies on your parchment-lined baking sheets, leaving a little space between them.
Bake for 8-12 minutes, or until the edges are lightly golden. Let the cookies cool on the baking sheets for a few minutes before transferring them to a wire rack to cool completely. Again, patience is key! Icing warm cookies is a recipe for disaster (literally, melty, sticky disaster).
Step 2: Whip Up the Royal Treatment (The Icing)
In a clean bowl, beat together the powdered sugar and meringue powder on low speed until combined. Gradually add the warm water, one tablespoon at a time, mixing until a thick, glossy icing forms. You want it to hold stiff peaks.
Divide the icing into several small bowls and tint each bowl with your desired gel food coloring. Remember, a little gel goes a long way!
Now you’ll need to adjust the consistency for different decorating tasks. For outlining, keep the icing thick. For “flooding” (filling in large areas), you’ll need to add a tiny bit more water, a drop at a time, until the icing flows smoothly but doesn’t disappear into a watery mess (aim for the “15-second rule” – a line of icing should smooth back into itself in about 15 seconds).
Step 3: Decorate Like a Boss (or at Least Try To)
Fill your piping bags with the different consistencies and colors of royal icing, fitted with your chosen piping tips (a small round tip is great for outlining and flooding).

First, outline the edges of your cooled cookies with the thicker icing. Let the outlines dry for a few minutes to create a “dam” that will contain the flood icing.
Next, flood the inside of the outlines with the thinner icing. Use a toothpick or scriber tool to gently spread the icing and pop any air bubbles.
Now comes the fun part – adding details! You can pipe dots, lines, swirls, or even “wet-on-wet” designs while the flood icing is still wet.
Step 4: The Waiting Game (Drying Time)
Once your cookies are decorated, you need to let the royal icing dry completely. This usually takes at least 6-8 hours, or even overnight. Leave them uncovered on a wire rack in a cool, dry place. Don’t try to rush this! Smudged icing is a sad sight.
Step 5: Admire Your Handiwork (and Calculate Your Costs)
Once dry, your royal icing cookies are ready to be enjoyed or admired (or both!). Now, if you were to sell these… you’d need to factor in the cost of all your ingredients, your time, and your mad decorating skills.
The Sweet Economics: How Much Do They Cost?
Alright, let’s get down to brass tacks. The cost of royal icing cookies varies wildly depending on several factors:
- Size and Complexity of Design: Simple shapes with minimal colors will be less expensive than large, intricate designs with lots of details and multiple colors.
- Ingredients Used: High-quality ingredients will increase the cost.
- Decorator’s Skill and Experience: A seasoned professional with a recognizable style can command higher prices.
- Location: Prices can vary depending on where you live.
- Packaging: Individually wrapped and beautifully packaged cookies will cost more.
General Price Ranges (for commercially made cookies):
- Simple Decorated Cookies (2-3 inches): $3-$6 per cookie
- Moderately Decorated Cookies (3-4 inches, multiple colors/details): $5-$10 per cookie
- Intricately Decorated Cookies (large, detailed designs, airbrushing, etc.): $8-$15+ per cookie
DIY Cost Breakdown:
The cost to make your own batch will depend on the price of ingredients in your area. However, a rough estimate for a batch of 2-3 dozen standard-sized decorated cookies might be around $15-$30 for ingredients. This doesn’t include your time, of course! If you value your time (and you should!), you’ll realize why those bakery prices aren’t as outrageous as they might initially seem.
Calories & Nutritional Info (Spoiler Alert: They’re Sweet)
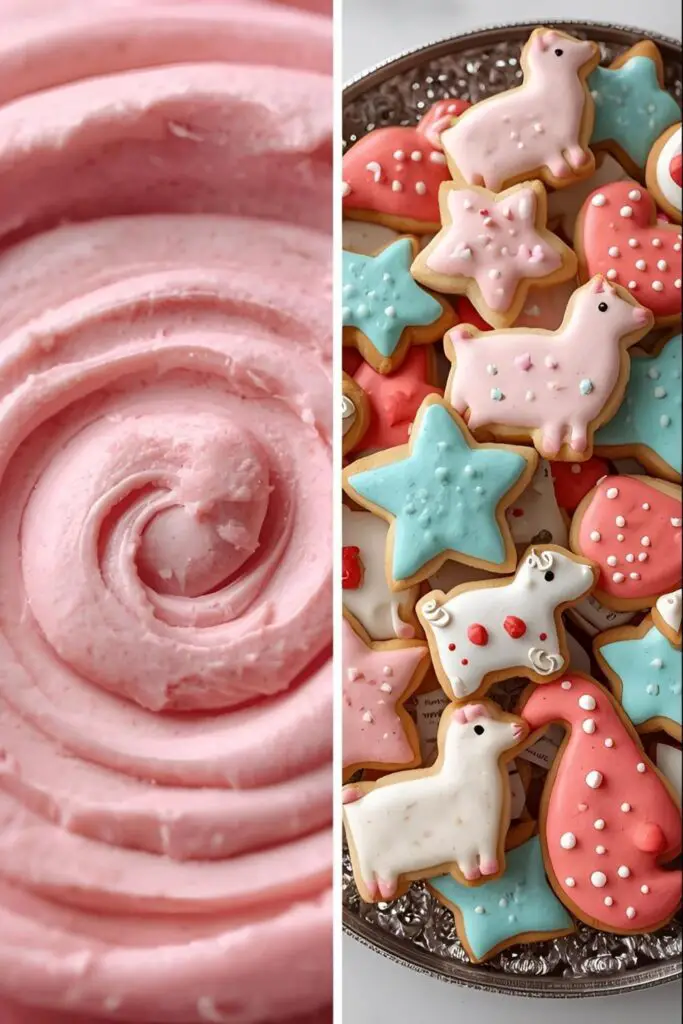
A collection of beautifully decorated royal icing cookies in various shapes and designs, some individually wrapped.
Let’s be honest, these aren’t exactly a health food. They’re a treat!
- Serving Size: 1 decorated sugar cookie (approx. 2-3 inches)
- Estimated Calories: 100-150 (depending on size and icing amount)
- Main Components: Sugar, refined carbohydrates, and a bit of fat.
- Nutritional Notes: Best enjoyed in moderation as a delightful indulgence. 🙂
Common Mistakes to Avoid (Don’t Let Your Cookies Crumble… or Smudge)
- Overmixing the Dough: We said it before, but it’s worth repeating. Overmixed dough = tough cookies. Mix until just combined.
- Icing That’s Too Thin or Too Thick: Achieving the right royal icing consistency takes practice. Start with less water and add tiny amounts until you reach the desired flow.
- Decorating on Warm Cookies: Seriously, don’t do it. Ensure your cookies are completely cool before you even think about icing.
- Touching Wet Icing: Patience, young padawan! Let the icing dry completely before handling or packaging your cookies. Smudges are the enemy.
- Not Popping Air Bubbles: Trapped air bubbles in your flood icing can create unsightly craters as the icing dries. Use a toothpick or scriber to gently pop them.
Variations & Customizations (Let Your Inner Cookie Artist Shine)
Want to get creative beyond basic shapes and colors?
1. Flavor Infusions
Add a touch of lemon or orange zest to your cookie dough for a citrusy twist. You can also add extracts like almond or peppermint to the royal icing.
2. Marbling Magic
While your flood icing is still wet, drizzle contrasting colors of thinner icing on top and gently swirl them together with a toothpick for a beautiful marbled effect.
3. Edible Accents
Embellish your royal icing designs with edible glitter, sprinkles, pearls, or even small fondant decorations for extra pizzazz.
FAQ Section: Your Cookie Cost and Crafting Queries, Answered
Let’s tackle some of those burning cookie questions!
1. Why are royal icing cookies so expensive to buy? As we discussed, it’s due to the high labor involved, the cost of quality ingredients, and the skill and artistry of the decorator.
2. How long do homemade royal icing cookies last? Properly stored in an airtight container at room temperature, they can last for 1-2 weeks. The icing acts as a natural preservative.
3. Can I freeze decorated royal icing cookies? Yes, you can! Once the icing is completely dry, wrap each cookie individually in plastic wrap, then place them in an airtight container in the freezer for up to 2-3 months. Thaw them at room temperature in their wrapping.
4. What is meringue powder, and why do I need it? Meringue powder is a dehydrated egg white product that helps royal icing dry hard and smooth. It’s more stable and safer to use than raw egg whites in icing.
5. My royal icing is too stiff. How do I fix it? Add a tiny amount of warm water (a few drops at a time) and mix gently until you reach the desired consistency. Be careful not to add too much water too quickly!
6. My royal icing is too runny. How do I fix it? Whisk in a small amount of powdered sugar, one tablespoon at a time, until the icing thickens.
7. Can I make vegan royal icing cookies? Yes! You can find vegan sugar cookie recipes and use vegan meringue powder alternatives like aquafaba (the liquid from canned chickpeas) to make royal icing, although aquafaba icing can be a bit more finicky.
Final Thoughts
So, how much are royal icing cookies? Well, the answer is… it depends! Whether you’re buying them or baking them yourself, you’re investing in a little piece of edible art. Making them at home can be a rewarding (and potentially cost-effective) endeavor, but be prepared to invest your time and a whole lot of sugar.
Now, go forth and create some beautiful (and delicious) cookies! And if anyone asks how much they cost, you can tell them they’re priceless… especially if you made them with love (and maybe a touch of sarcastic humor). 😉