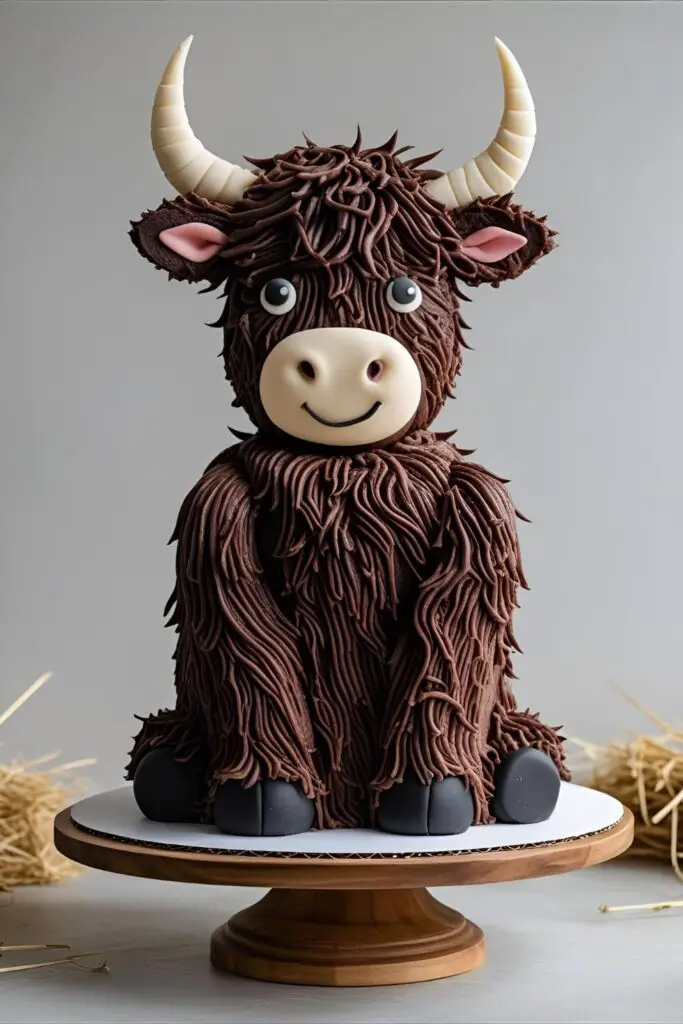
How to Make a Highland Cow Cake That’s Almost Too Cute to Eat
Okay, let’s have a little chat. You’ve seen them all over your social media feeds, haven’t you? Those impossibly fluffy, slightly grumpy-looking, utterly adorable Scottish Highland cows. They’ve captured the internet’s heart, and now they’re coming for your kitchen. If you’ve ever looked at one and thought, “I want to make that, but edible,” then you are my kind of person. Welcome. You’re in the right place to create the most charming highland cow cake on the planet.
Forget your fears of complex cake decorating. This is less about perfection and more about personality. We’re about to create a shaggy, delicious, chocolatey masterpiece that will make your friends and family gasp with delight. Is it a little extra? Absolutely. Is it worth it? 1000%. This cake isn’t just a dessert; it’s an event.
Why This Recipe is Udderly Amazing
So, why should you dedicate an afternoon to crafting this furry beast? I’m so glad you asked.
- The “Wow” Factor is Off the Charts: Seriously, place this on a table at a birthday party and watch what happens. It’s a showstopper. It’s a conversation starter. It’s the cutest thing anyone will have ever seen, and YOU made it.
- Deliciously Deceptive: Underneath all that adorable frosting “fur” is a ridiculously moist and rich chocolate fudge cake. This isn’t just a pretty face; it tastes as good as it looks.
- It’s a Super Fun Project: This is your chance to play with your food in a socially acceptable way. Piping the shaggy fur is surprisingly therapeutic, and bringing your little cow to life is just pure joy. TBH, it’s the most fun I’ve had baking in ages.
The Ingredient Shopping List

To create your new bovine best friend, you’ll need to assemble these key players. We’ll break it down by cake and by decoration.
For the Rich Chocolate Fudge Cake:
- All-Purpose Flour: 1 ¾ cups. The foundation of our delicious cow.
- Granulated Sugar: 2 cups. For that perfect, rich sweetness.
- Unsweetened Cocoa Powder: ¾ cup. Use a good quality one for a deeper chocolate flavor.
- Baking Soda & Baking Powder: 1 ½ tsp of each. The dynamic duo of leavening.
- Salt: 1 tsp. It makes the chocolate taste more chocolatey.
- Large Eggs: 2, at room temperature. Don’t you dare use cold eggs.
- Buttermilk: 1 cup, at room temperature. It creates an incredibly tender crumb.
- Vegetable Oil: ½ cup. For ultimate moistness.
- Vanilla Extract: 2 tsp. The essential backup singer to the chocolate star.
- Hot Brewed Coffee or Hot Water: 1 cup. This blooms the cocoa powder for an intense flavor. Your cake will NOT taste like coffee, I promise.
For the Fur, Horns, and Face:
- Unsalted Butter: 2 cups (4 sticks), softened to room temperature. The base of our glorious fur.
- Powdered Sugar: 5-6 cups, sifted. Lumps are the enemy of smooth piping.
- Unsweetened Cocoa Powder: 1 cup, sifted. This gives us our base brown color.
- Heavy Cream or Milk: 4-6 tablespoons. To get the perfect piping consistency.
- Vanilla Extract: 1 tsp.
- Salt: A pinch.
- White Fondant: A small block, for the horns and nose.
- Black Fondant or Black Food Coloring: For the nostrils and eyes.
- Pink Food Coloring: A tiny drop for the nose detail.
Tools & Kitchen Gadgets
Having the right gear makes the difference between a fun baking project and a frosting-fueled meltdown. Here’s what you’ll need:
- Stand Mixer with Paddle & Whisk Attachments: A hand mixer works too, but a stand mixer makes life a dream.
- Two 6-inch or 8-inch Round Cake Pans: I like 6-inch for a taller, cuter cow, but 8-inch works great too.
- Piping Bags: You’ll need at least a couple.
- Grass Piping Tip (like Wilton #233): This is the non-negotiable secret to the shaggy fur effect.
- Small Round Piping Tip (like Wilton #4): For the eyes, if you don’t use fondant.
- Cake Turntable: Not essential, but it makes frosting and piping SO much easier.
- Offset Spatula: For applying the base crumb coat of frosting.
- Fondant Sculpting Tools: Or just your clean fingers and a toothpick.
- Wire Cooling Rack: For preventing soggy cake bottoms. A true hero.
- Parchment Paper: To line your pans and save you from heartache.
Step-by-Step Instructions: Assembling Your Cow
Ready to get your hands dirty? Let’s break this down into manageable chunks.
Part 1: Bake the Perfect Chocolate Cake
- Prep Your Gear: Preheat your oven to 350°F (175°C). Grease your cake pans and line the bottoms with parchment paper.
- Mix the Dry Stuff: In the bowl of your stand mixer (or a large bowl), whisk together the flour, sugar, cocoa powder, baking soda, baking powder, and salt. Get it all nice and combined.
- Add the Wet Stuff: Add the eggs, buttermilk, oil, and vanilla to the dry ingredients. Beat on medium speed for about 2 minutes until everything is well incorporated. Scrape down the sides of the bowl.
- The Hot Liquid Trick: Reduce the mixer speed to low and carefully pour in the hot coffee or hot water. The batter will be very thin. This is normal! Don’t panic.
- Bake It: Pour the thin batter evenly between your two prepared pans. Bake for 30-40 minutes (less for 8-inch, more for 6-inch), or until a toothpick inserted into the center comes out clean.
- Cool Down: Let the cakes cool in the pans for 10 minutes before flipping them out onto a wire rack to cool completely. And I mean completely. We can’t have a melty cow.
Part 2: Decorate Your Highland Cow
- Sculpt Your Horns & Nose: While the cake cools, take your white fondant. Roll out two horn shapes, curving them slightly. Create a pink-ish oval for the nose. Use a tiny bit of black fondant for the nostrils. Let these air dry on a piece of parchment paper to harden. This is important for them to stand up properly.
- Make the Chocolate Buttercream: In your mixer, beat the softened butter until it’s creamy. Sift in the cocoa powder and powdered sugar, alternating between them. Add the vanilla and salt. With the mixer on low, slowly add the heavy cream until you reach a stiff but pipeable consistency. Beat on high for 3 minutes until light and fluffy.
- Assemble and Crumb Coat: Place one cake layer on your turntable or plate. Top with a layer of frosting. Add the second cake layer. Now, apply a very thin, smooth layer of frosting over the entire cake. This is a crumb coat, and it traps all the loose crumbs. Chill the cake in the fridge for 30 minutes to set this layer.
- Give Your Cow a Face: Before you go wild with the fur, press the fondant nose and horns gently into place. Use a little frosting as glue. You can also pipe on two simple black dots for eyes.
- Pipe the Fur! This is the fun part. Fill a piping bag fitted with your grass tip with the remaining chocolate buttercream. Starting from the bottom of the cake and working your way up, hold the piping bag against the cake, squeeze to create a small tuft of “fur,” and pull away. Repeat this process, covering the entire cake. Overlap the tufts slightly to create a thick, shaggy coat. Be messy! Be chaotic! Give it that signature fringe over its eyes.
Calories & Nutritional Info (The Part We Politely Ignore)

Look, you’re making a cow out of cake and butter. This is a special occasion treat, not diet food. But for the curious, here’s a ballpark estimate per slice (if you cut 12 slices).
- Calories: Approximately 600-650 kcal
- Carbohydrates: ~85g
- Sugar: ~65g (Yep. That’s a lot.)
- Fat: ~35g
- Protein: ~6g
My professional opinion: The joy you get from making and eating this cake cancels out at least half the calories. That’s just good math. 🙂
Common Mistakes to Avoid (Don’t Be a Sad Cow)
- The Droopy Horns Fiasco: You didn’t let your fondant horns dry long enough. Make them first and give them at least an hour (or more!) to air dry and become firm before you try to attach them.
- Frosting a Warm Cake: I will say this until I’m blue in the face. If you frost a warm cake, the buttercream will melt into a sad, chocolatey puddle. Patience is a virtue.
- Skipping the Crumb Coat: If you don’t do a crumb coat, your “fur” will be full of cake crumbs, and your cow will look like it just rolled in the mud. And not in a cute way. Chill the crumb-coated cake until it’s firm to the touch.
- Buttercream Blunders: If your buttercream is too soft, the fur won’t hold its shape. If it’s too stiff, your hand will cramp up from piping. If it’s too soft, chill it for 15 minutes. If it’s too stiff, add another splash of cream.
Variations & Customizations
Your cow, your rules! Here are a few fun ways to customize your creation.
1. The Vanilla Bean Cow
Not a chocolate fan? No problem. Use your favorite vanilla bean cake recipe for the base and a vanilla buttercream. You can color the frosting with brown and orange food coloring to get that classic ginger Highland cow look.
2. The Gluten-Free Coo
Simply swap the all-purpose flour in the cake recipe for a high-quality 1:1 gluten-free baking flour blend. Make sure it contains xanthan gum. No one will ever know the difference.
3. The Party Cow
Give your cow some extra flair! Craft a tiny party hat out of colorful fondant and stick it on its head with a toothpick. You could even make a festive flower crown for a coachella-themed cow. Why not?
FAQ: Your Highland Cow Conundrums Solved
What piping tip do I absolutely need for the fur?

The grass tip (Wilton #233 or a similar multi-opening tip) is the hero here. It’s what creates those perfect little tufts of shaggy fur. It’s worth buying for this cake alone.
Do I have to use fondant for the horns and nose?
Nope! You can also use modeling chocolate, which tastes better IMO. Or, for a simpler approach, use wafer ice cream cones for the horns and a cookie (like a Nilla Wafer) for the nose.
Can I make this cake ahead of time?
For sure. You can bake the cake layers a day or two in advance. Let them cool, wrap them tightly in plastic wrap, and store them in the fridge. You can even freeze them for up to a month. Make the frosting and decorate the day you plan to serve it for the freshest look.
Help! My buttercream is too soft and the fur is melting!
Your butter was likely too warm, or your kitchen is hot. Pop the whole bowl of buttercream (and your piping bag) into the fridge for 15-20 minutes. Give it a quick mix, and it should be stiff enough to pipe properly.
How do I make the fondant horns stay in place?
Let them dry until they are hard. When you’re ready to attach them, you can insert a dry spaghetti noodle or a toothpick into the base of each horn, leaving half of it sticking out to press into the cake for extra stability.
Is this recipe too hard for a beginner baker?
I won’t lie, it’s a project. But the individual steps are not difficult! The cake is a simple mix-and-bake recipe. The decorating is just repeating one simple motion. Take it step-by-step, don’t rush, and you’ll be amazed at what you can create.
How do I store the finished Highland cow cake?

Store it in a tall cake carrier or lightly covered in the refrigerator because of the buttercream. It will keep for up to 3-4 days. Let it sit at room temperature for about 30 minutes before serving to allow the frosting to soften up a bit.
Final Thoughts
You did it. You stared into the fluffy abyss of the internet and pulled out a tangible, edible, unbelievably cute creation. This Highland cow cake is more than a dessert; it’s a trophy. It’s proof that you can make cool things and that baking can be pure, unadulterated fun.
So go on, take a million pictures. Accept your new title as “The Person Who Makes The Awesome Cakes.” And when you finally slice into that shaggy mane, savor every single rich, chocolatey bite. You’ve earned it.