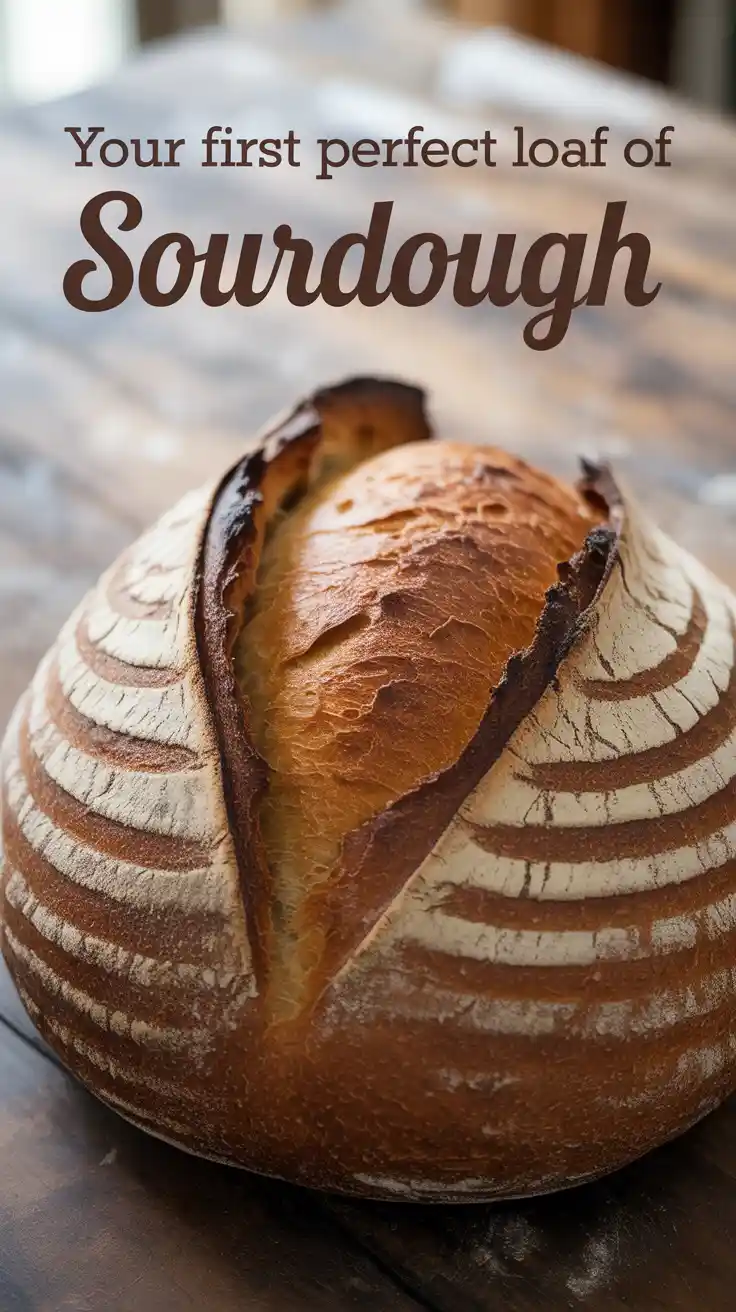
How to Make Gluten-Free Sourdough Bread (That Actually Tastes Amazing)
How to Make Gluten-Free Sourdough Bread (That Doesn’t Suck)
Let’s be brutally honest for a moment. Most gluten-free bread has the taste and texture of sad, expensive packing foam. And the concept of a truly crusty, chewy, tangy gluten-free sourdough? That sounds like a mythical creature, doesn’t it? A culinary unicorn, grazing in a field of broken dreams and crumbly, disappointing loaves.
Well, I’m here to tell you that the unicorn is real, I’ve captured it, and I have the instruction manual. This is your definitive, no-nonsense guide on how to make gluten free sourdough bread that will make you question everything you thought you knew. We’re talking a crackling crust, an airy, open crumb, and a flavor so profound you might just shed a single, joyous tear.
So, grab your apron and your sense of adventure. We’re about to bake something that’s not just “good for gluten-free”—it’s just plain good.
Why This Recipe is Awesome (AKA Your New Superpower)
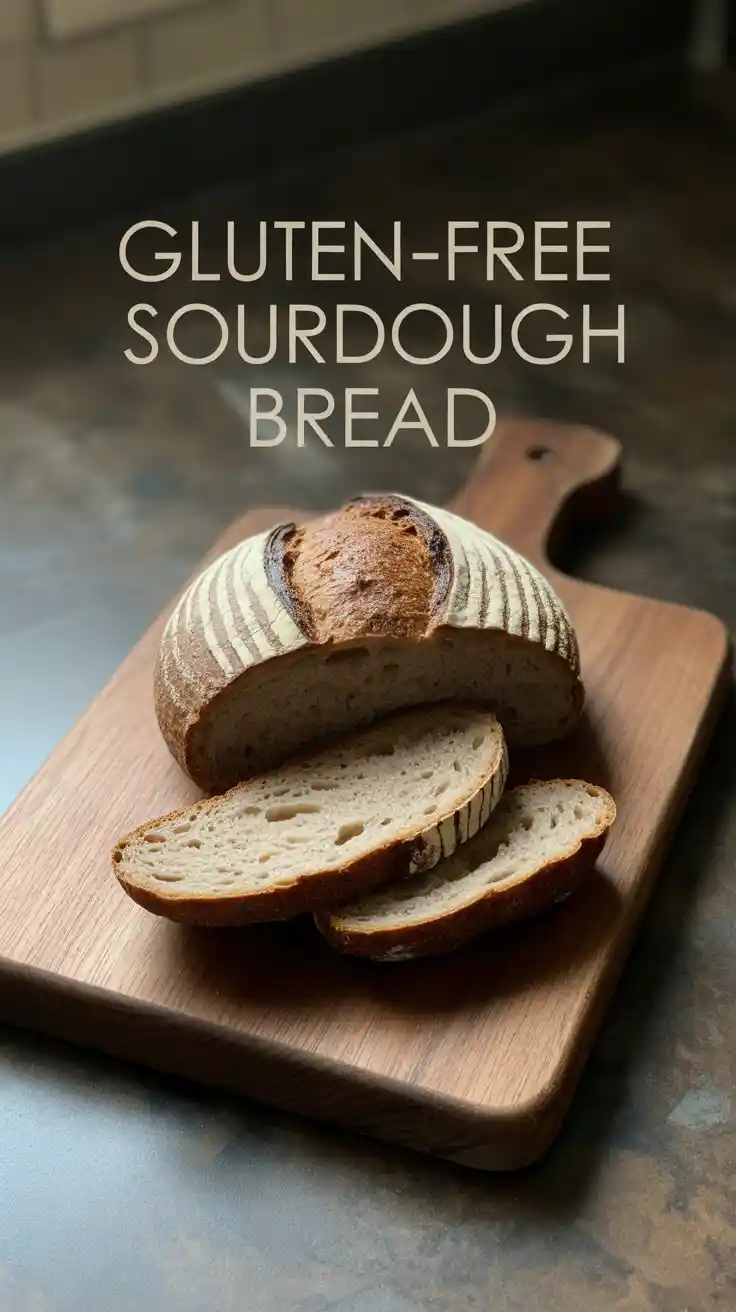
First and foremost, the flavor and texture are out of this world. This recipe yields a loaf with a deeply complex, tangy flavor from the natural fermentation process. The crust is shatteringly crisp, and the interior is soft, chewy, and riddled with lovely holes—a texture that most gluten-free breads can only dream of.
Second, the bragging rights are immense. Casually sliding a perfect, golden-brown loaf of this onto the table for guests is a power move. The inevitable question, “You made this?! And it’s gluten-free?!” will be music to your ears. You won’t just be a baker; you’ll be a wizard.
Finally, this bread is kinder to your gut. The long, slow fermentation of sourdough helps to break down the starches and proteins in the flour, making it easier to digest and its nutrients more available. It’s bread that tastes incredible and makes you feel good. What more could you ask for?
Ingredients You’ll Need

Gluten-free baking is a science, so precision is everything. This is not the time to “eyeball it.” A kitchen scale is your new best friend. Seriously.
For the Bread “Dough”:
- 100g active, bubbly gluten-free sourdough starter (I use a starter made from brown rice flour)
- 30g whole psyllium husks (not the powder, if you can help it—this is our magic!)
- 450g filtered water, lukewarm
- 130g superfine brown rice flour
- 130g sorghum flour
- 140g tapioca starch (sometimes called tapioca flour)
- 12g fine sea salt
- 1 tablespoon maple syrup (optional, but gives the yeast a nice little snack)

A Critical Note on Flours: Please, for the love of all that is holy, do not use a pre-made “1-to-1” gluten-free flour blend. They are formulated for cakes and cookies and will result in a dense, gummy brick of sadness. The specific blend of whole grains and starches here is what creates the magic.
Tools & Kitchen Gadgets Used
Having the right gear is half the battle. This is the equipment that will lead you to glory.
- Digital Kitchen Scale: This is 100% non-negotiable. If you don’t have one, stop right now and go get one. I’ll wait.
- Dutch Oven: A 5- to 6-quart cast iron or enamel Dutch oven is the secret weapon for that bakery-quality crust.
- Banneton Proofing Basket: A 9-inch round banneton will give your loaf that beautiful, rustic, ringed look. No banneton? A medium bowl lined with a heavily floured tea towel will work.
- Large Mixing Bowl: Where the magic begins.
- Dough Whisk or Sturdy Spatula: For mixing a dough that resembles wet cement.
- Parchment Paper: Your trusty sling for transferring the dough to a blazing hot pot.
- Bread Lame or a Fresh, Sharp Razor Blade: For scoring the loaf, which is both functional and makes you look cool.
Step-by-Step Instructions: The Path to Glory
Deep breaths. This looks like a lot, but each individual step is simple. We’re going to break it down.
H3: Part 1: Making the “Dough” (It’s Weird, Just Go With It)
- Create the Psyllium Gel: In your large mixing bowl, whisk together the 30g of whole psyllium husks and the 450g of lukewarm water. Let this concoction sit for about 10 minutes. It will transform from watery seeds into a thick, gloopy, alien-like gel. Don’t be scared; this is the binder that’s replacing gluten.
- Whisk Your Flours: In a separate, medium bowl, whisk together the brown rice flour, sorghum flour, tapioca starch, and salt. This ensures everything is evenly distributed before it hits the wet ingredients.
- Combine and Conquer: Add your 100g of active, bubbly starter and the optional maple syrup to the bowl containing the psyllium gel. Give it a quick stir. Now, dump in your pre-mixed dry ingredients. Use your spatula to mix everything vigorously until no dry spots remain. The final result will be a thick, sticky, paste-like “dough.” It will not look or feel like wheat dough. This is correct.
H3: Part 2: The Magic of Fermentation
- Bulk Fermentation (The First Rise): Cover the bowl with a clean kitchen towel or plastic wrap. Let it sit in a warm, draft-free spot (ideally around 75-80°F or 24-27°C) for 4-6 hours. You’re looking for the dough to get visibly puffy, a bit jiggly, and show a few bubbles. It will not double in size.
- Shaping and Proofing (The Second Rise): Generously dust your banneton or towel-lined bowl with brown rice flour. Scrape the sticky dough onto a lightly floured work surface. With wet or oiled hands to prevent sticking, gently pat and nudge the dough into a roundish shape (a boule). Carefully lift and place the loaf, seam-side up, into your prepared banneton.
- The Final Proof: You have two options here.
- Room Temp Proof: Cover and let it sit in a warm spot for another 1-2 hours until it looks a little puffier.
- Cold Proof (Highly Recommended): Cover the banneton with a plastic bag and place it in the refrigerator for at least 12 hours, and up to 24. The cold proof develops a much deeper, tangier flavor and makes the sticky dough much easier to handle and score.
H3: Part 3: The Grand Finale – Baking the Beast
- Preheat Like Your Life Depends On It: Place your Dutch oven, with the lid on, on the middle rack of your oven. Preheat the oven to 500°F (260°C). Let the Dutch oven preheat for a full hour. Yes, an hour. A screaming hot pot is the key to a good rise.
- Flip and Score: When you’re ready to bake, take your dough out of the fridge. Place a sheet of parchment paper over the top of the banneton and carefully flip the whole thing over. Lift the banneton off. Using your bread lame, make one swift, confident slash across the top, about ½-inch deep.
- Bake – Part 1 (The Steam Bath): Carefully take the blazing hot Dutch oven out of the oven. Remove the lid. Using the parchment paper as handles, lower your dough into the pot. Put the lid back on, return it to the oven, and immediately reduce the oven temperature to 450°F (230°C). Bake for 40 minutes.
- Bake – Part 2 (The Browning): After 40 minutes, remove the lid. The bread will be pale but should have risen nicely. Continue to bake, uncovered, for another 20-30 minutes, until the crust is a deep, rich, golden-brown and sounds hollow when you tap it.
- THE ABSOLUTE MOST IMPORTANT STEP: Remove the loaf from the Dutch oven and place it on a wire rack. Now, put your hands behind your back and walk away. Go for a walk. Call your mom. This bread must cool completely for a minimum of 6 hours, or ideally, overnight. Slicing into it while it’s warm will result in a gummy, sticky interior. Your patience will be rewarded tenfold.
Calories & Nutritional Info

This is hearty, wholesome bread. Here’s a rough idea per slice (assuming 12 thick slices per loaf):
- Calories: Approximately 190-220 kcal
- Carbohydrates: Roughly 38g
- Fiber: A very respectable 6g (thanks, psyllium!)
- Protein: About 4g
- Note: This bread is a powerhouse of fiber and complex carbs. The sourdough fermentation process makes it easier on the digestive system than standard bread. It’s a treat you can feel good about.
Common Mistakes to Avoid (Read This Before You Bake!)
I’ve made them all so you don’t have to. Please, learn from my cautionary tales.
- Using a Lazy Starter: If your starter isn’t bubbly, active, and at its peak when you use it, your bread will be a dense, sad brick. Feed your starter 4-12 hours before you plan to mix your dough and use it when it’s visibly full of life.
- Slicing It Warm: Are you sensing a theme here? I know it smells like heaven personified. But if you cut it before it’s 100% cool, the internal structure won’t have set, and you will be greeted by a gummy, disappointing mess. Be strong.
- Expecting It to Behave Like Wheat Dough: This dough will not form a smooth ball. You cannot knead it. It will not stretch. It will stick to everything. This is normal. Embrace the weirdness and trust the process.
- Not Weighing Your Ingredients: I know, I sound like a broken record. But a cup of flour can vary in weight dramatically. Baking is chemistry, and a digital scale is your only path to consistent, repeatable success.
Variations & Customizations
Once you’ve nailed the basic loaf, the world is your oyster.
- The Seedy Character: When you mix the dough, fold in ½ cup of mixed seeds like sunflower, pumpkin, and flax seeds. Before baking, brush the top of the loaf with a little water and sprinkle on more seeds.
- Rosemary & Olive Loaf: A savory dream. Gently fold in ½ cup of chopped Kalamata olives (patted dry) and 1 tablespoon of dried rosemary during the final mixing stage.
- The Breakfast Club: For a sweeter loaf perfect for toasting, add 1 teaspoon of cinnamon and ½ cup of soaked and drained raisins to the dough.
FAQ: Your Burning GF Sourdough Questions
- How do I know when my GF sourdough is truly done baking? The best way is with an instant-read thermometer. The internal temperature should be between 205-210°F (96-99°C). The crust should also be very dark and hard.
- Help! My bread came out gummy inside. What did I do wrong? The holy trinity of gumminess is: 1) you sliced it while it was still warm, 2) it was underbaked (check that internal temp!), or 3) your starter wasn’t strong enough to properly ferment and cook the dense dough.
- Can I really not substitute the psyllium husks? It is the key to this recipe’s texture. It creates a gel that mimics gluten’s structure. While some recipes use ground flax, I find whole psyllium husks provide the best chewy, open crumb. I highly recommend not substituting it.
- How do I store this magnificent creation? It’s best enjoyed within the first 2-3 days. Store it cut-side down on a cutting board, covered with a clean tea towel. For longer storage, slice the entire cooled loaf and freeze the slices in a zip-top bag. They toast up beautifully from frozen.
- My loaf is flat! What happened? This is almost always a proofing issue. Either your starter was weak, your kitchen was too cold for the dough to rise, or you over-proofed it (let it rise for too long), causing the structure to collapse.
- What should my gluten-free starter look, smell, and feel like? A happy, active GF starter should be thick, bubbly, and almost mousse-like at its peak. It should smell pleasantly tangy, a bit like yogurt or mild vinegar, NOT like nail polish remover (a sign of distress) or anything foul.
- Can I bake this without a Dutch oven? You can try, but it’s tough to get the same results. The Dutch oven traps steam, which is essential for a good rise and a crispy crust. You can try to replicate this with a pizza stone and a pan of hot water on a lower rack, but the Dutch oven method is far more reliable.
Final Thoughts
You did it. You stared into the gluten-free abyss, armed with nothing but some weird flours and a can-do attitude, and you pulled out a magnificent, crusty, tangy loaf of real bread. You are a baker. You are a scientist. You are, frankly, a legend.
Now, go find the best butter you own (or just eat it plain, it’s that good). Slice it thick—you’ve earned it. And take a moment to savor the crusty, chewy, tangy masterpiece you created from scratch. You’ll never look at store-bought GF bread the same way again.