The Definitive Guide to Cooking Frozen Garlic Knots in an Air Fryer
Let’s talk about that beautiful box of frozen garlic knots sitting in your freezer. You bought them with the best of intentions, dreaming of a golden, buttery, carb-loaded sidekick for your pasta night. But when the time comes, you’re faced with a conundrum. The oven takes forever to preheat. The microwave? A surefire way to create a tough, steamy, and deeply disappointing bread-puck. So, what’s the secret? How do you unlock their true potential? The answer to how long to cook frozen garlic knots in air fryer is not just a time and temperature; it’s a revelation.
Forget everything the back of the box told you. Your air fryer is about to turn those icy little dough balls into the garlic knots of your dreams: shatteringly crispy and golden on the outside, with a soft, fluffy, pull-apart center. This is the ultimate hack for the ultimate carb.
Why the Air Fryer is the Only Way to Go
Why am I so ridiculously passionate about this method? Let me count the ways.
- It’s All About That Superior Texture: This is the game-changer. An oven can make them golden, but an air fryer makes them CRISPY. The intense, circulating heat creates a crust that is simply unparalleled, while the inside stays perfectly soft and steamy.
- It’s Incredibly Fast: Your oven needs 10-15 minutes just to think about getting hot. Your air fryer is ready in minutes, and the knots themselves are perfectly cooked in less than 10 minutes. It’s the perfect last-minute addition to any meal.
- It’s Practically Foolproof: No more worrying about a burnt bottom and a pale top. The air fryer cooks them with an even, consistent heat that results in a perfectly golden, evenly cooked knot every single time. It’s almost impossible to mess up.
The Ingredient List: It’s a Short One
Prepare yourself for the most strenuous shopping trip of your life.
- A Box or Bag of Frozen Garlic Knots: That’s it. Any brand will do—New York Bakery, Rhodes, your grocery store’s brand, they all work beautifully.
- Optional (but let’s be real, mandatory) “Glow-Up” ingredients:
- 2 tablespoons of Melted Butter
- 1 teaspoon of Garlic Powder
- 1 tablespoon of chopped Fresh Parsley
- A sprinkle of Grated Parmesan Cheese
Tools & Kitchen Gadgets: Your Knot-Wrangling Kit
You don’t need much to achieve garlic bread greatness.
- An Air Fryer: The star of our show.
- Tongs: For safely retrieving your golden-brown treasures.
- A Small Bowl and a Pastry Brush: For the glorious garlic butter bath at the end.
Step-by-Step Instructions: The Magic Numbers
Ready for the big reveal? This is the secret formula you came for. It’s so easy it feels like cheating.
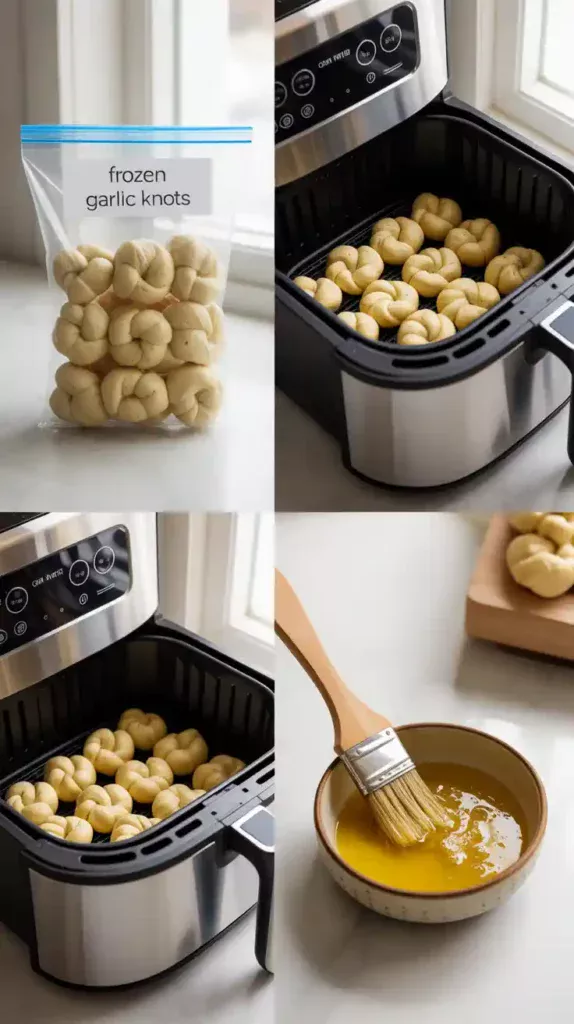
Step 1: The Preheat
Get your air fryer preheating to 350°F (175°C) for a few minutes. A hot start helps to get that initial crisp on the outside.
Step 2: The Arrangement
Take your garlic knots straight from the freezer. Do not thaw them! Place them in the air fryer basket in a single, even layer. Do not overcrowd them. They need a little personal space to get crispy.
Step 3: The Magic Time & Temp
Here it is, the answer you’ve been searching for. Cook your frozen garlic knots at 350°F (175°C) for 6 to 8 minutes.
That’s it! The exact time will depend on the size of your knots and the specific model of your air fryer. For smaller knots, start checking at 6 minutes. For larger, doughier knots, they might need the full 8 minutes.
Step 4: The Mid-Cook Shake
At the halfway point (around the 3-4 minute mark), give the basket a good shake. This is crucial for tossing the knots around and ensuring they get evenly golden-brown on all sides.
Step 5: The Optional (But Incredible) Glow-Up
During the last minute of cooking, you can pause the air fryer. In a small bowl, mix your melted butter, garlic powder, and fresh parsley. Brush this glorious mixture all over the hot knots. For an extra level of cheesy goodness, sprinkle with Parmesan, then cook for the final minute.
Calories & Nutritional Info (A Delicious Little Knot)

This will vary by brand, but here’s a general idea for one to two garlic knots.
- Serving Size: 2 glorious garlic knots.
- Calories: Approximately 180-250 kcal.
- Good For: Soaking up pasta sauce, accompanying a salad, or just a Tuesday.
- Pairs Well With: Literally everything.
Common Mistakes to Avoid (Knotty Problems)
- Cooking Them Too Hot: It’s tempting to blast everything at 400°F in an air fryer, but that’s a mistake for garlic knots. The high heat will burn the buttery, garlicky topping and the outside of the dough long before the inside has a chance to get soft and fluffy. A moderate 350°F (175°C) is the sweet spot.
- The Microwave Travesty: Do not microwave frozen garlic knots unless you enjoy eating tough, chewy, and deeply disappointing bread. Just don’t.
- Overcrowding the Basket: If you pile the knots in, they will steam each other. You’ll end up with soft, pale, and slightly damp knots instead of crispy, golden ones. Cook in a single layer.
- Forgetting to Shake: If you don’t shake the basket, the bottoms of your knots might get a little too dark while the tops are still pale. The shake is the key to an even, all-over golden hue.
Variations & Customizations: Untie Your Creativity
The classic garlic knot is perfect, but here are a few fun ways to mix things up.
1. The Ultimate Cheesy Pull-Apart Knots
During the last 2 minutes of cooking, pause the air fryer. Pile your hot garlic knots into the center of the basket, sprinkle them generously with shredded mozzarella and Parmesan cheese, and cook until the cheese is melted, bubbly, and glorious. Serve as a pull-apart appetizer.
2. The Everything Bagel Garlic Knots
This is a flavor explosion. After the knots are cooked, brush them with melted butter and then immediately sprinkle them with a generous amount of “everything bagel” seasoning. The combination of garlic, butter, and that savory everything spice is incredible.
3. The Sweet Cinnamon Sugar Knots
For a dessert or sweet breakfast treat. Cook the knots plain. As soon as they come out of the air fryer, brush them with melted butter and roll them in a mixture of cinnamon and sugar. They taste like a glorious cross between a doughnut hole and a churro.
FAQ: Your Most Pressing Knotty Questions
So, what is the perfect time and temperature again?
The magic formula is 6 to 8 minutes at 350°F (175°C), shaking the basket once halfway through.
Do I really not have to thaw them first?
Correct! Do not thaw them. They are designed to be cooked from frozen, and that’s how you’ll get the best texture contrast between the crispy outside and the soft inside.
Do I need to spray them with oil?
Nope! Most frozen garlic knots already have a good amount of butter or oil in their topping, so there’s no need to add any more unless you’re doing the garlic butter glow-up at the end.
How do I make them taste extra garlicky?
The optional “glow-up” step is your best friend. Brushing the hot, cooked knots with a mixture of melted butter and a generous pinch of garlic powder will seriously amplify that delicious garlic flavor.
Can I cook other frozen breads, like Texas toast, in the air fryer?
Absolutely! The air fryer is a champion for all frozen breads. For something like frozen Texas toast, you’ll want a slightly higher temperature, around 375°F (190°C), for about 5-7 minutes, flipping halfway.
Why were my garlic knots still doughy on the inside?
You likely either overcrowded the basket, or you pulled them out too soon. Make sure they have space, and if they still seem pale and soft after 8 minutes, give them another 1-2 minutes until they are a deep golden brown.
Final Thoughts
You have now officially mastered the fastest, easiest, and most delicious way to prepare frozen garlic knots. You are the keeper of the secret to a perfect, crispy-on-the-outside, soft-on-the-inside, carb-loaded delight. You are now perpetually less than 10 minutes away from a plate of garlicky, buttery happiness.
So go on, stock your freezer. You’ll never have to suffer through a sad, oven-baked side dish again. Your pasta nights just got a serious, irreversible upgrade.