How to Make Peach Cobbler Dump Cake: Seriously the Easiest Dessert Ever
Okay, friend, let’s be real. You want dessert, but the thought of whipping out a million ingredients and dirtying every bowl in your kitchen makes you want to order takeout, right? Well, hold your horses (and your phone)! Because we’re about to dive into the magical world of peach cobbler dump cake. Yes, you heard that right. “Dump cake.” It’s practically an insult to how delicious this thing is, but honestly, it’s the most accurate description of the ridiculously simple process. Get ready to impress your friends (and yourself) with minimal effort.
Why This Peach Cobbler Dump Cake Is Your New BFF
Why should you even bother with this recipe? Let me count the ways. First off, it tastes like a warm hug filled with sweet peaches and a buttery, golden topping. Need I say more? Secondly, it’s faster than waiting for that takeout to arrive. We’re talking minimal prep time, people! Plus, if you need a last-minute dessert for guests, this peach cobbler dump cake makes you look like a culinary genius without actually requiring any genius-level skills. Seriously, if you can open cans and melt butter, you’re basically a pro at this. It’s the kind of dessert that makes everyone go “Mmm, this is SO good!” and you can just casually shrug and say, “Oh, it was nothing.” 😉
Ingredients You’ll Need (Spoiler: Not Many!)
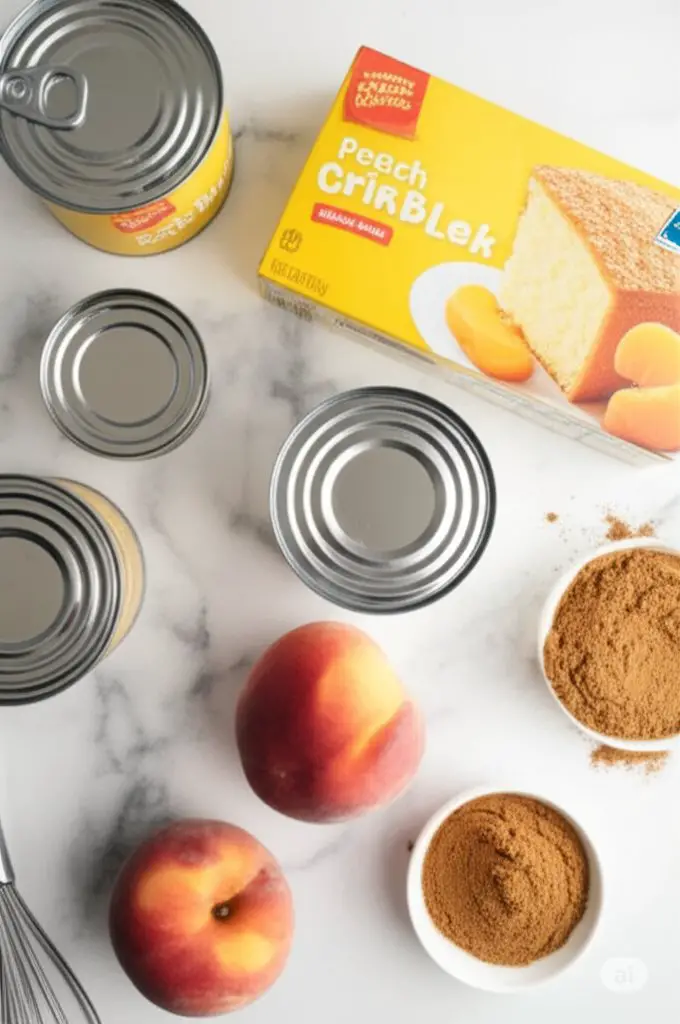
Here’s the super short and sweet list of what you’ll need to whip up this masterpiece:
- 2 (15-ounce) cans sliced peaches in heavy syrup, undrained. Don’t drain them! The syrup is part of the magic.
- 1 (18.25-ounce) box yellow cake mix. Any brand will do, so grab your favorite.
- ¾ cup (1 ½ sticks) unsalted butter, melted. Yes, the whole shebang. Don’t skimp!
- 1 teaspoon ground cinnamon (optional, but highly recommended for that cozy vibe).
- A sprinkle of turbinado sugar or granulated sugar (optional, for extra sparkle and crunch on top).
Key Substitutions:
- Feeling adventurous? Swap the peaches for apple pie filling, cherry pie filling, or even a mix of berries. Just make sure they’re canned in syrup.
- Don’t have yellow cake mix? White cake mix or butter pecan cake mix would also work nicely, offering slightly different flavor profiles.
Tools & Kitchen Gadgets Used:
Alright, here’s the lowdown on the equipment you’ll need. Perfect for adding those affiliate links, right? 😉
- 9×13 inch baking dish: The trusty workhorse of many kitchens.
- Can opener: Unless you’re superhuman and can open cans with your bare hands.
- Measuring cup (for butter): To get that golden ratio just right.
- Mixing spoon or spatula: For lightly distributing the ingredients. We’re not making a layered cake here.
- Oven: The heat source that transforms this dump of ingredients into glorious cobbler.
- Optional: Small bowl for cinnamon mixing: If you decide to spice things up (and you should!).
Step-by-Step Instructions (So Easy It’s Almost Criminal)

Alright, buckle up, buttercup. This is where the “dump” part really shines.
- Preheat your oven to 350°F (175°C). Go ahead, get that heat going.
- Grab your 9×13 inch baking dish. No need to grease it or anything fancy. We’re keeping it simple, remember?
- Pour both cans of undrained sliced peaches into the bottom of the baking dish. Spread them out somewhat evenly. Don’t overthink it; they’ll sort themselves out in the oven.
- Sprinkle the dry yellow cake mix evenly over the top of the peaches. Resist the urge to mix it in! Just let it sit there like a golden blanket.
- If you’re using cinnamon, mix it with a tablespoon of the dry cake mix in a small bowl. This helps distribute it more evenly. Then, sprinkle this cinnamon-sugar mixture over the cake mix layer.
- Pour the melted butter evenly over the entire surface of the dry cake mix. Try to get every bit of that powdery mix moistened. This is what creates that glorious, slightly chewy topping.
- If you want a little extra sparkle and crunch, sprinkle a bit of turbinado sugar or granulated sugar over the top. Optional, but it does add a nice touch.
- Bake for 45 to 55 minutes, or until the top is golden brown and bubbly, and the peaches are heated through. The exact time will depend on your oven, so keep an eye on it. Does your kitchen smell amazing yet? Thought so.
- Let it cool for at least 10-15 minutes before serving. Trust me on this. It’s molten hot straight out of the oven (and worth the wait!).
- Serve warm with a scoop of vanilla ice cream, a dollop of whipped cream, or even just on its own. You’ve earned it!
Calories & Nutritional Info (The Less You Know, the Happier You Are? 😉)

Okay, let’s talk numbers. Keep in mind these are estimates and can vary based on the specific brands and portion sizes you use.
- Estimated Calories per serving (based on 12 servings): Around 300-350 calories.
- Key Nutritional Notes (per serving, approximate):
- Fat: 15-20g (mostly from the butter)
- Carbohydrates: 40-50g (mostly from the cake mix and syrup)
- Protein: 2-3g
- Sugar: Let’s just say it’s a dessert. 🤷♀️
Look, it’s not a health food. It’s a delicious, easy dessert that brings joy. Sometimes, that’s all that matters, right?
Common Mistakes to Avoid (And How to Laugh at Them)
Even though this recipe is practically foolproof, here are a few little oopsies people sometimes make. Don’t worry, we’ve all been there!
- Draining the peaches: NO! Don’t do it! The syrup is crucial for moisture and flavor. If you drain them, your cobbler might end up dry and sad. Think of the syrup as liquid gold.
- Mixing the cake mix and peaches: Resist the urge! The magic of a dump cake is in the layers. Just sprinkle the dry mix on top. Trust the process. It feels wrong, but it’s so right.
- Not melting the butter evenly: You want that buttery goodness distributed across the entire top. Globs of unmelted butter won’t create that lovely, consistent topping. Take a few extra seconds to make sure it’s fully melted and drizzled evenly.
- Underbaking: Nobody wants a gooey, uncooked cake mix situation. Bake it until the top is golden brown and bubbly. If you’re unsure, give it a gentle poke; it should feel somewhat firm.
- Serving it immediately: Patience, young Padawan! Letting it cool for a bit allows the flavors to meld and prevents you from burning your tongue off. Plus, it helps the cobbler set up a little.
Variations & Customizations (Let’s Get Creative!)
Okay, so the original is fantastic, but what if you’re feeling a little fancy or have dietary needs? Here are a few fun tweaks:
- Spiced Peach Cobbler: Add a pinch of ground nutmeg or cloves along with the cinnamon for an extra layer of warm spice. You could even throw in a tiny bit of ground ginger.
- Berry Peach Cobbler: Toss in a cup of frozen mixed berries (like blueberries, raspberries, and blackberries) with the peaches before adding the cake mix. This adds a tart and juicy twist.
- Nutty Peach Cobbler: Sprinkle some chopped pecans or walnuts over the cake mix before pouring on the melted butter. This adds a delightful crunch and nutty flavor.
- Dairy-Free Peach Cobbler: Use a dairy-free butter substitute and check that your cake mix doesn’t contain dairy. Serve with dairy-free ice cream or a coconut whipped topping.
- “Healthier” Peach Cobbler (ish): Okay, it’s still dessert, but you could use a whole wheat cake mix and reduce the amount of melted butter slightly (maybe by ¼ cup). It won’t be quite the same, but it’s a small step!
FAQ Section (Because You Know You Have Questions!)
Alright, let’s tackle some of those burning questions you might have about this glorious peach cobbler dump cake.

Q1: Can I use fresh peaches? While you can, canned peaches in syrup work best for this recipe due to their moisture content. If you do use fresh peaches, you’ll want to peel and slice them and maybe simmer them with a bit of sugar and water to create some syrup before using. It adds an extra step, though.
Q2: Can I make this ahead of time? You can bake the peach cobbler dump cake ahead of time and let it cool completely. Store it covered in the refrigerator for up to 3 days. Reheat it in a 300°F (150°C) oven until warmed through before serving.
Q3: Can I freeze peach cobbler dump cake? Technically, yes, but the texture might change slightly. Let it cool completely, then wrap it tightly in plastic wrap and then foil. Freeze for up to 2 months. Thaw overnight in the refrigerator and reheat as mentioned above.
Q4: My cake mix has lumps. Should I sift it? For this recipe, small lumps aren’t a huge deal. The melted butter will help moisten everything. However, if you have large, stubborn lumps, you can give it a quick whisk with a fork before sprinkling it over the peaches.
Q5: The top of my cobbler is browning too quickly. What should I do? If the top is getting too dark before the middle is cooked, you can loosely tent the baking dish with aluminum foil for the remaining baking time.
Q6: Can I add oats or nuts to the topping? Absolutely! Adding a mixture of oats, flour, butter, and sugar (like a streusel topping) along with some chopped nuts would add a lovely texture. Just sprinkle it over the peaches before the cake mix.

Q7: What’s the best way to serve peach cobbler dump cake? Warm is definitely the way to go! A scoop of cold vanilla ice cream is a classic pairing, but whipped cream, a drizzle of caramel sauce, or even a sprinkle of extra cinnamon all work wonderfully.
Final Thoughts (Go Forth and Bake!)
So there you have it! The easiest, most ridiculously delicious peach cobbler dump cake recipe you’ll ever stumble upon. Seriously, if you mess this up, I’m not sure we can be friends anymore (just kidding…mostly 😉). But honestly, it’s that simple. Now, go forth, raid your pantry, and bake up a little bit of happiness. And hey, if anyone asks for the recipe, just tell them it’s a family secret. Or, you know, share the love. Enjoy! 😊