The “Pups to the Rescue!” Guide to an Easy Paw Patrol Birthday Cake
Alright, parents, Ryder here. Just kidding. But if your living room has been taken over by a team of heroic talking puppies and the phrase “Paw Patrol is on a roll!” is permanently etched into your brain, then you know the birthday request that’s coming. You’re not just making a cake; you’re on a mission to create the ultimate paw patrol birthday cake.
Before you start having nightmares about sculpting a perfect 3D Marshall out of fondant, let me call off the alarm. We’re not doing that. We’re going to use a brilliant, low-stress, “work smarter, not harder” strategy that will make you look like the hero of Adventure Bay. We’re creating a fun, vibrant scene that’s easy to decorate, and we’re using a secret weapon that doubles as a birthday gift. No job is too big, no pup is too small, and no parent is too tired for this cake!
Why This Cake is Totally Pawsome
So, why is this the one and only Paw Patrol cake tutorial you’ll ever need? Let’s go, go, go!
- It’s a Cake and a Gift in One: Here’s the ultimate parent hack: the main characters on this cake are actual, real-life toy figurines. This means less painstaking decorating for you and a brand new set of pups for the birthday kid to play with long after the cake is gone. You are a genius.
- It’s Super Easy and Looks Amazing: This design is all about creating a fun scene. We use simple frosting techniques, some crushed crackers for a path, and let the toys do all the heavy lifting. It’s a full-on Adventure Bay scene that will make your kid’s eyes light up.
- The Flavor is Kid-Approved: Underneath our beautiful landscape is a classic, crowd-pleasing, and utterly joyful Funfetti cake. It’s a party on the inside and the outside!
The Ingredient List: Get Your Pup Pack Ready
To build our Adventure Bay headquarters, we need a few key supplies.
For the “Pup-Tastic” Funfetti Cake:
- All-Purpose Flour: 2 ½ cups.
- Granulated Sugar: 1 ¾ cups.
- Baking Powder: 2 ½ teaspoons.
- Salt: ½ teaspoon.
- Unsalted Butter: 1 cup (2 sticks), softened.
- Large Eggs: 4, at room temperature.
- Vanilla Extract: 1 tablespoon.
- Whole Milk: 1 ¼ cups, at room temperature.
- Rainbow Sprinkles (Jimmies): ½ cup.
- The “On a Roll” Shortcut: Let’s be real, you’re busy. A box of funfetti cake mix, prepared according to the directions, is a perfect and delicious time-saver.
For the Adventure Bay Frosting & Scenery:
- Unsalted Butter: 2 cups (4 sticks), softened.
- Powdered Sugar: 7-8 cups, sifted.
- Milk or Heavy Cream: 5-7 tablespoons.
- Vanilla Extract: 2 teaspoons.
- A Pinch of Salt.
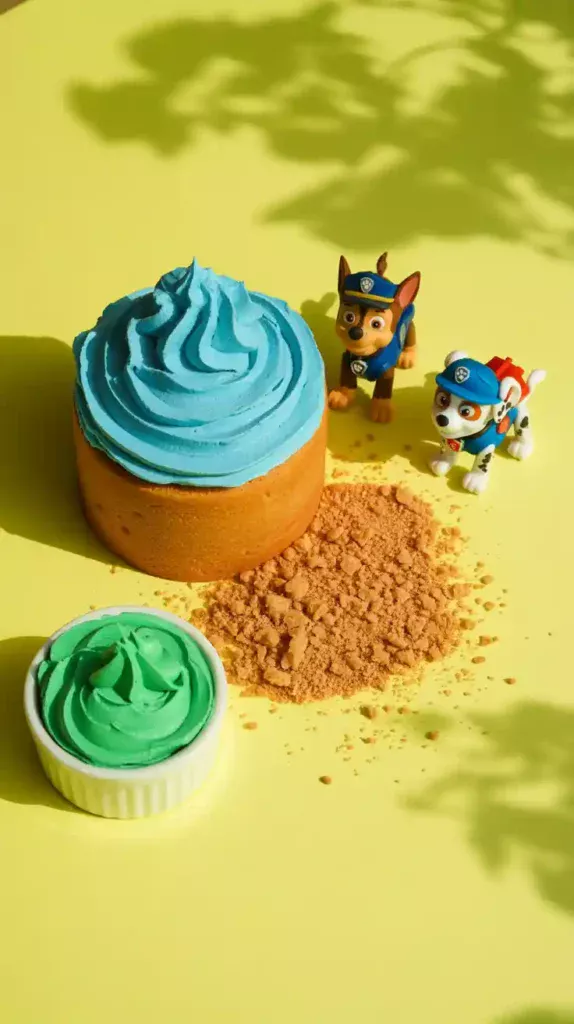
- Gel Food Colorings: Sky Blue and Leaf Green are the main players.
- The “Dirt Path”: A handful of Graham crackers or digestive biscuits, crushed.
- The Pups: New, clean Paw Patrol toy figurines. This is the most important part!
Tools & Kitchen Gadgets: Your Pup Pad
Every pup needs their tools. Here’s what you’ll need for this mission.
- Two 8-inch or 9-inch Round Cake Pans.
- A Stand Mixer or Hand Mixer.
- An Offset Spatula and a Bench Scraper: For frosting your cake like a pro.
- A Large Cake Board or Serving Platter.
- A Ziploc Bag and a Rolling Pin: For crushing your graham crackers into “dirt.”
- Piping Bags and Tips (Optional but fun): A grass tip (Wilton #233) and a small star tip are great for adding details.
Step-by-Step Instructions: The Mission Briefing
Okay, pups, let’s dive in!
Step 1: Bake the Base
- Preheat your oven to 350°F (175°C). Grease and flour your cake pans.
- Prepare your funfetti cake batter and gently fold in the sprinkles at the end.
- Divide the batter between your pans and bake for 30-35 minutes, or until a toothpick comes out clean. Let the cakes cool completely. A warm cake is a wobbly lookout tower.
Step 2: Mix Your Adventure Bay Palette

Whip up your buttercream until it’s light and fluffy. Divide it into three bowls:
- Largest portion: Tint this a bright, happy sky blue.
- Medium portion: Tint this a vibrant grass green.
- Small portion: Leave this white for details.
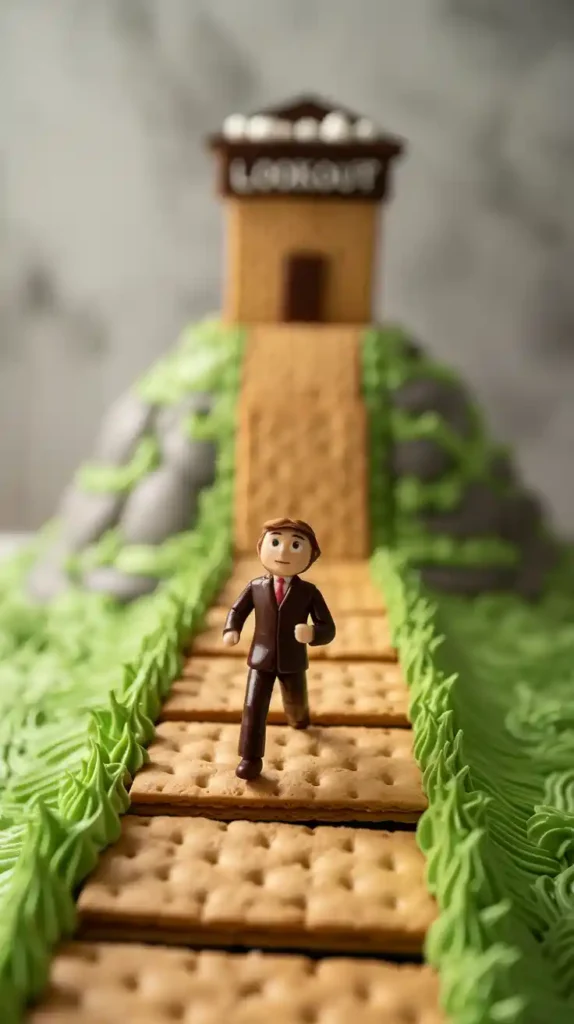
Step 3: Create the Landscape
- Level your cooled cake layers and stack them on your cake board with a layer of frosting in between.
- Apply a thin crumb coat all over and chill for 20-30 minutes.
- Now, create your scene. Frost the top third of the cake and a little ways down the side with the sky blue frosting. Frost the bottom two-thirds of the cake with the green frosting.
- Use your offset spatula or bench scraper to smooth the frosting. Don’t worry about a perfect line where the blue and green meet; a slightly blended horizon looks great.
Step 4: Add the Pawsome Details
- Take your crushed graham crackers and create a winding “dirt” path from the bottom of the cake up towards the top. Gently press the crumbs into the frosting.
- If you have a grass tip, pipe some fun, textured grass along the bottom edge of the cake and along the path.
- Use your white frosting to pipe a few fluffy clouds in the “sky.” You can also use a star tip to pipe a simple shell border around the base.
Step 5: Call in the Pups!
This is the final and best step. Thoroughly wash and dry your new Paw Patrol toy figurines. Arrange them on the cake as if they’re on a mission. Place Chase at the bottom of the path, Skye “flying” near the top, and Marshall ready to put out the candles.
Calories & Nutritional Info (Pup-erating Fuel)
This cake is powered by teamwork, bravery, and a significant amount of sugar.
- Serving Size: Enough for one pup and all their friends.
- Special Ingredient: The power of friendship.
- Calories: Let’s just say it’s enough to keep you on a roll all afternoon.
Common Mistakes to Avoid (Pups in Trouble!)
- Placing Dirty Pups on the Cake: I know they’re new, but they’ve been in a factory and a store. You must wash the toys with soap and water and let them dry completely before they become cake toppers. This is a crucial food safety step.
- A Sinking Lookout: If your cake layers aren’t leveled, you’ll have a lopsided cake, and your pup figurines might slide. A flat surface is a safe surface.
- A Muddy Mess: When you’re frosting the blue sky and green grass, try to keep them relatively separate. Over-blending them will result in a murky, swampy color instead of a clean landscape.
- Forgetting to Chill: That crumb coat and a final quick chill before placing the (sometimes heavy) toys on top will prevent your frosting from getting squished and will keep your pups from sinking into the “grass.”
Variations & Customizations (Different Missions!)
Every pup has their specialty. So can your cake!
1. The “Rubble on the Double” Construction Site
For the little builder in your life. Use a chocolate cake and chocolate frosting. Cover the entire cake in crushed Oreo cookies to look like dirt and rocks. Place Rubble and his construction vehicle on top, along with some candy rocks.
2. The “Skye’s High-Flying” Adventure
Is Skye the favorite? Frost the entire cake in sky blue buttercream. Use your white frosting to pipe on lots of fluffy clouds all over the sides and top. Place Skye and her helicopter on a big cloud right on top.
3. The Paw Print Cake

For a simpler, more graphic design. Frost the cake in a solid color associated with a favorite pup (like red for Marshall or blue for Chase). Then, using a contrasting color, create the iconic Paw Patrol paw print logo on top. You can use a stencil or freehand it—it’s a very forgiving shape!
FAQ: Your Pup Pad Questions, Answered
Where is the best place to find the Paw Patrol toy toppers?
The toy aisle of any major department store (like Target or Walmart), party supply stores, and online retailers like Amazon are your best bets. Look for the small figurine sets; they are the perfect size for a cake.
Is this cake design good for a beginner baker?
This is the perfect cake for a beginner! The “scene-setter” style with toy toppers is incredibly forgiving and relies on basic frosting skills. It looks way more complicated and impressive than it actually is.
Can I use a different flavor of cake?
Absolutely! A classic vanilla or a rich chocolate cake would be fantastic. You can even tint a vanilla cake the color of your child’s favorite pup for an extra surprise inside.
How do I make the little paw prints that are in the logo?
It’s easy! Use a piping bag with a medium round tip. Pipe one large, slightly oval-shaped dot for the “palm,” and then four smaller dots above it for the “toes.”
Can I make the cake ahead of time?
For sure. You can bake the cake layers a day or two in advance, let them cool, and wrap them tightly. You can even assemble and frost the entire cake the day before. Just add the toy figurines right before the party.
My frosting colors aren’t as bright as the cartoon! What’s the trick?

Use gel food coloring, not the liquid kind you find in the little teardrop bottles. Gel colors are highly concentrated and will give you those vibrant, cartoon-worthy colors without making your frosting runny.
How do I store leftovers of the cake?
Remove the toys first! Then, cover the cake and store it in the refrigerator. It will stay fresh for up to 3-4 days.
Final Thoughts
You did it! You responded to the call, you saved the day, and you created a birthday cake that is destined for the family photo album. You’ve proven that when it comes to birthday parties, no job is too big, no pup is too small, and no parent is too tired to make a little magic happen.
So get ready for the chorus of excited squeals. You’re about to be the hero of the day. Now go on, you’ve earned your pup treat!