Why This Chocolate Sheet Cake Reigns Supreme (No Shade to Other Cakes)
Listen, I love a good Black Forest gateau as much as the next person, but let’s be real. Sometimes you need instant gratification without the culinary acrobatics. This chocolate sheet cake is your answer. It’s ridiculously easy to whip up, think one bowl wonder status. It bakes in a sheet pan, which means faster cooking and way less fuss. Plus, the frosting? We pour it on while the cake is still warm! Could it get any simpler?
And the taste? Oh. My. Chocolatey. Goodness. We’re talking a rich, moist crumb enveloped in a smooth, decadent frosting that practically melts in your mouth. This cake is perfect for potlucks, birthday parties (because who needs a tiered drama-fest?), or just a Tuesday when you decide adulting deserves a chocolate reward. Trust me, your friends and family will think you’re some kind of baking wizard, and you’ll just be sitting there like, “Nah, it was easy peasy.”
The Chocolate Dream Team (Ingredients You’ll Need)
Keep it simple, keep it chocolatey. Here’s the lowdown on what you’ll need to make this magic happen.
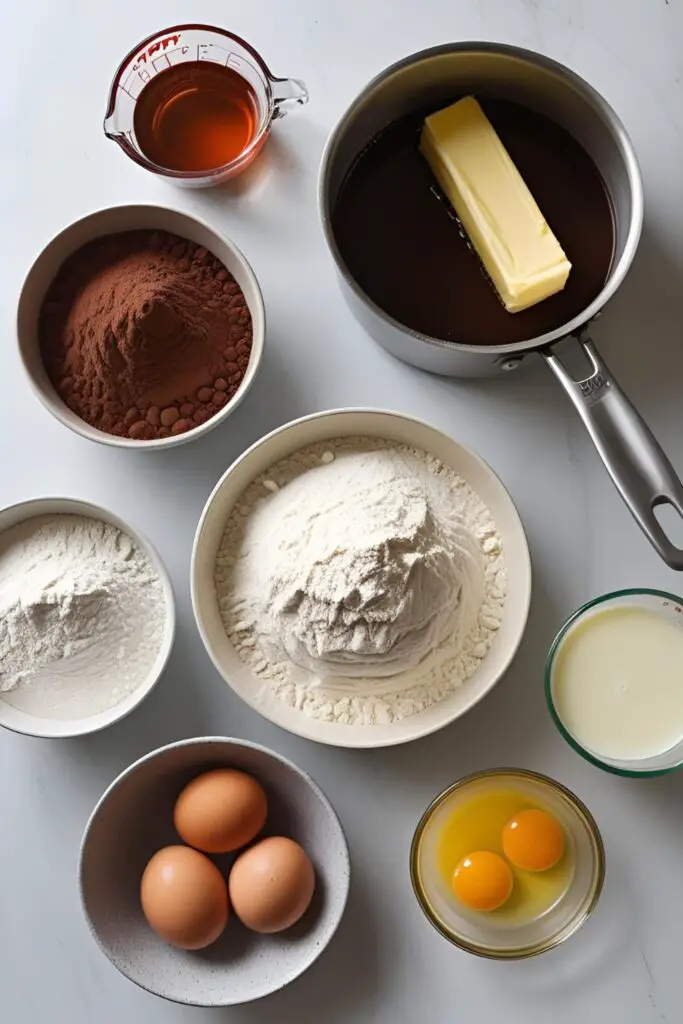
For the Seriously Chocolatey Cake:
- Unsalted Butter (1 cup / 2 sticks): We melt this, so no need for softening drama.
- Unsweetened Cocoa Powder (½ cup): The star of our chocolate show. Don’t skimp!
- Water (1 cup): Hot water, to be precise. It helps the cocoa bloom and intensifies the chocolate flavor.
- Granulated Sugar (2 cups): Sweetness is key, my friend.
- All-Purpose Flour (2 cups): The structure of our chocolate masterpiece.
- Baking Soda (1 teaspoon): Our leavening agent for a nice rise.
- Salt (½ teaspoon): Enhances all the flavors. Don’t skip it!
- Large Eggs (2 of them): Room temperature is always a good idea for even mixing.
- Vanilla Extract (1 teaspoon): Because vanilla makes everything better.
- Buttermilk (½ cup): Adds tenderness and a slight tang.
For the Lush Chocolate Frosting:
- Unsalted Butter (½ cup / 1 stick): Again, melted for ease.
- Unsweetened Cocoa Powder (¼ cup): More chocolate? Yes, please!
- Powdered Sugar (3-4 cups): Start with 3 and add more to reach your desired thickness.
- Milk (¼ cup): To bring it all together to creamy perfection.
- Vanilla Extract (1 teaspoon): A little extra vanilla never hurt anyone.
- Pinch of Salt: Balances the sweetness.
Key Substitutions:
- No Buttermilk? No sweat. For every ½ cup of buttermilk, use ½ cup of milk and add ½ tablespoon of lemon juice or white vinegar. Let it sit for 5 minutes until slightly thickened. Boom, DIY buttermilk.
- Dairy-Free Option: You can often substitute melted coconut oil for the butter in both the cake and frosting. For the buttermilk, use your favorite non-dairy milk with the vinegar/lemon juice trick.
Your Chocolate-Making Arsenal (Tools & Gadgets)
You won’t need a kitchen overflowing with gadgets for this one. Just the basics.
- Large Mixing Bowl: Big enough to handle all that chocolatey goodness.
- Whisk or Electric Mixer: Both work just fine.
- 9×13 inch Baking Pan: The star of the show – the sheet pan!
- Parchment Paper (optional but recommended): Makes cleanup a breeze.
- Measuring Cups and Spoons: Precision is your friend in baking.
- Rubber Spatula: For scraping down the bowl and spreading that luscious frosting.
- Saucepan: For melting the butter and blooming the cocoa.
Let’s Get This Chocolate Party Started (Step-by-Step Instructions)
Alright, are you ready to transform simple ingredients into a pan of pure chocolate happiness? Let’s do this.
Step 1: Preheat and Prep (The Boring But Necessary Part)

Preheat your oven to 350°F (175°C). Grease your 9×13 inch baking pan and, if you’re feeling extra virtuous about cleanup later, line it with parchment paper.
Step 2: Bloom the Chocolate (Flavor Power-Up!)
In a saucepan over medium heat, melt the 1 cup of butter. Once melted, remove from the heat and whisk in the ½ cup of cocoa powder until smooth. Now, carefully whisk in the 1 cup of hot water. It will look like a rich, liquid chocolate. Don’t worry, it’s supposed to!
Step 3: The Dry Squad (Combining the Basics)
In your large mixing bowl, whisk together the granulated sugar, flour, baking soda, and salt.
Step 4: Wet Meets Dry (Chocolate Magic Happens)
Pour the warm chocolate mixture into the dry ingredients and whisk until just combined. Don’t overmix! Nobody likes a tough cake, do they?
Step 5: The Final Touches (Adding the Good Stuff)
Stir in the eggs one at a time, followed by the vanilla extract and the buttermilk. Mix until everything is smooth and you have a beautiful, chocolatey batter. Doesn’t that look promising?
Step 6: Bake It ‘Til It’s Perfect (Patience, Young Grasshopper)
Pour the batter into your prepared baking pan and spread it evenly. Bake for 20-25 minutes, or until a toothpick inserted into the center comes out with moist crumbs attached. Don’t overbake, or your cake might end up drier than your last online date conversation.
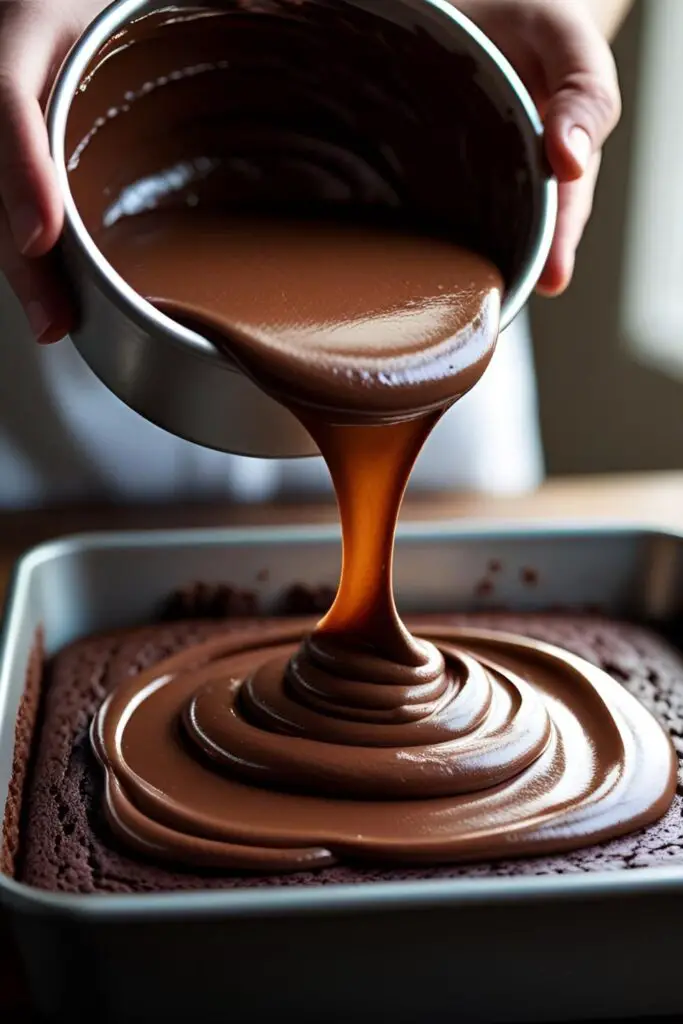
Step 7: Frosting Frenzy (The Best Part, IMO)

While the cake is baking (or just after it comes out of the oven – we’re frosting it warm!), let’s make the frosting. In the same saucepan (no need to wash it!), melt the ½ cup of butter over medium heat. Remove from heat and whisk in the ¼ cup of cocoa powder until smooth. Gradually whisk in the powdered sugar, alternating with the milk, until you have a smooth, creamy frosting. Stir in the vanilla extract and the pinch of salt. If your frosting is too thick, add a tiny bit more milk. Too thin? Add more powdered sugar. You’re the boss here.
Step 8: The Grand Finale (Warm Cake, Warm Frosting = Heaven)
Pour the warm chocolate frosting evenly over the warm cake. The warmth helps the frosting melt slightly and creates a gloriously smooth and fudgy finish. Let it cool completely (if you can wait that long!) before slicing and serving.
Calories & Nutritional Info (Let’s Be Real, You’re Here for the Chocolate)
Okay, fine, let’s talk numbers. But remember, this cake is about joy, not deprivation.
- Serving Size: One reasonably sized square (about 1/12th of the pan).
- Estimated Calories: Around 300-350 kcal per serving (this can vary based on frosting thickness).
- Main Nutrients: Well, mostly carbs and deliciousness. You’ll get a little iron from the cocoa.
- FYI: This is a treat, folks. Enjoy it in moderation (if that’s even possible with this cake).
Common Mistakes to Avoid (Don’t Be That Person)
Let’s steer clear of these baking blunders, shall we?
- Using Cold Water: Hot water is crucial for blooming the cocoa and unlocking its full flavor potential. Cold water will just give you a sad, pale chocolate taste.
- Overbaking the Cake: Nobody wants a dry, crumbly chocolate cake. Keep an eye on it and take it out when a toothpick comes out with moist crumbs. It will continue to cook slightly as it cools.
- Frosting a Cold Cake: While you can do this, pouring warm frosting over a warm cake creates a smoother, more integrated finish. The frosting kind of melds into the top layer. Trust me on this.
- Skimping on the Cocoa: Cocoa powder is the heart and soul of this cake. Use good quality unsweetened cocoa for the best flavor. Don’t use sweetened cocoa mix!
- Not Measuring Accurately: Baking is a science, my friends. Use those measuring cups and spoons correctly, especially with the leavening agents.
Variations & Customizations (Spice It Up, Buttercup!)
Want to get a little creative? Here are a few fun twists on this classic.
- Mexican Chocolate Sheet Cake: Add 1 teaspoon of ground cinnamon and ¼ teaspoon of cayenne pepper to the dry ingredients for a subtle warmth and spice that complements the chocolate beautifully.
- Mocha Sheet Cake: Dissolve 1-2 tablespoons of instant coffee or espresso powder in the hot water before adding the cocoa. This will give your cake a delicious coffee-chocolate kick.
- Peanut Butter Frosting: Instead of the classic chocolate frosting, whip up a peanut butter frosting using softened butter, powdered sugar, peanut butter, milk, and a touch of vanilla. The salty-sweet combo is divine.
FAQ: Your Chocolate Cake Conundrums, Cracked
Let’s tackle those burning chocolate cake questions.
1. Why did my chocolate sheet cake come out dry?

Likely it was overbaked. Ovens can vary, so start checking for doneness at the earlier end of the baking time. Also, make sure you used the correct amount of liquid ingredients.
2. Can I make this cake ahead of time?
Absolutely! The cake (unfrosted) can be wrapped tightly in plastic wrap and stored at room temperature for a day or two, or in the freezer for up to a month. Frost it before serving.
3. How do I get a really smooth frosting?
Make sure your butter is fully melted and you whisk the cocoa in thoroughly. Sifting the powdered sugar can also help prevent lumps. If you still have lumps, try whisking vigorously or even using an electric mixer on low speed.
4. Can I double this recipe?
You sure can! Just double all the ingredients and bake it in a larger sheet pan (like an 11×17 inch) for a few extra minutes.
5. What’s the best way to serve chocolate sheet cake?
Honestly? Just a simple slice is perfect. But you can also serve it with a scoop of vanilla ice cream, fresh berries, or a dusting of powdered sugar.
6. Can I make this without eggs?
Egg substitutes (like flax eggs or applesauce) might work, but the texture could be slightly different. I haven’t personally tested an egg-free version of this exact recipe.
7. My frosting is too thick/thin! Help!
Too thick? Add milk, one tablespoon at a time, until you reach the desired consistency. Too thin? Gradually whisk in more powdered sugar until it thickens up.
Final Thoughts (Go Forth and Bake Chocolate!)
So there you have it. The lowdown on the chocolate sheet cake that’s about to become your new best friend. It’s easy, it’s chocolatey, and it’s guaranteed to disappear faster than free pizza at an office party. Now, go preheat that oven and get ready to unleash your inner chocolate enthusiast. And hey, if you happen to eat a corner straight out of the pan while it’s still warm… well, I won’t tell anyone. Happy baking!