How to Make an Easy Minnie Mouse Cake Topper (No Art Degree Required!)
You’ve baked the perfect cake for the party. It’s moist, it’s delicious, it’s frosted to perfection… and it’s a little bit naked. Now what? Before you resign yourself to buying one of those generic, plastic-y decorations from the grocery store, what if I told you that you could create an adorable, professional-looking, and completely edible minnie mouse cake topper with your own two hands?
Yes, you. Even if you think you have the artistic skills of a potato. I promise. We’re not sculpting a renaissance masterpiece here. We’re basically playing with a delicious, sugary version of Play-Doh, and it’s going to be way more fun than you think.
So, are you ready to enter your “extra” baking era and become a birthday party legend? Let’s make some magic.
Why this “Recipe” is Awesome
Okay, so it’s less of a recipe and more of a culinary craft project, but it’s awesome for so many reasons.
- It’s a Total Showstopper: A homemade fondant topper instantly elevates a simple cake from “homemade” to “HANDMADE.” It’s the “wow” factor that will make all the other parents at the party give you that look of combined admiration and jealousy. It’s a great look.
- Way Easier Than It Looks: I’m not going to ask you to sculpt Minnie’s face. We’re not creating a photorealistic portrait. We’re using cookie cutters and simple, repeatable shapes to create that iconic silhouette. It’s basically a cut-and-paste art project that you can eat.
- You Get All the Bragging Rights: Imagine the sheer, unadulterated pride when someone asks where you bought the cake, and you get to casually say, “Oh, I made it. The topper, too.” The power you will feel in that moment is immeasurable.
Ingredients (Your Edible Art Supplies)
This is all about having the right materials on hand.
- Black Fondant: About 8 ounces. Pro Tip: Do yourself a huge favor and buy pre-colored black fondant. Trying to dye white fondant black will result in a grey, sticky mess and permanently stained hands.
- Pink or Red Fondant: About 4 ounces for Minnie’s signature bow.
- White Fondant: A very small amount for the polka dots.
- Tylose Powder (also called CMC): This is the secret weapon! It’s a hardening agent that you’ll knead into your fondant to make it firm up and hold its shape. It turns regular fondant into a modeling paste.
- Cornstarch or Powdered Sugar: For dusting your work surface to prevent sticking.
- A tiny bit of water or edible glue: To stick the pieces together.
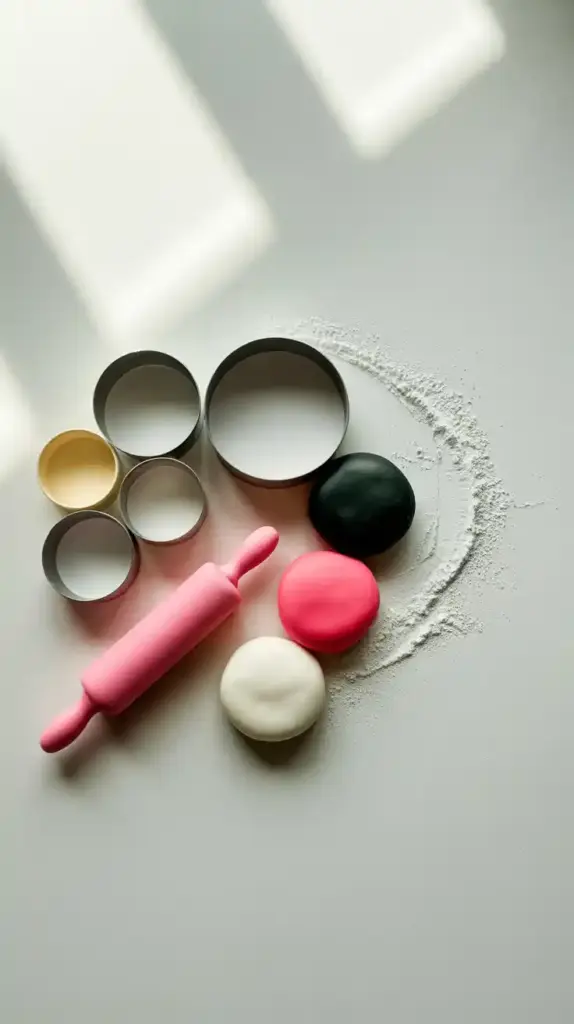
Tools & kitchen gadgets used

You don’t need a full artist’s studio, but these tools will make you feel like a pro.
- A Silicone Mat or Parchment Paper (to work on)
- A Small, Non-Stick Fondant Rolling Pin
- Round Cookie Cutters: You’ll need two sizes—one large (about 3-4 inches) for the head, and one smaller (about 1.5-2 inches) for the ears.
- A Food-Safe Craft Knife or a small pizza cutter
- A Small, Clean Paintbrush (to be used only for food!)
- A Small Piping Tip (like a Wilton #12, for cutting out perfect polka dots)
- Something to dry your bow on, like a cardboard paper towel roll cut in half lengthwise.
Step-by-step instructions
We’ll tackle this in three parts: the head/ears, the bow, and the grand assembly.
Part 1: The Iconic Silhouette
Step 1: Power Up Your Fondant Take your black fondant and sprinkle it with a little bit of Tylose powder (about ½ teaspoon for 8 ounces). Knead it in thoroughly. This will make your fondant firmer and help it dry hard so it doesn’t flop over on the cake.
Step 2: Make the Ears Dust your silicone mat lightly with cornstarch. Roll out your black fondant to about ⅛-inch thickness. Use your smaller round cutter to cut out two perfect circles. Set them aside on a piece of parchment paper to start firming up.
Step 3: Make the Head Roll out the remaining black fondant to the same ⅛-inch thickness. Use your larger round cutter to cut out the main head shape.
Part 2: The Signature Bow
Step 4: Make the Bow Loops Knead a little Tylose powder into your pink or red fondant. Roll it out into a long rectangle. Use your craft knife or pizza cutter to trim this into two smaller rectangles (about 3 inches by 1.5 inches each) and one tiny little strip (about 1 inch by ¼ inch). Take one of the larger rectangles and gently fold it in half lengthwise, like a hot dog bun, bringing the two long edges together to meet in the middle. Dab a tiny bit of water along the seam to seal it. Now, fold this piece in half to create a bow loop, pinching the raw ends together with another tiny dab of water. Repeat with the second rectangle. You now have two beautiful bow loops.

Step 5: Assemble and Dry the Bow Place your two loops side-by-side, with the pinched ends touching. Take your tiny strip of fondant, dab it with a microscopic amount of water, and wrap it around the center where the two loops meet. Gently pinch it in the back to secure it. Now, place your finished bow on the curved surface of your paper towel roll. This will help it dry with a beautiful, natural, loopy shape instead of lying flat. Let it sit for at least a few hours, or preferably overnight.
Part 3: The Grand Assembly
Step 6: Polka Dots! Roll out a small piece of white fondant very, very thin. Use the round end of your piping tip to punch out a bunch of tiny, perfect white circles. It’s like a tiny hole punch for fondant.
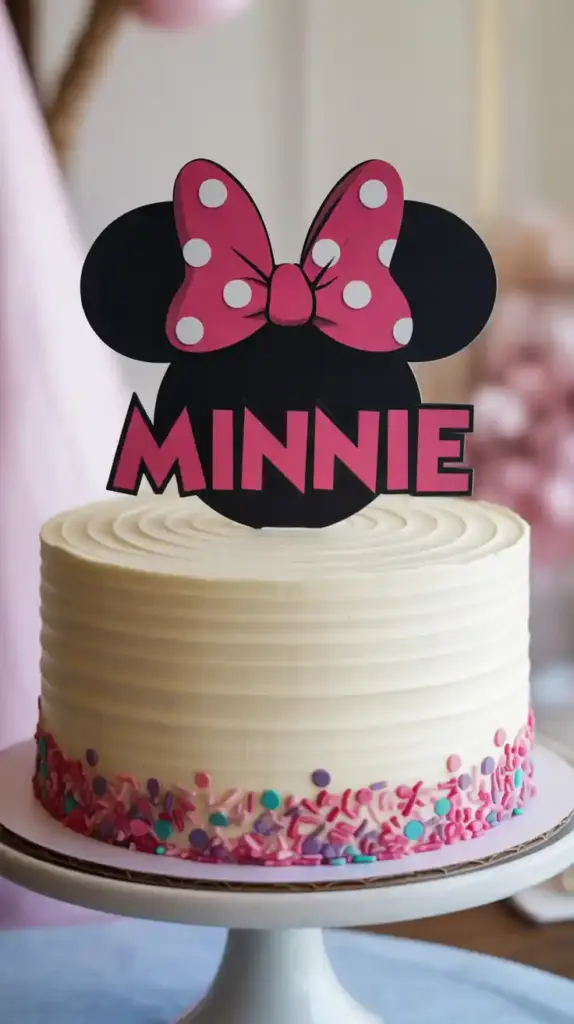
Step 7: Put It All Together Lay your large black head circle on a piece of parchment paper. Using your small paintbrush and a tiny amount of water, “paint” a little glue on the bottom edge of one of the ear circles and press it firmly onto the back of the head. Repeat with the other ear. Once your bow is firm, use a little dab of water to glue it to the front of the head, right between the ears. Use your paintbrush to add tiny dabs of water to the bow and stick on your white polka dots.
Step 8: The Final, Agonizing Wait This is the most crucial step of all. You must let your finished topper dry completely. Place it in a safe, dry place for at least 24 to 48 hours. It needs to be lightweight and hard to the touch. If you try to put a soft, floppy topper on a cake, it will be a sad, droopy mess.
Calories & Nutritional Info
Let’s be honest. It’s a decoration made of pure sugar.
- Serving Size: 1 topper (Please don’t eat the whole thing)
- Estimated Calories: A lot.
- Nutritional Profile: It’s a treat for the eyes. Let’s leave it at that. Advise your party guests that while it’s edible, it’s mostly for decoration.
Common Mistakes to Avoid
Avoid these simple mistakes for a perfect, perky topper.
- Skipping the Tylose Powder: I know it’s tempting to skip an ingredient you might not have. But if you want a floppy, sad bow that slumps over in defeat, then by all means, skip it. If you want a perky, proud, three-dimensional bow that holds its shape, you must use Tylose powder or CMC.
- Rolling Your Fondant Too Thick: If your fondant is too thick, your topper will be excessively heavy and might sink into your cake. If it’s too thin, it will be fragile and difficult to work with. Aim for a consistent ⅛-inch thickness.
- Using a Flood of Water: Water is your glue, but too much of it will turn your beautiful fondant into a slimy, sticky, disintegrating mess. Use a tiny, tiny dab with a paintbrush. A little goes a very long way.
- Being Wildly Impatient: This is the big one. You cannot make this and immediately stick it on the cake. The topper needs to dry for at least 24 hours to become hard and stable enough to stand up proudly on your cake.
Variations & Customizations

Once you’ve got the basic silhouette down, you can customize it for any theme!
- Golden Glam Minnie: Once your bow is dry, use a food-safe paintbrush to carefully paint it with edible gold paint for a super glamorous, high-end look. You can also use gold fondant or sprinkle it with edible gold glitter.
- The Easiest Variation Ever: Mickey Mouse! Want to make a Mickey topper instead? Follow the steps for the head and ears, and then… just stop. You’re done. It’s literally a Minnie topper without the bow.
- Themed Minnie: Match Minnie’s bow to your party’s color scheme! A pastel pink bow for a baby shower, a light blue and silver bow for a “winter wonderland” theme, or a red and green one for a Christmas party. The possibilities are endless.
FAQ Section
All your burning, fondant-related questions, answered.
1. What is Tylose powder and do I really, really need it? Tylose powder (also known as CMC) is a food-safe powder that you knead into fondant to make it stronger and dry harder, like gumpaste. For a flat, 2D topper you might get away without it, but for a 3D bow that needs to hold its shape, it is highly recommended.
2. How do I get my fondant super black without staining my entire life? The secret is to buy pre-colored black fondant. Seriously. Trying to dye it yourself will use an entire bottle of black food coloring, turn your hands black for days, and you’ll still probably only get a dark grey.
3. How far in advance can I make a fondant topper? Weeks! Even months! Once it is completely hard and dry, a fondant topper is essentially a sugar sculpture. Store it in a cardboard box (not an airtight container, which can make it soften) in a cool, dry place away from sunlight.
4. How do I attach the finished topper to the cake? Once the topper is hard, you can simply press it gently into the fresh buttercream on top of your cake. For extra security, you can insert a couple of dry spaghetti sticks or toothpicks into the bottom of the topper before it dries, leaving about an inch sticking out to anchor it into the cake.
5. My fondant is cracking while I work with it. What do I do? This usually means it’s a bit dry. Knead in a tiny dab of vegetable shortening with your fingers. This will make it more pliable and prevent cracking.
6. Can I make this without fondant? Yes, you could use modeling chocolate or gumpaste. Gumpaste dries even harder than fondant with Tylose and is great for more delicate work. Modeling chocolate is delicious but can be softer and more sensitive to heat.
7. How do I store the topper while it’s drying? Just leave it out on a piece of parchment paper on your counter in a safe place where it won’t be disturbed by pets, children, or clumsy spouses. It needs air to dry properly.
Final Thoughts
And there you have it! A perfect, adorable, and completely homemade Minnie Mouse cake topper that will be the star of the party. You’ve officially graduated from baker to cake artist. You’ve entered your “extra” era, and frankly, it looks delicious on you.
Now go on, place that masterpiece atop your cake, stand back, and prepare for the oohs, aahs, and endless compliments. You’ve earned every single one.