The Ultimate Marble Cake Recipe: Perfectly Swirled & Incredibly Moist
Ever stood in front of a dessert menu, paralyzed by the eternal question: chocolate or vanilla? It’s a classic dilemma, a true test of character. Well, my friend, today we’re ending that struggle once and for all. I’m here to give you the ultimate marble cake recipe, the diplomatic dessert that lets you have the best of both worlds in one perfect, swirly slice. Say goodbye to indecision and hello to your new favorite cake.
Why This Recipe is Your New Best Friend
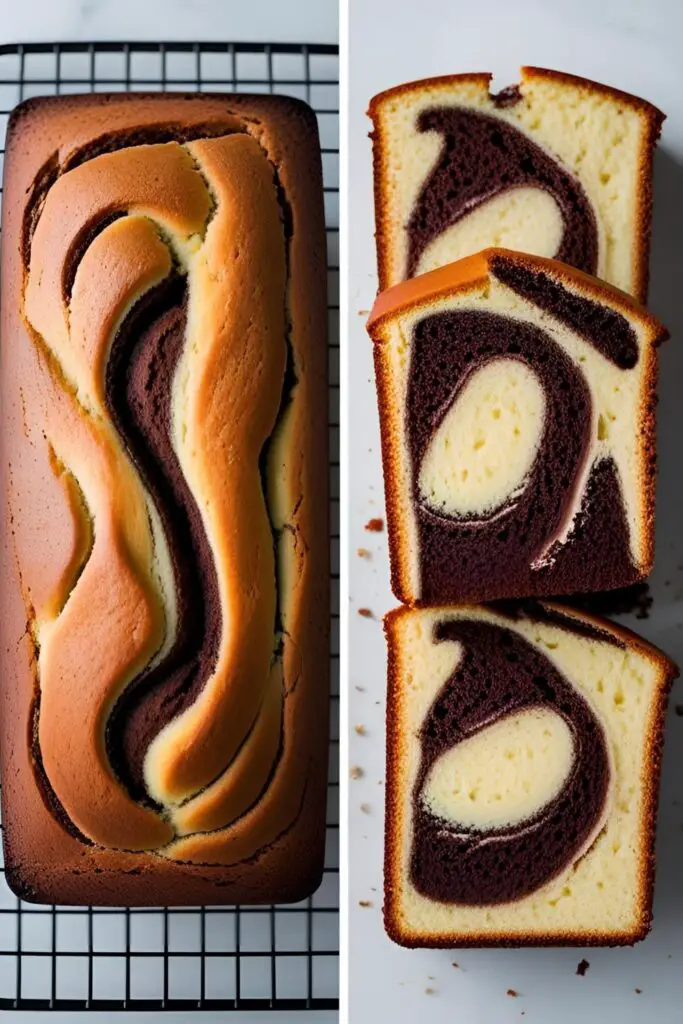
So, what makes this marble cake the one you’ll bake on repeat? First off, it’s a showstopper. Seriously. That moment when you cut into the loaf and reveal those gorgeous, random swirls of chocolate and vanilla? It gets an audible “Ooooh!” every single time. You’ll look like a professional baker, even if your biggest culinary achievement to date is not burning toast.
Beyond its good looks, this cake is ridiculously moist and tender, thanks to a few key ingredients. It’s got a rich, buttery vanilla flavor and a deep, decadent chocolate flavor that play together beautifully. Plus, it’s surprisingly straightforward to make. No weird, complicated techniques here—just one batter, split in two, and a little artistic swirling. What’s not to love?
Ingredients You’ll Need (No Weird Stuff, Promise)
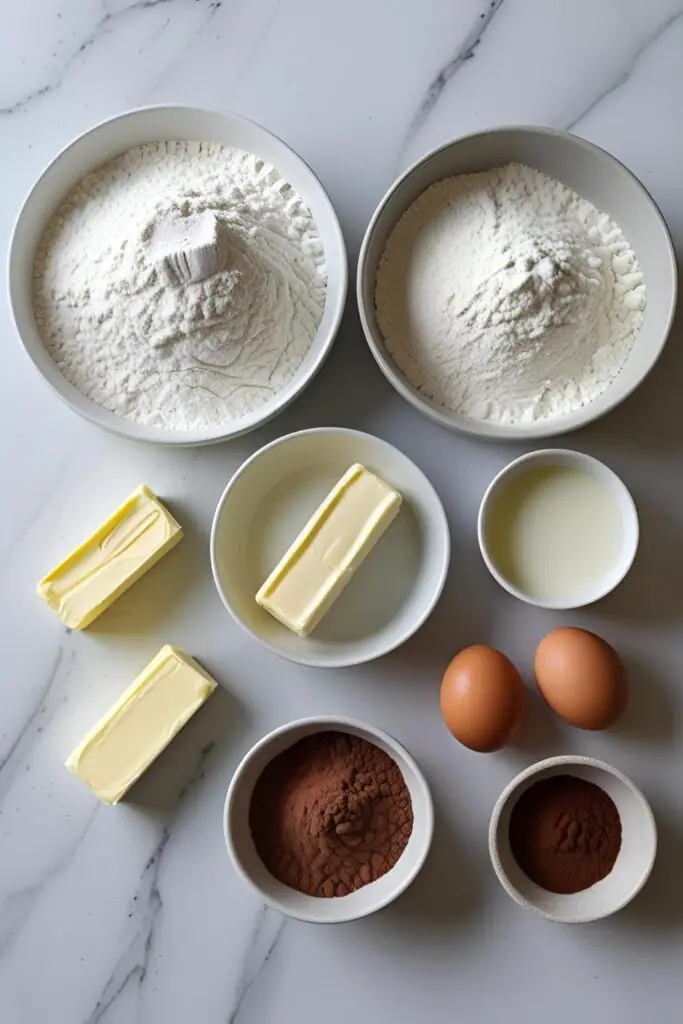
We’re keeping it classic and simple. You probably have most of this in your kitchen right now.
- 1 ¾ cups all-purpose flour
- 1 ½ teaspoons baking powder
- ½ teaspoon salt
- ½ cup unsalted butter, at room temperature (this is super important!)
- 1 cup granulated sugar
- 2 large eggs, at room temperature
- 2 teaspoons vanilla extract (the good stuff, please!)
- ¾ cup whole milk, at room temperature (sour cream or full-fat yogurt also works wonders here)
For the Chocolate Swirl:
- 2 tablespoons unsweetened cocoa powder
- 2 tablespoons hot coffee or hot milk (the coffee deepens the chocolate flavor!)
Key Substitutions:
- Dairy: You can substitute the whole milk with buttermilk for an extra tender crumb. For a dairy-free version, use a high-quality plant-based butter and unsweetened almond or soy milk.
- Flour: A gluten-free all-purpose baking blend (with xanthan gum) can be substituted 1:1 for the all-purpose flour.
- Cocoa Powder: Dutch-processed cocoa powder will give you a darker, richer chocolate swirl if you have it.
Tools & Kitchen Gadgets Used:
Here’s what you’ll need to pull off this swirly masterpiece. Ready your Amazon cart.
- Stand Mixer or Hand Mixer: While you could do this by hand, an electric mixer will make creaming the butter and sugar a million times easier.
- Mixing Bowls: You’ll need one large bowl for the main batter and a smaller one to mix the chocolate portion.
- 9×5 inch Loaf Pan: The classic shape for a marble cake. A bundt pan or an 8-inch round pan will also work, just adjust the baking time.
- Measuring Cups and Spoons: Baking is a science, people!
- Silicone Spatula: For scraping down the bowl and making sure every last bit of batter gets used.
- Parchment Paper: To line the loaf pan for easy removal. Trust me, you want this.
- Butter Knife or Skewer: The magical tool for creating those perfect swirls.
Step-by-Step Instructions (Let’s Get Swirling!)

Ready to make some magic? Follow these steps, and you’ll be in marble cake heaven.
- Prep Your Station: Preheat your oven to 350°F (175°C). Grease and flour your 9×5 inch loaf pan, then line it with parchment paper, leaving some overhang on the sides to act as handles. This is your get-out-of-jail-free card for removing the cake later.
- Combine the Dry Stuff: In a medium bowl, whisk together the flour, baking powder, and salt. Set it aside. This is your dry team.
- Cream Butter & Sugar: In the large bowl of your stand mixer (or using a hand mixer), beat the room temperature butter and granulated sugar on medium-high speed for about 3-5 minutes. You want it to be light, pale, and fluffy. Don’t rush this step; it’s what makes the cake tender!
- Add Eggs & Vanilla: Add the eggs one at a time, beating well after each addition until fully incorporated. Scrape down the sides of the bowl as needed. Then, beat in the vanilla extract.
- Alternate Wet & Dry: With the mixer on low speed, add the dry ingredients in three additions, alternating with the milk in two additions (begin and end with the dry ingredients). Mix until just combined after each addition. Do not overmix! Overmixing develops gluten and makes the cake tough.
- Divide and Conquer: Now, divide the batter. Transfer about half of the vanilla batter to your second (smaller) bowl.
- Make it Chocolatey: In a tiny bowl, mix the cocoa powder with the hot coffee or milk until you have a smooth, thick paste. Add this chocolate paste to the smaller bowl of batter and fold it in gently with a spatula until it’s just combined. Now you have two glorious batters!
- The Fun Part – The Marble Effect: Dollop alternating spoonfuls of the vanilla and chocolate batters into your prepared loaf pan. You can do this in a random pattern or create layers. There’s no wrong way, TBH.
- Time to Swirl: Take your butter knife or skewer and insert it into the batter. Gently swirl it through the pan just 2-3 times in a figure-eight motion. Do not overdo it! The goal is distinct swirls, not a homogenous, sad-brown cake. Less is more.
- Bake it Up: Bake for 50-60 minutes, or until a wooden skewer or toothpick inserted into the center of the cake comes out with a few moist crumbs attached, but no wet batter.
- Cool Down: Let the cake cool in the pan on a wire rack for about 15 minutes before using the parchment paper handles to lift it out. Let it cool completely on the wire rack before slicing. I know, the waiting is the hardest part.
Calories & Nutritional Info (The Obligatory Fine Print)
Let’s be honest, you’re not eating marble cake for the health benefits. But if you must know, here’s an approximation for one slice (assuming you cut the loaf into 12 slices).
- Estimated Calories: 250-300 per slice
- Fat: Around 12-15g
- Carbohydrates: Approximately 30-35g
- Sugar: A delightful 20g
- Protein: About 4g
Think of it as fuel for your soul. 😉
Common Mistakes to Avoid (Read This Before You Bake!)
Avoid these common cake-tastrophes to ensure marble cake success.
- Over-Swirling the Batter: This is the most common mistake. It’s tempting to keep swirling, but you’ll just end up with a muddy, light-brown cake instead of beautiful, distinct ribbons of chocolate and vanilla. Two to three passes with the knife is enough!
- Using Cold Ingredients: Cold butter, eggs, and milk do not emulsify properly. This can lead to a dense, greasy, or curdled batter. Set your ingredients out on the counter for at least 30-60 minutes before you start.
- Overmixing the Batter: I’ll say it again for the people in the back: stop mixing as soon as the flour is incorporated! Overmixing creates a tough, dry cake. We want tender, moist, and fluffy.
- Not Measuring Flour Correctly: Spoon your flour into the measuring cup and level it off with a knife. Scooping directly from the bag can pack in too much flour, leading to a dry cake.
Variations & Customizations (Let’s Get Fancy)
Once you’ve nailed the classic, feel free to get creative.
- Mocha Marble Cake: Use hot, strong-brewed coffee to mix with your cocoa powder. You can also add 1 teaspoon of instant espresso powder to the cocoa for an even bigger coffee kick. It’s a coffee lover’s dream.
- Raspberry White Chocolate Marble Cake: Instead of a chocolate swirl, create a raspberry swirl. Blend ½ cup of fresh or frozen raspberries with 2 tablespoons of sugar to make a puree. Swirl this into the vanilla batter. You can also fold ½ cup of white chocolate chips into the batter for extra decadence.
- Matcha Marble Cake: For the green tea lovers! Omit the cocoa powder mixture. In a separate bowl, whisk 1 ½ tablespoons of high-quality matcha powder with 2 tablespoons of hot water to form a paste. Fold this into half of the vanilla batter for a beautiful and delicious green tea swirl.
FAQ Section (All Your Marble Cake Questions, Answered)
Got questions? I’ve got answers. Here are some common queries about this swirly beauty.

1. What is the secret to a moist marble cake? The secret is using room temperature, full-fat ingredients (like whole milk or sour cream) and not overmixing the batter. Creaming the butter and sugar properly also incorporates air, which contributes to a light, moist texture.
2. Why is my marble cake dry? The most likely culprits are overbaking or measuring the flour incorrectly. Use the spoon-and-level method for flour and start checking your cake for doneness a few minutes before the recipe says to.
3. Can I make this in a different pan, like a bundt pan? Absolutely! This recipe will fit in a standard 10-cup bundt pan. You’ll need to grease and flour it very well. The baking time will be slightly shorter, around 40-45 minutes.
4. How do you get the perfect swirls in a marble cake? The trick is to alternate dollops of batter and then use a knife or skewer to gently run through the batter only a few times. Do not stir or whisk! Think of it as gently folding the batters into each other in the pan.
5. Can I use oil instead of butter? You can, but the flavor and texture will be different. Butter provides a richer flavor and a finer crumb. If you use oil, the cake will be very moist but may lack that classic buttery taste.
6. Can I make the batter ahead of time? It’s not recommended. The baking powder is activated as soon as it hits the liquid ingredients, so the batter will lose its leavening power if it sits for too long before baking.

7. How should I store leftover marble cake? Store it in an airtight container at room temperature for up to 3-4 days. It will stay perfectly moist!
Final Thoughts (Go On, Be Indecisive!)
You are now fully armed with everything you need to bake a stunning and delicious marble cake. It’s the perfect solution for your indecisive sweet tooth and a guaranteed way to impress anyone you share it with (if you decide to share, that is).
So go forth and embrace the swirl! Bake this cake, pour yourself a cup of coffee, and enjoy a slice of having it all. Let me know how your masterpiece turns out!