Your Takeout Place Will Miss You: The Ultimate Chicken Tikka Masala Recipe
Let’s have a little chat. You’ve had a long day. You want something comforting, something deeply flavorful, something that feels like a warm hug in a bowl. Your brain immediately whispers, “Indian takeout.” But then you remember the last time—the slightly-too-oily sauce, the chicken that was a bit… questionable. What if I told you that you could make a restaurant-quality chicken tikka masala at home that blows takeout out of the water? And what if I told you it’s not even that hard?
You’re skeptical. I get it. This dish seems shrouded in mystery, with a laundry list of spices and techniques best left to the pros. But I’m here to pull back the curtain. Together, we are going to conquer this icon of Indian cuisine, and your kitchen is about to become the best new curry house in town. That sad jar of “simmer sauce” in your pantry is officially on notice.
Why This Recipe is Basically a Life Upgrade
Still on the fence? Let me convince you why you need this in your life, like, yesterday.
First, the flavor is off the charts. We’re talking tender, yogurt-marinated chicken, charred to perfection, swimming in a creamy, tangy, and luxuriously spiced tomato gravy. Every bite is a complex explosion of flavor that is both comforting and exciting.
Second, your house will smell incredible. Forget scented candles. When you start blooming those spices, your home will be filled with an aroma so intoxicatingly delicious that your neighbors might just knock on your door with a bowl and a hopeful look in their eyes.
Finally, this is peak impress-your-friends-and-family food. Serving a homemade chicken tikka masala is a power move. It looks and tastes like you spent days slaving over a hot stove, but TBH, most of the time is just hands-off marinating. You get all the glory with a fraction of the perceived effort. It’s the perfect culinary magic trick.
The Mission Briefing: Ingredients

This looks like a long list, but most of it is just spices. Go raid your spice rack. You’ve probably got half of this already.
For the Chicken Marinade (The Flavor Foundation):
- 1.5 lbs boneless, skinless chicken thighs, cut into 1-inch pieces. (Breasts work, but thighs stay juicier. Trust me on this.)
- 1/2 cup plain full-fat yogurt. Don’t use Greek yogurt; it’s too thick.
- 2 tablespoons lemon juice. Freshly squeezed, please.
- 3 cloves garlic, minced or grated.
- 1 tablespoon fresh ginger, grated.
- 1 teaspoon garam masala.
- 1 teaspoon turmeric.
- 1 teaspoon ground cumin.
- 1 teaspoon Kashmiri red chili powder (or 1/2 tsp cayenne pepper for more heat).
- 1 teaspoon salt.
For the Masala (The Glorious Gravy):
- 2 tablespoons ghee or unsalted butter.
- 1 large onion, finely chopped.
- 3 cloves garlic, minced or grated.
- 1 tablespoon fresh ginger, grated.
- 1 teaspoon ground coriander.
- 1 teaspoon ground cumin.
- 1/2 teaspoon turmeric.
- 1 teaspoon garam masala.
- 1 (15-ounce) can crushed tomatoes. Good quality makes a huge difference!
- 1 cup heavy cream or full-fat canned coconut cream for a dairy-free option.
- 1 tablespoon kasuri methi (dried fenugreek leaves). This is the secret weapon! Crush it in your palm before adding.
- Salt to taste.
- Fresh cilantro, for garnish.
Your Kitchen Toolkit
No need for fancy gadgets from the future, just some trusty kitchen sidekicks.
- Large Mixing Bowl: For the chicken to have its marinade spa day.
- Whisk: To ensure all those spices get friendly with the yogurt.
- Chef’s Knife & Cutting Board: For all your chopping needs.
- Large Skillet, Dutch Oven, or Heavy-Bottomed Pot: This will be the stage for your masala masterpiece.
- Wooden Spoon or Spatula: For sautéing and stirring.
- Measuring Spoons & Cups: Precision is your friend when it comes to spices.
- Microplane or Garlic Press: Makes dealing with garlic and ginger a total dream.
- Metal or Bamboo Skewers (Optional): If you plan on broiling or grilling the chicken for that authentic char.
The Step-by-Step Playbook to Deliciousness
Alright, deep breath. Let’s do this. It’s easier than you think.

Step 1: Marinate That Chicken In your large mixing bowl, combine all the marinade ingredients: yogurt, lemon juice, garlic, ginger, and all those beautiful spices. Mix it all up until it’s well combined. Add your chicken pieces and toss until every single piece is lovingly coated. Cover the bowl and let it marinate in the fridge for at least 1 hour. If you have the time, letting it go for 4-8 hours (or even overnight) is where the real magic happens.
Step 2: Cook the Chicken You have two excellent choices here.
- The Skillet Method: Heat a tablespoon of ghee or oil in your large skillet over medium-high heat. Add the chicken, working in batches to avoid crowding the pan. Cook for 3-4 minutes per side until nicely browned and charred in spots. The chicken doesn’t need to be fully cooked through yet. Set it aside on a plate.
- The Broiler/Grill Method: Thread the marinated chicken onto skewers. Place them on a baking sheet and broil on high for about 8-10 minutes, flipping once, until you get some lovely char marks. This method gives it a more authentic “tandoori” flavor.
Step 3: Build the Gravy Base In the same skillet or pot you used for the chicken, melt the remaining ghee or butter over medium heat. Add the chopped onion and sauté for about 5-7 minutes, until soft and golden. Stir in the minced garlic and grated ginger and cook for another minute until fragrant. Your kitchen should be smelling epic right now.
Step 4: Bloom the Spices Add the ground coriander, cumin, turmeric, and garam masala to the pot. Stir constantly for about 30 seconds. This step, called blooming, toasts the spices and unlocks a much deeper level of flavor. Do not skip this!
Step 5: Simmer the Sauce Pour in the crushed tomatoes, scraping up any browned bits from the bottom of the pot (that’s pure flavor!). Bring the sauce to a simmer and let it cook for about 10 minutes, stirring occasionally, until it thickens and deepens in color.
Step 6: The Creamy Finale Reduce the heat to low. Slowly stir in the heavy cream. Let it gently heat through, but do not let it come to a rolling boil, or it might curdle. Return the cooked chicken and any accumulated juices back to the pot. Stir in the crushed kasuri methi and a final pinch of salt to taste. Let everything simmer together for 5 more minutes for the flavors to meld.
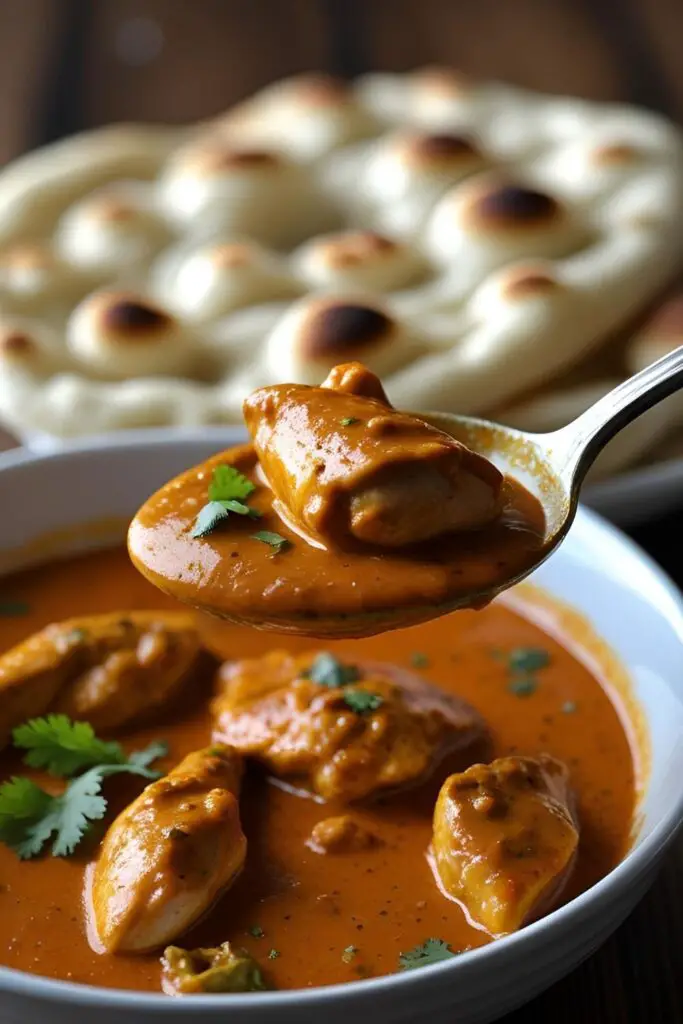
Serve hot, garnished with a flurry of fresh cilantro, alongside basmati rice and warm naan bread for dipping. You are officially a culinary legend.
Nutritional Debriefing (For the Curious)
This is comfort food, not diet food, but here’s a ballpark estimate per serving (not including rice or naan):
- Calories: ~500-600 kcal
- Protein: ~40g
- Fat: ~35g (Thank you, cream and ghee!)
- Carbohydrates: ~15g
- Note: You can reduce the fat content by using half-and-half or evaporated milk instead of heavy cream, but the texture won’t be as rich. IMO, it’s worth the splurge.
Common Pitfalls and How to Avoid Them
Read this section unless you want to end up with a sad, beige soup.
- Skimping on the Marinade Time: I know you’re hungry, but that marinating time is crucial. It tenderizes the chicken and infuses it with flavor. A short marinade leads to bland chicken, and nobody wants that.
- Burning Your Spices: When you bloom the spices, you need to stir them constantly for just 30-60 seconds. If you walk away to answer a text, you’ll come back to a burnt, bitter mess. Stay focused!
- Curdling the Cream: High heat is the enemy of dairy. Always lower the heat to low before stirring in the heavy cream and never let the sauce boil aggressively after it’s been added.
- Forgetting the Kasuri Methi: You can make this dish without it, but it won’t have that authentic, slightly earthy, and addictive restaurant flavor. Find it in an Indian grocery store or online. It’s a game-changer.
Choose Your Own Adventure: Variations
This recipe is a fantastic starting point. Feel free to play with it!
- Paneer Tikka Masala (Vegetarian): Swap the chicken for 1-inch cubes of paneer. Marinate the paneer for only 30 minutes (any longer and it can get soft) and pan-fry it until golden before adding it to the sauce.
- Vegan Tikka Masala: Use extra-firm tofu (pressed well!) or chickpeas and cauliflower. In the marinade and sauce, swap the dairy yogurt and cream for their plant-based counterparts, like full-fat coconut cream. Use oil instead of ghee.
- Make it Fiery: If you like your curry to fight back a little, add one or two finely chopped serrano or bird’s eye chilies along with the onions. You can also up the amount of cayenne pepper.
Answering Your Burning Questions (FAQ)
1. Is chicken tikka masala really spicy? It’s more flavorful than spicy-hot. The heat level is very easy to control. Kashmiri red chili powder provides amazing color with mild heat. If you want it spicier, add cayenne or fresh chilies.
2. What’s the difference between butter chicken and chicken tikka masala? Great question! While similar, chicken tikka masala is more tomato-forward with a robust, layered spice profile. Butter chicken is typically milder, richer, and, well, more buttery, with a smoother, less complex sauce.
3. Can I make this in a slow cooker? Yes! Marinate and brown the chicken first. Sauté the aromatics and bloom the spices on the stovetop, then transfer everything (except the cream and kasuri methi) to the slow cooker. Cook on low for 4-6 hours. Stir in the cream and kasuri methi during the last 15 minutes.
4. How do restaurants get that bright orange/red color? It comes from a combination of turmeric and a specific type of chili powder, like Kashmiri red chili, which is prized for its vibrant color and mild heat. Some restaurants, unfortunately, use a bit of red food coloring. We don’t need to do that!
5. Is kasuri methi really necessary? For that 100% authentic restaurant taste, yes. It adds a unique, slightly savory, and aromatic quality that’s hard to replicate. If you absolutely can’t find it, you can leave it out, and the dish will still be delicious.
6. How long can I store leftovers? You can store it in an airtight container in the fridge for up to 4 days. Like many curries, it often tastes even better the next day as the flavors have more time to mingle.
7. What should I serve with chicken tikka masala? The classic pairing is fluffy basmati rice and warm naan bread (garlic naan, for the win!). A side of cooling cucumber raita is also a fantastic addition to balance the richness.
Final Thoughts
Look at you. You just made chicken tikka masala from scratch. You took a dish that seemed intimidating and made it your own. Go ahead, grab a spoon (or just tear off a piece of naan) and dive in. That rich, creamy, perfectly spiced gravy and those tender, smoky pieces of chicken are your reward.
Now, do me a favor. Go delete that takeout app from your phone. You won’t be needing it anymore. 😉