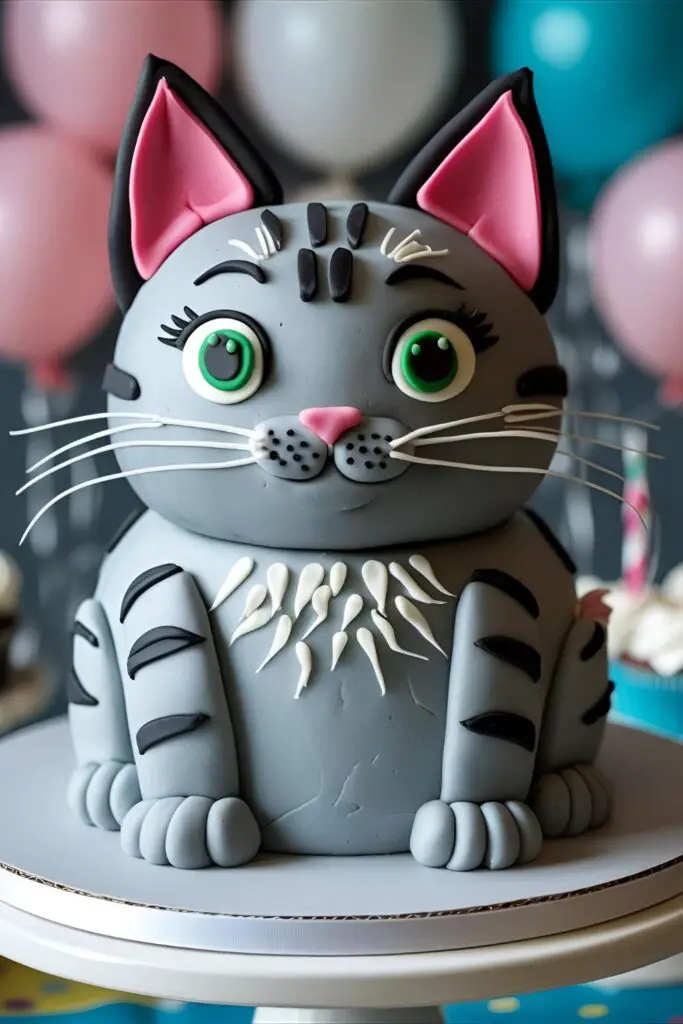
The Only Cat Birthday Cake Recipe You’ll Ever Need (It’s Purr-fect)
Let’s be honest. If you’re a cat person, you’re a cat person. Your camera roll is 90% pictures of your furry overlord sleeping, your favorite mug has a cat on it, and you’ve definitely had a full conversation with your pet. So when a birthday rolls around (yours, a friend’s, maybe even the cat’s—we don’t judge), what could possibly be more appropriate than a cat birthday cake?
But wait, before you close this tab thinking it requires an art degree and the patience of a saint, let me stop you right there. What if I told you that creating an adorable, Instagram-worthy cat cake is not only possible but actually fun and surprisingly simple? You are about to become the hero of the party, the master of buttercream, the creator of the cutest dessert known to humankind. Let’s make a cake that’s the absolute cat’s meow.
Why This Recipe is the Cat’s Pajamas
Still on the fence? Let me convince you why this cake needs to happen in your kitchen, like, yesterday.
- Maximum Adorableness, Minimum Stress: This design is all about simple shapes and fun textures. You don’t need to be a professional sculptor. We use clever tricks to make a big impact, so it looks impressive without causing a nervous breakdown.
- It Tastes as Good as it Looks: This isn’t one of those stunning-but-dry fondant monstrosities. Underneath that cute face is a moist, fluffy, classic vanilla bean cake with a creamy vanilla buttercream that people will actually want to eat.
- Completely Customizable: Is your cat a grumpy tabby? A sleek black cat? A fluffy calico? You can easily change the frosting colors and expression to match any feline personality. It’s a personalized gift and a dessert all in one! IMO, that’s a major win.
The Ingredient Lineup (No Tuna Required)
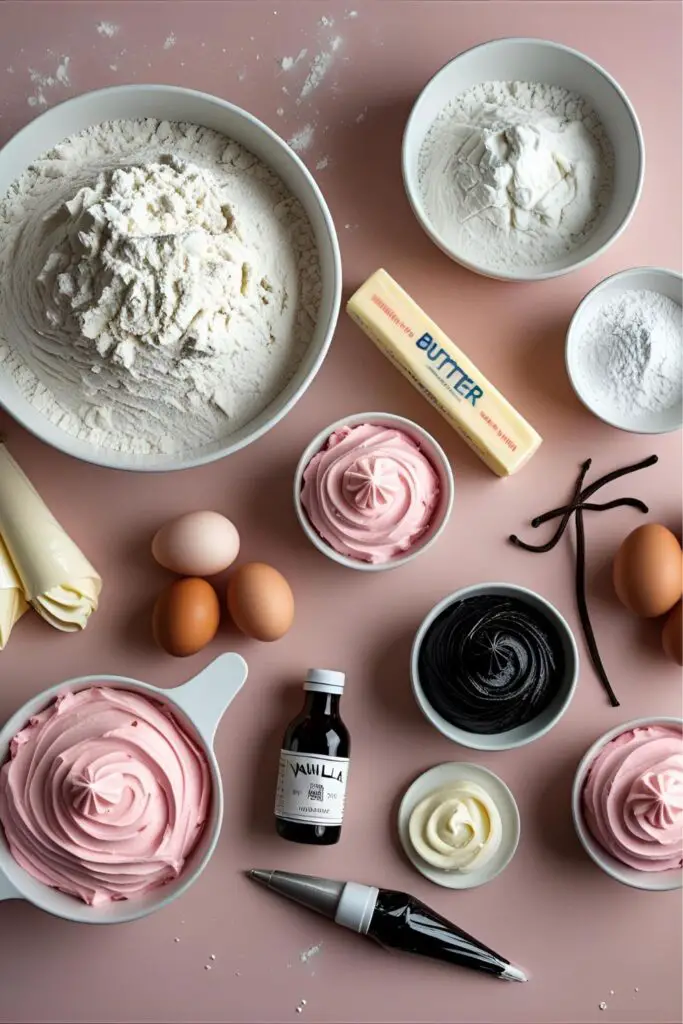
First, a very important PSA: This cake is for humans, not for cats! Now that we have that out of the way, let’s gather our supplies.
For the Purr-fect Vanilla Cake:
- All-Purpose Flour: 2 ½ cups. The trusty base of our operation.
- Baking Powder: 2 ½ teaspoons. For a light and fluffy lift.
- Salt: ½ teaspoon. Balances all the sweetness.
- Unsalted Butter: 1 cup (2 sticks), softened to room temperature. And I mean softened. Cold butter is the enemy of fluffy cake.
- Granulated Sugar: 1 ¾ cups.
- Large Eggs: 4 of them, at room temperature. Seriously, room temp everything.
- Vanilla Extract: 1 tablespoon. Use the good stuff, not the imitation kind.
- Whole Milk: 1 cup, also at room temperature.
- Sour Cream: ¼ cup, room temperature. This is the secret to an ultra-moist cake!
For the Frosting & Cat Features:
- Unsalted Butter: 2 cups (4 sticks), softened.
- Powdered Sugar: 6-7 cups, sifted. Please sift it; lumpy frosting is a tragedy.
- Vanilla Extract: 2 teaspoons.
- Heavy Cream or Milk: 3-6 tablespoons.
- Salt: A pinch.
- Black, Pink, and other Gel Food Colorings: To create your cat’s specific colors. Gel is better than liquid as it won’t thin out your frosting.
- White Fondant or Cut-out Sugar Cookies: For the ears.
- Black Licorice Laces or Dry Spaghetti: For the whiskers.
Tools & Kitchen Gadgets
Having the right equipment will make this process a whole lot smoother. No one wants to be piping whiskers with a Ziploc bag they snipped the corner off of. Not today.
- Stand Mixer with Paddle Attachment: Or a hand mixer and a strong will.
- Two 8-inch Round Cake Pans: The perfect canvas for our cat face.
- Parchment Paper: Your best friend for ensuring the cake doesn’t stick.
- Cake Turntable: Makes frosting the sides a breeze.
- Offset Spatula: For that smooth base layer of frosting.
- Piping Bags: You’ll want a few for the different colors.
- Piping Tips: I recommend a medium star tip (like Wilton #21) for texture and a small round tip (like Wilton #3) for details like the mouth and eyes.
- Wire Cooling Rack: Essential for cooling your cakes properly.
- Food-safe paintbrush or toothpick: For fine details.
Step-by-Step Instructions: Let’s Get This Kitty Created
Deep breaths. You can do this. We’ll break it down into baking and decorating.
Part 1: Bake the Cake Base
- Get Ready: Preheat your oven to 350°F (175°C). Grease and flour your two 8-inch cake pans, and line the bottoms with parchment paper.
- Combine Dry Ingredients: In a medium bowl, whisk together the flour, baking powder, and salt. Set it aside.
- Cream Butter & Sugar: In your stand mixer, beat the softened butter and sugar on medium-high speed for about 5 minutes until it’s very pale and fluffy. This step whips air into the batter, so don’t skimp on the time.
- Add Eggs and Flavor: Add the room temperature eggs one at a time, mixing well after each. Scrape down the bowl, then mix in the vanilla extract and sour cream.
- Alternate Dry and Wet: With the mixer on low, add about a third of the flour mixture, then half of the milk. Repeat this, ending with the last of the flour mixture. Mix only until the flour disappears. Overmixing leads to a tough cake!
- Bake Away: Divide the batter evenly between your pans. Bake for 30-35 minutes, or until a toothpick inserted in the center comes out clean.
- Cool It Down: Let the cakes cool in their pans for about 15 minutes before turning them out onto a wire rack to cool completely. I cannot stress this enough. Frosting a warm cake is a one-way ticket to a sloppy, melty mess.
Part 2: Decorate Your Cat Cake
- Make the Buttercream: While the cakes cool, beat the softened butter in your mixer until creamy. On low speed, gradually add the sifted powdered sugar. Add the vanilla and salt. Once combined, increase the speed to medium-high and beat for 3-5 minutes until light and fluffy. Add cream one tablespoon at a time to reach a smooth, spreadable consistency.
- Assemble and Crumb Coat: Stack your two cooled cake layers on your cake stand, with a layer of frosting in between. Cover the entire cake with a thin, smooth layer of frosting. This is the crumb coat, which acts like a primer and traps any loose crumbs. Refrigerate the cake for at least 30 minutes to let this layer set.
- Color Your Frosting: Divide the remaining buttercream into separate bowls for each color you need (e.g., a main color for the fur, black for stripes/outlines, pink for the nose). Use gel food coloring to tint each bowl to your desired shade.
- Create the Face: Apply a smooth, even layer of your main color frosting over the entire cake. Using a toothpick, lightly sketch out where the eyes, nose, and mouth will go.
- Add the Features: Use your piping bags to bring the face to life. Pipe a cute pink triangle for the nose. Use the small round tip to pipe the eyes and mouth. If your cat has stripes or patches, pipe those on now! Use a star tip to add some fluffy texture around the edges of the face if you like.
- Ears and Whiskers: For the ears, cut two triangles out of fondant or use the pointy ends of two triangle-shaped sugar cookies. Gently press them into the top of the cake. For the whiskers, carefully stick pieces of black licorice laces or uncooked spaghetti into the frosting on either side of the nose.
Calories & Nutritional Info (For the Curious Humans)

This is a birthday cake. Its primary nutritional value is joy. But if you must know… here’s a rough estimate per slice (assuming 12 slices).
- Calories: Approximately 580-630 kcal
- Carbohydrates: ~80g
- Sugar: ~60g (It’s a celebration!)
- Fat: ~30g
- Protein: ~6g
Disclaimer: These numbers are an estimate. Your cat would tell you not to worry about it and to go take a nap in a sunbeam instead.
Common Mistakes to Avoid (Cat-astrophes, If You Will)
- Rushing the Cooling Process: I sound like a broken record, but it’s the most common mistake. A warm cake + buttercream = a drooping, sad-looking cat. Be patient and let it cool completely.
- Skipping the Crumb Coat: Want a furry cat, not a grubby cat? The crumb coat is essential. It keeps your final layer of frosting clean and professional-looking. Don’t skip the chill time!
- Lopsided Ears: Don’t just place the fondant ears on top; press them gently but firmly into the top of the cake so they are secure. If they’re heavy, a little extra frosting “glue” on the back helps.
- Using Liquid Food Coloring: Liquid food coloring can thin out your frosting, making it too runny to pipe sharp details. Stick with gel food coloring for vibrant colors without ruining the consistency.
Variations & Customizations
This is where you can really let your creativity shine!
1. The Grumpy Cat
Use white frosting as a base, with grey and brown tones for the face markings. Use your black frosting to pipe a distinct frown for the mouth. It’s a purr-fect tribute.
2. The Calico or Tortoiseshell Cat
This is so fun! After your base frosting layer, use an offset spatula to gently smear on patches of black and orange/brown colored frosting before piping any other details. It creates a beautiful, blended, multi-colored coat.
3. The Gluten-Free Kitty
Making this for a gluten-sensitive friend? Simply swap the all-purpose flour for your favorite 1-for-1 gluten-free baking flour blend. The recipe works beautifully, and no one will be the wiser.
FAQ: Answering Your Meow-st Pressing Questions
Can I really make this look like MY cat?

Yes! That’s the best part. Take a picture of your cat and use it as a reference. Mix your gel food colorings to match their fur, and copy their unique markings. It’s all about capturing their essence.
What are the best options for whiskers?
I love using uncooked thin spaghetti noodles broken to size because they are stiff and easy to handle. Black licorice laces are also great. In a pinch, you can carefully pipe long lines with black frosting, but it’s trickier.
Is this cake actually safe for my cat to eat?
NO. Absolutely not. This cake is for human consumption only. Sugar, chocolate (if you go that route), and large amounts of fat are not good for cats. Give your kitty a species-appropriate treat, like a bit of tuna or their favorite catnip toy, to celebrate.
What if I’m terrible at drawing?
You don’t need to be! The cat face is made of simple shapes: two circles for eyes, a triangle for the nose, and a “w” shape for the mouth. Keep it simple and cartoony—it will still be incredibly cute.
How do I make the pointy ears?
The easiest way is to cut two triangles from a sheet of white fondant about ¼-inch thick. Let them air dry for about 30 minutes to stiffen up. Alternatively, cut a triangular sugar cookie in half diagonally before baking.
Can I make the cake ahead of time?
Totally. Bake the cake layers, let them cool, and wrap them tightly in plastic wrap. You can keep them at room temperature for a day or in the fridge for two days. The frosting can also be made ahead and stored in the fridge; just let it come to room temp and re-whip it before using.
My frosting colors aren’t vibrant enough. What should I do?

You’re likely using too little gel color. They are very concentrated, but sometimes you need more than you think, especially for black or deep colors. Also, know that colors deepen over time. Let your tinted frosting sit for 20-30 minutes, and it will become more vibrant.
Final Thoughts
There you have it—your masterclass in creating a cake that is almost too cute to slice. You’re ready to tackle this project and emerge victorious, covered in a light dusting of powdered sugar and glory. Go on, make that cat birthday cake!
Your cat will likely be unimpressed and more interested in the box your mixer came in, but every human in the room will be absolutely delighted. And that’s a victory worth celebrating. Happy baking! 🙂