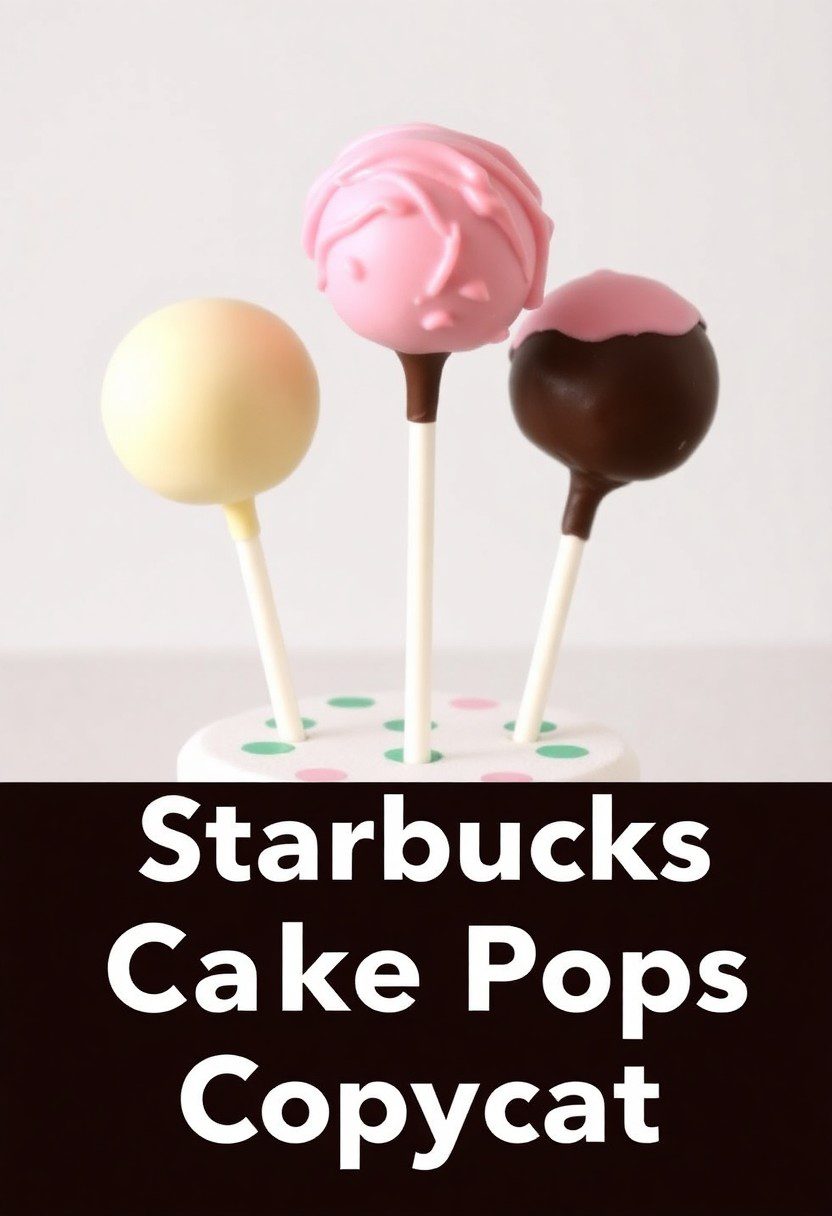
The “For Real Life?!” Guide to Making a Bluey Themed Cake
Alright, let’s have a real chat. Is the theme song to a certain Australian cartoon playing on a constant loop in your brain? Do you find yourself using phrases like “Wackadoo!” and “Oh, biscuits!” in your daily adult life? If you’re the parent of a small child, you’re not just hosting a birthday party; you’re creating a core memory. And this year, the request is in: they want a bluey themed cake.
Before you spiral into a panic, thinking you need to be a professional cake artist to pull this off, I’m here to tell you to take a deep breath. We’re not aiming for a perfect, fondant-covered sculpture. We’re aiming for something way better: a cake that is adorable, recognizable, delicious, and made with love (and a clever, low-stress decorating hack). Hooray!
Why This Cake is an Absolute Wackadoo Win
So, why is this the Bluey cake you should be making? For real life?!
- It’s Adorable and Actually Achievable: We’re making Bluey’s happy little face, and the method is basically a fun game of paint-by-numbers with frosting. No complicated carving, no fighting with fondant. It’s all about simple shapes and colors.
- It’s a Party on the Inside, Too: What’s the most joyful cake flavor on the planet? Funfetti, obviously. We’re pairing the fun, colorful exterior with a classic, sprinkle-packed vanilla cake that every kid (and grown-up) will love.
- You’ll Win All the Parent Points: When your little one sees this cake, their reaction will be worth every second you spend. You’ll be the hero of the day, the master of “Keepy Uppy,” and the undisputed champion of birthday cakes.
The Ingredient List: Let’s Get All the Bits

To create our favorite Blue Heeler, we need a fun cake base and a vibrant palette of frosting colors.
For the “Wackadoo!” Funfetti Cake:
- All-Purpose Flour: 2 ½ cups.
- Granulated Sugar: 1 ¾ cups.
- Baking Powder: 2 ½ teaspoons.
- Salt: ½ teaspoon.
- Unsalted Butter: 1 cup (2 sticks), softened.
- Large Eggs: 4, at room temperature.
- Vanilla Extract: 1 tablespoon.
- Whole Milk: 1 ¼ cups, room temperature.
- Rainbow Sprinkles (Jimmies): ½ cup.
- The “Oh, Biscuits!” Shortcut: In a hurry? One box of white or funfetti cake mix, prepared according to the package, works like a charm.
For the Heeler Family Frosting:
- Unsalted Butter: 2 cups (4 sticks), softened.
- Powdered Sugar: 6-7 cups, sifted.
- Vanilla Extract: 2 teaspoons.
- Milk or Heavy Cream: 4-6 tablespoons.
- Salt: A pinch.
- Gel Food Colorings: This is important for getting the right shades! You’ll need:
- Sky Blue or Royal Blue (for the main color)
- Navy Blue or Black (for the dark patches)
- Gold or Egg Yellow (for the snout)
Tools & Kitchen Gadgets: Bandit’s Toolkit
Gather your tools. It’s time to make some magic.
- Two 9-inch Round Cake Pans: For our cake layers.
- A Stand Mixer or Hand Mixer: For the cake and the buttercream.
- An Offset Spatula & Bench Scraper: To get a nice, smooth frosting base.
- A Cake Turntable: Makes frosting so much easier.
- Piping Bags and Round Piping Tips: A large one (like a Wilton #1A) for filling in colors and a small one (like a Wilton #3) for outlines and details.
- A Printout of Bluey’s Face: Optional, but it’s a super helpful visual guide.
- A Toothpick or Skewer: For our tracing magic trick.
Step-by-Step Instructions: This Episode of “Cake” is Called…
Let’s do this! Grab your aprons.
Step 1: Bake the Party Cake
- Preheat your oven to 350°F (175°C). Grease and flour your two round cake pans.
- Make your funfetti cake batter from scratch or a box mix. Gently fold in the sprinkles at the very end.
- Divide the batter evenly between the pans and bake for 30-35 minutes, or until a toothpick comes out clean. Let the cakes cool completely. No cheeky shortcuts here; a warm cake is a crumbly disaster.
Step 2: Mix Your Bluey Palette
- While the cakes cool, whip up your buttercream. Beat the softened butter until creamy, then gradually add the powdered sugar, vanilla, salt, and milk until you have a stiff but smooth consistency.
- Now, let’s mix our colors. Divide the frosting into bowls:
- Largest portion: Tint this a bright, happy light blue for Bluey’s main fur color.
- Medium portion: Tint this a pale, creamy tan/gold for her snout and ears.
- Small portion: Tint this a dark blue for her spots and eyebrows.
- Tiny portion: Tint this black for the nose and pupils. Leave a tiny bit of white for the eyes.
Step 3: The Frosting Foundation
Level your cooled cake layers and stack them on your cake board with a layer of frosting in between. Apply a thin crumb coat of the light blue frosting all over the cake. Chill for 30 minutes to lock in the crumbs. Once firm, apply a final, smooth, even coat of the light blue frosting.
Step 4: The Tricky Bit (That’s Actually Easy)
Find a good, clear image of Bluey’s face online. Using that as your guide and a clean toothpick, gently sketch the main shapes onto the top of your chilled cake. You want to draw the outline of her tan snout, her two dark blue eye spots/patches, and the shape of her ears.
Step 5: Color Inside the Lines
- Fit a piping bag with a large round tip. Fill it with your tan frosting. Carefully pipe to fill in the snout and inner ear shapes you drew.
- Do the same with your dark blue frosting for her spots/patches.
- Now, take a small offset spatula or the back of a spoon and gently smooth out the piped frosting inside your sketched lines.
Step 6: The Final Details
Use a small round tip to pipe two white ovals for the eyes, then a black dot for the pupils. Pipe on a cute triangle nose and her two signature dotty eyebrows. Hooray! You’ve made Bluey!
Calories & Nutritional Info (For Real Life?!)
Let’s be honest, this cake is powered by sugar and pure joy. But if Bandit asked for the stats…
- Servings: Enough for all the little squibs at the party.
- Special Ingredient: The magic of imaginative play.
- Calories: Let’s just say it’s more than a few dollarbucks worth.
Common Mistakes to Avoid (Oh, Biscuits!)
- A Smeary Mess: If you don’t chill your light blue base coat until it’s firm, the other colors will smear into it when you try to smooth them out. A cold cake is your best friend.
- The Wrong Shade of Blue: Bluey is a very specific color! Use a picture for reference. Start with a tiny amount of gel coloring and add more until you get it right. Remember, she has at least three distinct shades on her face.
- Freehanding the Face: Unless you’re a confident artist, I highly recommend the toothpick tracing method. It takes the guesswork out and ensures the proportions are right, so she actually looks like Bluey and not some weird blue dog cousin.
- Forgetting the Eyebrows: Those two little dark blue dots are surprisingly important! They give her that classic, curious expression. Don’t forget them!
Variations & Customizations
Want to change the channel? Here are a few other ideas.
1. The Bingo Cake
It’s the same technique, just a different color palette! Use orange for the main fur color and a creamy off-white for the snout, belly, and ear patches. Don’t forget her two little spots on her head!
2. The Iconic “Duck Cake”
For the true Bluey superfans. This is your chance to recreate the famously difficult Duck Cake from the show! It’s a challenging but hilarious project involving a simple sponge cake, lots of buttercream, and an absurd amount of popcorn for the feathers. Just don’t drop it on your way to the party.
3. The Easy Figurine Scene
Not confident in your piping skills? No problem! Frost a 9×13 inch sheet cake with green and blue frosting to look like the Heeler’s backyard and the sky. Use crushed cookies to make a path, and then place clean Bluey and Bingo toy figurines on top. It’s a classic for a reason.
FAQ: Your Bluey Cake Questions, Answered
Is this cake design hard for a beginner?
Not at all! The “trace and fill” frosting method is very forgiving and perfect for beginners. It looks impressive, but it’s really just coloring inside the lines. You can do this!
How do I get the frosting so smooth?
The secret is a crumb coat (that first thin layer of frosting that you chill) and using a bench scraper for the final coat. A cake turntable also helps immensely.
Can I make this cake with fondant instead of frosting?
You certainly can, but it’s a lot more work, and IMO, buttercream just tastes better. The all-frosting design gives it a soft, charming look that really fits the show’s aesthetic.
Can I make the cake ahead of time?
For sure! You can bake the cake layers a day or two in advance. Let them cool, then wrap them well and store them. You can frost and decorate the day of or the day before the party.
My buttercream is too sweet! How can I fix it?
American buttercream is famously sweet. Adding a generous pinch of salt for every cup of butter helps cut the sweetness. You can also add a tiny splash of lemon juice.
Where can I buy Bluey toy figurines for the cake?
Most major toy stores and online retailers like Amazon carry small Bluey and Bingo figurine sets that are the perfect size for cake toppers. Just remember to wash them well before using them!
I messed up a part of the face! Is it ruined?
Oh, biscuits! No, it’s not ruined. The beauty of frosting is that it’s correctable. Just use a small spatula to gently scrape off the mistake, smooth over the area with the base color, chill it for a few minutes, and try again.
Final Thoughts
You did it! You survived the magic xylophone, avoided the featherwand, and successfully created the best Bluey themed cake on the block. Your work is done. Now, get ready for the chorus of “Hooray!” when your little one sees their favorite blue heeler in cake form.
Now, go on and enjoy the party. You’ve earned it. And maybe, just maybe, this episode of “Baking” will become one of your kid’s favorite memories.