Angel Food Strawberry Shortcake: Your Shortcut to Dessert Divinity
Let’s be honest, sometimes you want a dessert that looks and tastes like a million bucks, but you only have about ten bucks worth of energy. I see you. It’s the weekend here in Khulna, and the last thing you want is a complicated, multi-hour baking project. Enter the undisputed champion of low-effort, high-reward desserts: the angel food strawberry shortcake. This isn’t your grandma’s dense, crumbly biscuit shortcake. Oh no. This is a glorious, cloud-like creation that will make you look like a pastry genius with minimal actual genius required.
Why This Heavenly Creation Is a Must-Try
You’re probably thinking, “Angel food cake? Isn’t that the stuff you buy in a plastic container at the grocery store?” And yes, that is precisely the point. This recipe is awesome because it’s a semi-homemade masterpiece. We’re taking that light-as-air, store-bought angel food cake and elevating it into a stunning, layered dessert that’s bursting with fresh strawberries and luscious cream. It’s the perfect blend of easy and impressive.
The flavor is pure, classic comfort: sweet, juicy strawberries, rich whipped cream, and the delicate, airy texture of the angel food cake. It’s a dessert that’s both incredibly satisfying and surprisingly light. It’s the perfect showstopper for a summer barbecue, a potluck, or just a random Saturday when you decide you deserve something beautiful and delicious.
The Holy Trinity of Ingredients (Plus a Few Helpers)
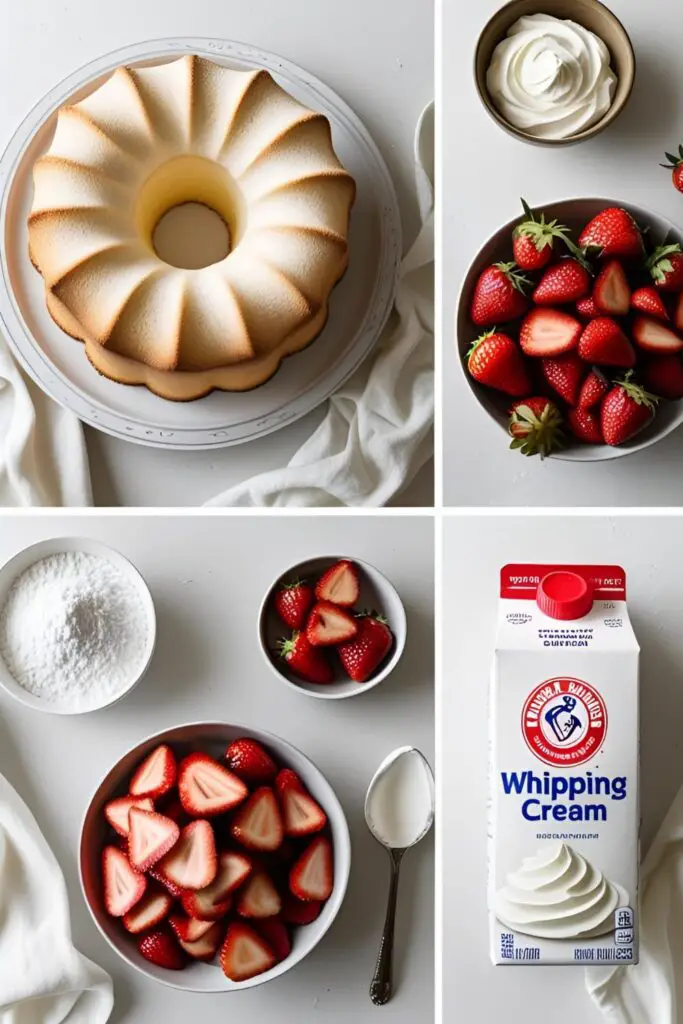
The beauty of this recipe is its simplicity. We’re using a few quality ingredients to create something truly special.
For the Strawberry Goodness:
- Fresh Strawberries (2 pounds): Hulled and sliced. Find the reddest, juiciest ones you can.
- Granulated Sugar (¼ cup): Just enough to bring out the natural sweetness of the berries.
- A Splash of Balsamic Vinegar or Lemon Juice (1 tablespoon, optional): This is a pro-tip! A little acid makes the strawberry flavor pop.
For the Creamy Dreamy Filling:
- Heavy Whipping Cream (2 cups): It must be very cold to whip up properly.
- Powdered Sugar (½ cup): To sweeten our fluffy clouds of cream.
- Vanilla Extract (1 teaspoon): For that classic, warm flavor.
The Foundation:
- A Store-Bought Angel Food Cake (one 10-inch cake): Yes, you have my full permission to buy the cake. This is our glorious shortcut to dessert heaven.
Your Assembly Toolkit (No Oven Required!)
This is more of an assembly project than a baking one, so the tool list is wonderfully simple.
- A Large Serrated Knife: This is the best tool for slicing the angel food cake into clean layers without squishing it.
- A Large Mixing Bowl: For macerating the strawberries.
- An Electric Mixer (Hand or Stand): Absolutely essential for making perfect, stable whipped cream.
- A Large Spatula: For folding and spreading the whipped cream.
- A Cake Stand or Serving Platter: To present your beautiful creation.
Step-by-Step to Strawberry Shortcake Bliss

Get ready for the easiest “fancy” dessert you’ll ever make.
Step 1: Macerate the Strawberries
This is a fancy word for “letting the strawberries hang out in sugar.” In your large mixing bowl, combine the sliced strawberries, granulated sugar, and the optional balsamic vinegar or lemon juice. Gently stir to combine, then let them sit at room temperature for at least 30 minutes. The sugar will draw out the juices, creating a beautiful, natural syrup.
Step 2: Perform Cake Surgery
While the strawberries are doing their thing, it’s time to prep your cake. Place the angel food cake on your cutting board. Using your long, serrated knife, carefully slice the cake horizontally into three even layers. Angel food cake is delicate, so use a gentle sawing motion.
Step 3: Whip It Good
In a separate, chilled mixing bowl, it’s time to make the whipped cream. Pour in the cold heavy whipping cream and begin to beat it with your electric mixer on medium speed. Once it starts to thicken, gradually add the powdered sugar and vanilla extract. Increase the speed to high and beat until stiff peaks form. Be careful not to over-whip, or you’ll start making butter!
Step 4: The Grand Assembly – Layer One
Place the bottom layer of your angel food cake on your cake stand or serving platter. Top it with about one-third of the whipped cream, spreading it evenly. Then, spoon about one-third of your macerated strawberries and their glorious syrup over the cream.
Step 5: The Grand Assembly – Layer Two & Three
Carefully place the middle cake layer on top. Repeat the process: another third of the whipped cream and another third of the strawberries. Finally, place the top cake layer on, and pile the remaining whipped cream and strawberries on top in a beautiful, rustic mound.
Step 6: Chill Out (A Very Important Step)

For the best results, let your assembled cake chill in the refrigerator for at least 1 hour before serving. This allows the layers to set and the flavors to meld together.
Calories & Nutritional Info (A Lighter Indulgence)

Thanks to the airy nature of the cake, this is a surprisingly light-feeling dessert.
- Serving Size: One respectable slice (about 1/12th of the cake).
- Calories: Approximately 250-350 kcal per slice.
- Good Stuff: It’s packed with Vitamin C from all those fresh strawberries!
- The Verdict: It feels decadent and indulgent, but it won’t weigh you down like a heavy chocolate cake. It’s basically a fruit salad… with cake and cream. 🙂
Common Mistakes to Avoid (Shortcake Sabotage)
Don’t let these simple slip-ups ruin your dessert masterpiece.
- Using the Wrong Knife to Cut the Cake: A regular chef’s knife will squish and tear the delicate angel food cake. A long, serrated bread knife is the only tool for the job.
- Not Macerating the Strawberries: Just piling fresh strawberries on the cake is fine, but letting them macerate in sugar first creates that delicious syrup that soaks into the cake and makes the whole dessert sing.
- Using Warm Cream: Your heavy cream must be ice-cold to whip up into stable, fluffy peaks. You can even chill your mixing bowl and beaters for a few minutes for extra insurance.
- Assembling at the Last Minute: While you can, the cake is even better if it has at least an hour in the fridge for the cream to set and the strawberry syrup to soak into the cake layers a bit.
Variations & Customizations (Remix Your Shortcake)
The classic is a classic for a reason, but feel free to play!
- Mixed Berry Shortcake: Don’t just stop at strawberries! Use a mix of fresh strawberries, blueberries, raspberries, and blackberries for a beautiful and delicious berry explosion.
- Lemon-Infused Cream: Add the zest of one lemon to your heavy cream before you start whipping it. The bright, zesty note of lemon is a perfect complement to the sweet strawberries.
- Chocolate Drizzle Delight: For the chocoholics, melt some good quality dark chocolate and drizzle it over the top of the finished cake. Strawberry and chocolate is a match made in heaven.
FAQ: Your Burning Shortcake Questions, Answered
Let’s clear up some of the most common questions about this heavenly dessert.
1. Do I have to use a store-bought angel food cake?
Absolutely not! If you’re an ambitious baker with a tube pan and a lot of egg whites, you can certainly make your own. But the beauty of this recipe is the delicious, time-saving shortcut.
2. Can I make this dessert ahead of time?

Yes, but with a caveat. You can assemble it up to 4-6 hours ahead of time. Any longer than that, and the cake may become a bit too soggy. Your best bet for making it a day ahead is to prep all the components (macerate the strawberries, whip the cream, slice the cake) and store them separately in the fridge, then assemble it an hour before serving.
3. How do I store leftovers?
Cover the cake loosely with plastic wrap and store it in the refrigerator. It’s best eaten within 2 days.
4. Can I use frozen strawberries?
You can, but fresh is definitely best for texture. If you use frozen strawberries, let them thaw completely and drain off any excess liquid before you macerate them with the sugar.
5. My whipped cream got runny! What happened?
You either didn’t whip it long enough to reach stiff peaks, or you over-whipped it and it started to break down. Using very cold cream and a chilled bowl is the key to success.
6. What’s the difference between this and traditional strawberry shortcake?
Traditional strawberry shortcake is typically made with a dense, scone-like biscuit. This version uses a light and airy angel food cake for a much softer and lighter dessert experience.
7. Can I make this dairy-free?
Yes! Use a store-bought vegan angel food cake (many are naturally dairy-free) and swap the heavy whipping cream for a high-quality, full-fat canned coconut cream (use only the thick, solid part from the top of a chilled can) for the whipped topping.
Final Thoughts
You are now the proud owner of the world’s easiest, most impressive dessert recipe. You have the power to transform a humble, store-bought cake into a showstopping masterpiece that will have everyone begging for the recipe.
So go forth and assemble! Embrace the shortcut, enjoy the fresh flavors, and take all the credit. Just be prepared to be the designated “dessert person” for every gathering from now on. It’s a sweet responsibility, but someone’s got to do it.