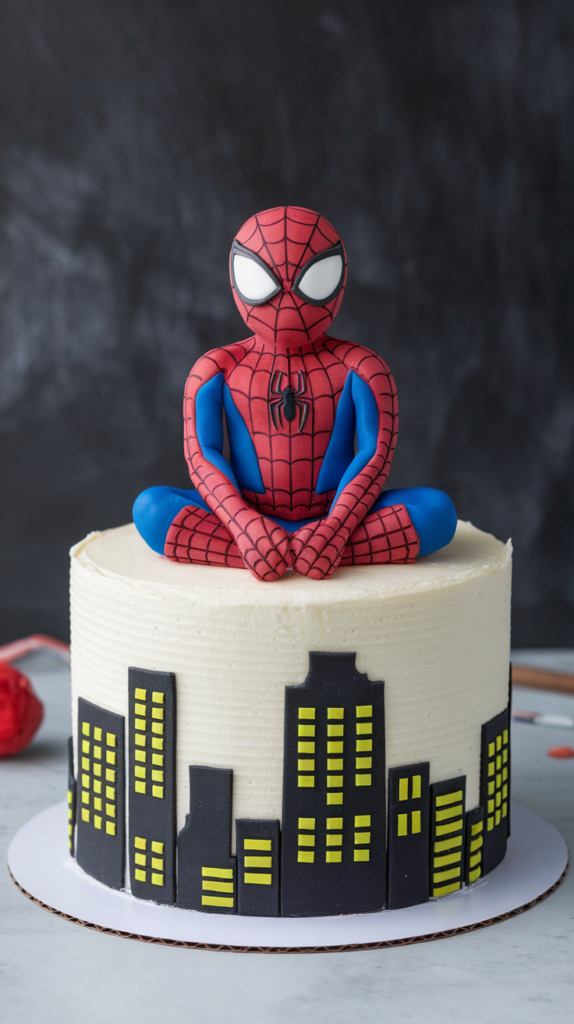
How to Make a Spiderman Cake Topper That’ll Make You a Birthday Hero
Let’s set the scene. A child’s birthday is approaching. Their request is simple, yet daunting: a Spider-Man cake. You could buy a generic cake with a cheap plastic figure plopped on top, but where’s the glory in that? You want to be the hero of the party. You want the “Whoa, you MADE that?!” moment. Well, today is your lucky day, because I’m going to show you how to create an edible Spiderman cake topper that looks amazing and is shockingly fun to make.
Forget what you think you know about cake decorating. You don’t need a fancy art degree or superhuman patience. You just need some colorful sugar dough (aka fondant), a little guidance, and the willingness to get your hands slightly stained with red food coloring. This guide will walk you through creating a Spiderman cake topper that will make any store-bought cake look like a masterpiece.
Why This DIY Topper is a Superhero Move
So why go to the trouble of making your own Spiderman cake topper? Oh, let me count the ways.
First, it looks a million times better. Let’s be real, those plastic toppers from the party store look… sad. They’re flimsy, the paint job is questionable, and they have the personality of a wet napkin. A handmade fondant topper has dimension, character, and looks intentional and impressive.
Second, you get bragging rights for life. When someone asks where you bought the cake, you get to casually say, “Oh, the cake is from the store, but I made the little Spidey on top.” The resulting gasps of admiration will fuel your ego for weeks. It’s the ultimate power move.
Finally, it’s actually fun! Think of it as playing with super-tasty, edible clay. It’s a creative outlet that results in something awesome that you can put on a cake. What’s not to love?
Materials & Edible Supplies
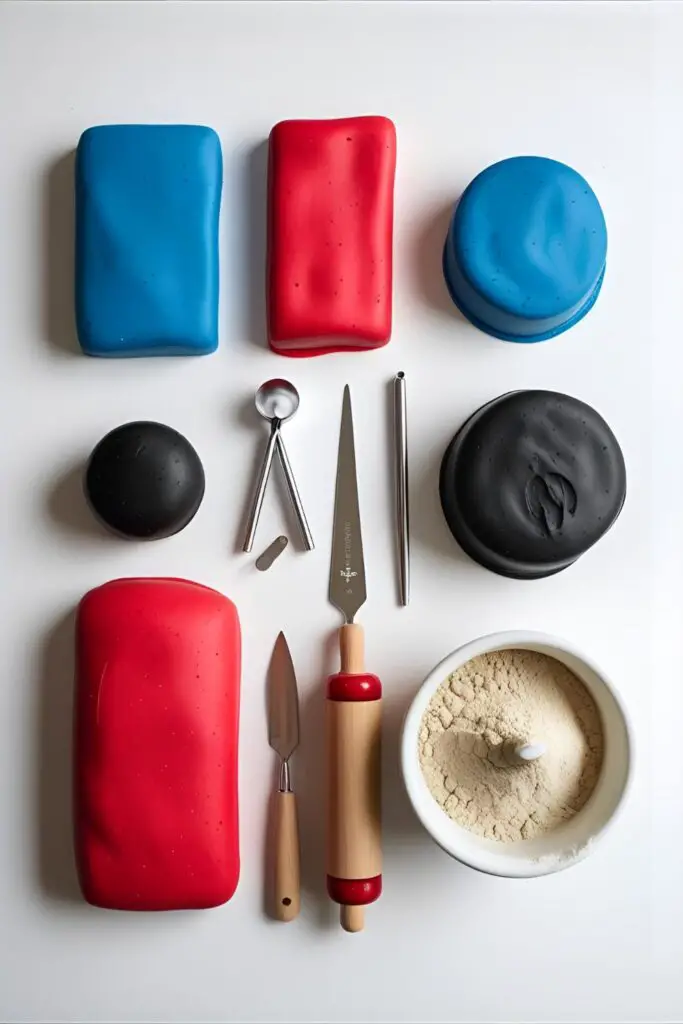

This isn’t a baking recipe, it’s an art project! So here’s your supply list.
- Fondant: You’ll need Red, Blue, Black, and a tiny bit of White fondant. You can buy these colors pre-made (highly recommended) or color white fondant yourself if you enjoy chaos.
- Tylose Powder (or CMC): This is your secret weapon. Mixing a little into your fondant helps it dry harder and hold its shape. This is not optional if you want your Spidey to stand up and not slump like he just lost a fight.
- Cornstarch or Powdered Sugar: For dusting your work surface to prevent sticking.
- Edible Glue or a Small Cup of Water: To act as your “glue” for sticking fondant pieces together.
- Black Edible Food Marker: For drawing on the web details. This is much easier than piping, trust me.
Tools & Kitchen Gadgets Used
Having the right tools will take this from “frustrating mess” to “fun art project.”
- Fondant Rolling Pin: A small, non-stick rolling pin is your best friend.
- Fondant Modeling Tools: You don’t need a huge set, but a Ball Tool and a Dresden Tool (the one with a pointy end and a veiny end) are incredibly useful.
- Small, Sharp Knife or X-Acto Knife: For clean, precise cuts. Make sure it’s one you only use for food projects!
- Smooth, Non-Stick Cutting Mat: To work on.
- Food-Safe Paint Brushes: For applying your edible glue (water).
- Styrofoam Block or Foam Pad: Perfect for letting your pieces dry without getting flattened.
Step-by-Step Instructions: Let’s Build a Spider-Man!
Alright, take a deep breath. We’re going to break this down piece by piece. It’s just a bunch of simple shapes stuck together. You got this.
H3: Prep Your Fondant (Don’t Skip This!)
- Activate the Fondant: Take the amount of red, blue, and black fondant you think you’ll need. Knead each color separately until it’s soft and pliable.
- Add Tylose Powder: For the red and blue fondant that will form the body, sprinkle in about ¼ teaspoon of tylose powder per golf-ball-sized amount of fondant. Knead it in thoroughly. This will make the fondant start to firm up.
H3: Building the Body & Legs
- The Torso: Roll a piece of your tylose-infused red fondant into a teardrop or cone shape. This will be the torso. Gently flatten the front and back.
- The Legs: Roll two equal-sized pieces of the tylose-infused blue fondant into long, sausage-like shapes. These are the legs. Make them slightly thicker at the top (the thigh) and thinner at the bottom (the ankle).
- Attach the Legs: Bend the “thigh” part of each leg and attach them to the wider bottom of the red torso using a small dab of water. You can pose them however you like—squatting, one leg bent, etc. This is your Spidey, you decide his pose!
H3: Adding the Arms & Details
- The Arms: Create two more blue “sausages” for the arms, similar to the legs. Attach them to the sides of the torso near the “shoulders.”
- The Boots & Hands: Roll out some red fondant very thin. Cut out boot shapes and wrap them around the bottom of the blue legs. For the hands, make two small red mitten shapes and attach them to the ends of the arms.
- The Spider Logo: This is the fiddly part. Take a tiny piece of black fondant (without tylose) and roll it into a teeny, tiny spider shape. Or, be smart and just draw it on later with your edible marker. I know which one I’d choose.
H3: Creating the Head & Final Assembly
- The Head: Roll a piece of red fondant into a smooth, slightly oval ball for the head.
- The Eyes: Roll out some white fondant very thin. Cut out two classic, pointy Spidey eye shapes. Glue them onto the head. Then, roll out the black fondant even thinner and cut a slightly smaller border to go around the white eyes. This gives it that iconic look.
- Attach the Head: Use a toothpick or a piece of dry spaghetti for support. Stick it halfway into the top of the torso, then gently press the head onto the exposed half.
- The Webbing: Let the figure dry for at least an hour. Then, take your black edible marker and carefully draw the web pattern all over the red sections. Take your time!
- Dry Completely: Let your finished Spiderman cake topper dry for at least 24 hours in a cool, dry place before even thinking about putting it on a cake.
Calories & Nutritional Info
You want the nutritional info for… a fondant sculpture? Okay, you do you. Just know that this is classified as “art,” not “food.”
- Serving Size: One glance of admiration.
- Calories: It’s basically pure sugar, so… a lot? The whole topper is probably 400-500 calories.
- Main Nutrient: Joy.
- Dietary Notes: It’s gluten-free! But also, please don’t eat the whole thing. It’s for looking cool, not for snacking.
Common Mistakes to Avoid (Or, How Not to End Up with a Sad, Slumped Spidey)
- Not Using Tylose Powder: I said it before, and I’ll say it again. If you skip the tylose, your Spidey will slowly slump into a sad, colorful puddle. Use the tylose powder.
- Cracked Fondant: If your fondant is cracking as you work, it’s too dry. Knead in a TINY bit of vegetable shortening until it’s smooth again.
- Sticky Fondant: If your fondant is a sticky mess, your hands are too warm, or it’s too humid. Dust your hands and your work surface with a little cornstarch.
- Trying to Assemble Too Quickly: You need to give the main body and leg structure some time to firm up before adding the head and details, or the weight will cause it to collapse. Patience is a superpower.
- Placing it on the Cake Too Early: Do not place your topper on a cake with fresh, wet buttercream until right before serving. The moisture from the frosting can soften the hardened fondant and cause it to… you guessed it… slump.
Variations & Customizations
Once you’ve mastered the classic Spidey, why not explore the Spider-Verse?
- Miles Morales: Swap the color palette! Use black fondant for the main suit and red for the details. Draw on the iconic red spider logo and webbing.
- Spider-Gwen / Ghost-Spider: This is a super cool variation. Use white fondant for the main body and head, with black accents. Use pink and teal for the iconic hood and arm details.
- The “I’m a Beginner” Mask Topper: Feeling intimidated by a full figure? Just make the mask! Cut out a large red fondant circle. Add the white and black eye pieces. Draw on the webbing with your edible marker. Place it flat on top of the cake. It’s simple, iconic, and still looks awesome.
FAQ: Your Spiderman Cake Topper Questions
Got questions? I’ve got answers. Here are some common queries for aspiring fondant artists.
H3: What’s the best fondant to use for a spiderman cake topper?

For figures, a firmer fondant works best. Brands like Satin Ice or Fondarific are great. Honestly, for your first time, even the Wilton brand from a craft store will work just fine, especially once you add tylose.
H3: How far in advance can I make it?
You can make your topper up to 2 weeks in advance! This is a huge plus. Just store it in a cardboard box (not an airtight container) in a cool, dry place, away from sunlight.
H3: How do I store the finished topper?
Do NOT put it in the fridge or freezer. The condensation will make it soft and sticky. A simple cardboard box that allows it to breathe is perfect.
H3: How do I attach the topper to the cake?
Once the topper is fully hardened, you can place it directly on a buttercream or fondant-covered cake. For extra security, you can add a little dollop of fresh buttercream to the bottom of the topper to act as glue.
H3: My fondant is super sticky! What do I do?
Sticky fondant is usually caused by humidity or warm hands. Lightly dust your hands and your work surface with cornstarch. It will absorb the extra moisture.
H3: Do I really need tylose powder?
For a standing figure? Yes. 100%. It is the difference between a superhero and a super-slump. For a flat decoration like the mask variation, you can skip it.
H3: What’s the easiest way to make the web pattern?

The black edible food marker is, by far, the easiest and cleanest method. Trying to pipe it with black royal icing is a path to madness for beginners. Trust the marker.
Final Thoughts: You’ve Got Superpowers Now
Look at you! You took a block of sugar and turned it into a superhero. You faced down fondant, wrangled food coloring, and came out the other side a decorating champion. You now possess the power to make any birthday cake about 200% more awesome.
So go ahead, place that Spiderman cake topper on your cake with pride. Take all the pictures. Graciously accept all the compliments. You’ve earned them. Now, what character are you going to make next?