The Ultimate DIY Monster High Cake Recipe Your Kids Will Scream For
So, it happened. Your child, with the sweet innocence only a kid can have, looked you dead in the eye and requested the one thing that strikes fear into the hearts of parents everywhere: a themed birthday party. And the theme? It’s not dinosaurs. It’s not princesses. They want a Monster High cake.
You nod, smile, and internally start calculating the cost of a custom bakery order. But what if I told you that you, yes you, could create a monstrously cool, freaky-fabulous cake that will make you the undisputed hero of the party? A cake so cool, it’ll make the other parents think you secretly moonlight as a pastry chef.
Forget the bland sheet cake from the grocery store. We’re about to dive headfirst into the world of pink, black, and ghoulishly good cake decorating. It’s easier than you think, I promise. Probably.
Why This Recipe is Freaky-Fabulous
Let’s be real, a themed cake has to deliver on multiple fronts. Here’s why this one is a guaranteed smash hit.
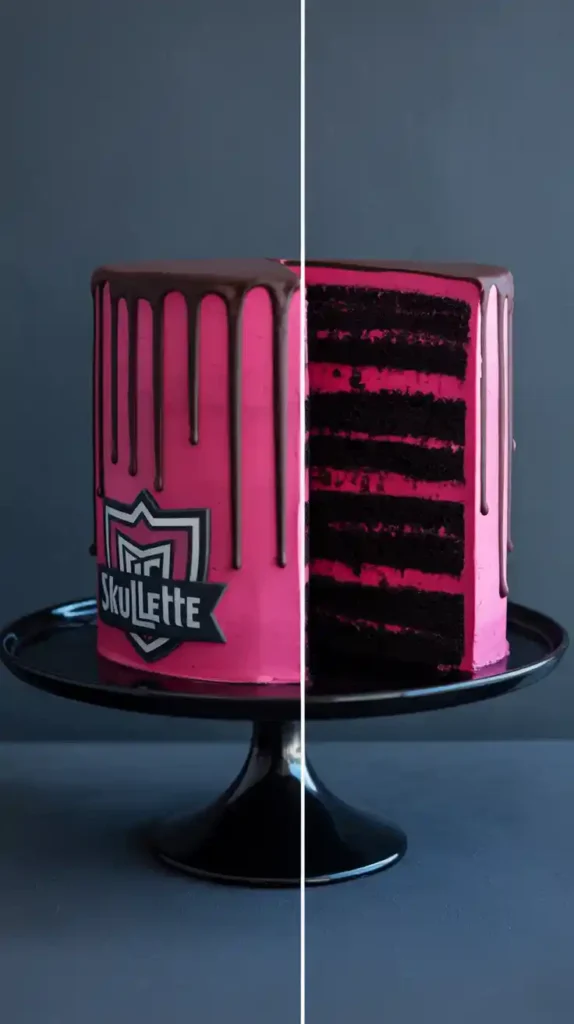
First, it’s a showstopper. We’re not just tinting some frosting and calling it a day. We’re creating a multi-layered, pink-and-black striped interior, smothered in vibrant frosting, and finished with a dramatic, glossy black drip. It’s the kind of cake that makes kids shriek with delight and adults whip out their phones.

Second, it actually tastes amazing. Underneath all that ghoulish glam is a classic, moist, and fluffy vanilla cake that kids will devour. No weird, “on-theme” flavors here that no one actually wants to eat. We’re aiming for empty plates and sugar-fueled smiles.
Finally, it’s shockingly simple. I know, it looks complicated, but we’re using a few clever shortcuts (hello, doctored cake mix!) that deliver maximum impact with minimum stress. You get all the credit for a “from scratch” masterpiece, without the from-scratch headache.
The Ghoul’s Shopping List: Ingredients
Gather your creepy components! For a cake this vibrant, using the right stuff is key.
For the “Voltageous” Cake Layers:
- 2 boxes of white cake mix
- All the ingredients listed on the cake mix boxes (usually eggs, oil, and water)
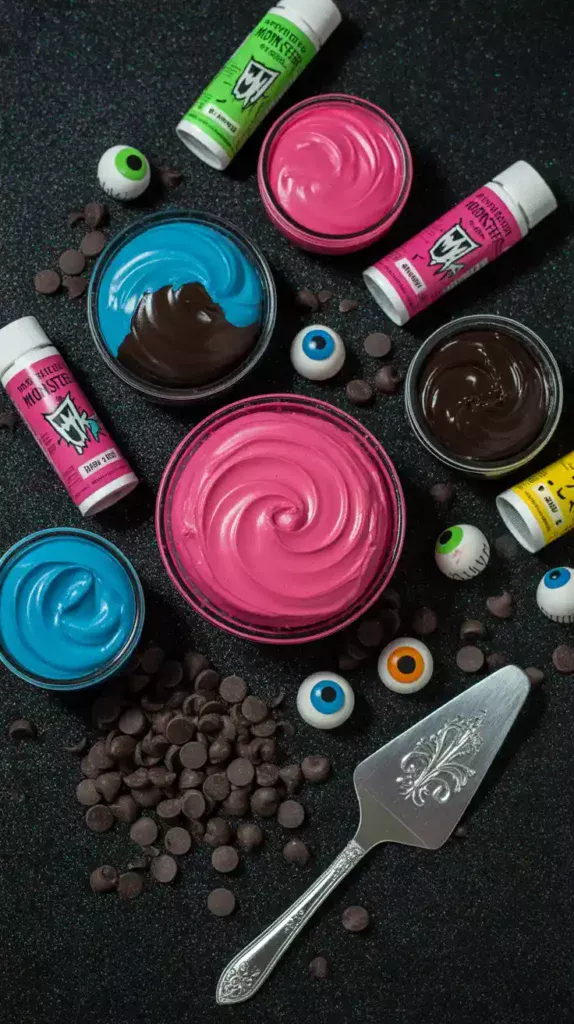
- Hot Pink Gel Food Coloring (Essential for that Draculaura vibe!)
- Black Gel Food Coloring (Liquid coloring will just make grey sadness. Go for the gel.)
- 1 container of funfetti or spooky-themed sprinkles (optional, but highly encouraged)
For the “Shockingly Sweet” Buttercream:
- 2 cups (452g) unsalted butter, softened to room temperature
- 6−7 cups (720-840g) powdered sugar, sifted
- 1/4 cup (60ml) heavy cream or whole milk
- 2 teaspoons pure vanilla extract
- A pinch of salt
- More Hot Pink Gel Food Coloring
For the “Drop Dead Gorgeous” Black Drip:
- 1 cup (170g) semi-sweet or dark chocolate chips
- 1/2 cup (120ml) heavy cream
- 1−2 teaspoons black gel food coloring
For the Claw-some Decorations:
- Monster High “Skullette” logo or character topper (you can find printable ones online!)
- Black, pink, or silver rock candy sticks
- A ghoulish mix of sprinkles, edible glitter, and sugar pearls
Your Mad Scientist Lab: Tools & Gadgets
Having your lab equipment ready is step one to a successful experiment.
- Stand Mixer or Electric Hand Mixer: Crucial for whipping that buttercream into submission.
- Large Mixing Bowls: One for each color of cake batter.
- Whisk & Silicone Spatula: For all your mixing and scraping needs.
- Measuring Cups and Spoons: Baking is a science, after all.
- Three 8-inch Round Cake Pans: For creating those perfect, even layers.
- Parchment Paper: Your best defense against a cake that won’t leave the pan.
- Wire Cooling Rack: A must for preventing a soggy bottom.
- Offset Spatula & Bench Scraper: The secret weapons for getting that smooth, professional frosting finish.
- Cake Turntable: Seriously, this will make frosting the cake about a thousand times easier.
- Piping Bag or Squeeze Bottle: For achieving the perfect, controlled drip.
Step-by-Step: Creating Your Monsterpiece
Alright, ghoul-friend, let’s bring this monster to life.
H3: Part 1: Baking the Freaky-Fab Cake Layers
- Prep the Lab: Preheat your oven to 350°F (175°C). Grease your three cake pans and line the bottoms with parchment paper.
- Mix the Potion: Prepare both boxes of cake mix in one very large bowl according to the package directions.
- Divide and Conquer: Evenly divide the batter between two bowls. In one bowl, add several drops of hot pink gel coloring and mix until you have a vibrant, shocking pink. In the other bowl, do the same with the black gel coloring. Be generous; you want a true black, not a murky grey.
- Layer It Up: Now for the fun part. Alternate pouring the pink and black batter into your three prepared pans to create a striped or marbled effect. A little pink, a little black, repeat. Or, you can make one pan all pink, one all black, and one marbled. Go wild!
- Bake It: Bake for the time specified on the box, or until a toothpick inserted into the center comes out clean.
- Cool It Down: Let the cakes cool in the pans for about 15 minutes before flipping them onto a wire rack to cool completely. Do not, I repeat, do not proceed until they are fully cooled.
H3: Part 2: The Buttercream & Assembly
- Whip the Frosting: In your stand mixer, beat the softened butter until creamy. Gradually add the sifted powdered sugar, alternating with the heavy cream, until it’s all incorporated. Add the vanilla and salt, then whip on high speed for 3-5 minutes until it’s light and fluffy.
- Color Me Pink: Add a few drops of hot pink gel coloring and mix until you achieve your desired shade.
- Stack ’em High: Place your first cake layer on the turntable. Add a thick layer of pink buttercream. Repeat with the second and third layers.
- The Crumb Coat: Apply a very thin layer of buttercream all over the cake. This traps all the crumbs so your final coat is flawless. Chill the cake in the fridge for 30 minutes. This step is non-negotiable.
H3: Part 3: The Black Drip and Final Touches
- Final Frosting: Once chilled, apply a thick, final coat of pink buttercream. Use your bench scraper and offset spatula to get it as smooth as you can. Chill the cake again for at least 30 minutes until the frosting is firm and cold.
- Make the Drip: Place the chocolate chips in a heatproof bowl. Heat the heavy cream in the microwave or on the stove until it’s hot but not boiling. Pour the hot cream over the chocolate and let it sit for 5 minutes.
- Whisk and Color: Whisk the ganache until smooth. Add the black gel coloring and stir until it’s a deep, dark black. Let the ganache cool for 10-15 minutes. It should be slightly warm and pourable, but not hot. It should be the consistency of syrup.
- Let It Drip! Using a squeeze bottle or spoon, apply the drip around the top edge of your cold cake. Let it run down the sides naturally. Pour the rest of the ganache on top and spread it out.
- Decorate Immediately! While the ganache is still wet, add your sprinkles, rock candy, and the Monster High topper. Work quickly before it sets!
Calories & Nutritional Info (Because You Asked)
Let’s just file this under “party food.”
- Serving Size: 1 slice (if you can manage to cut it into 16 slices)
- Estimated Calories: Around 550 kcal of pure, monstrous joy.
- Sugar Content: Frighteningly high.
- Nutritional Note: This cake’s main food group is “awesome.” It is essential fuel for celebrating another year of being uniquely you. Enjoy every bite, guilt-free.
Common Mistakes to Avoid (The Real Horror Show)
- Using Liquid Food Coloring: I know I sound like a broken record, but you will be so disappointed with the pale, watery colors. Gel coloring is the only way.
- A Hot Mess Drip: If you pour hot ganache on a room-temperature cake, you will have a black-and-pink puddle. The cake must be cold and the ganache must be cooled to a slightly warm, pourable consistency.
- Skipping the Chill Times: The crumb coat and final chill are what make the drip effect work. A cold, firm canvas is essential for those sharp, clean drips. Don’t skip these steps!
- The Ganache is Too Thin/Thick: Too thin and it’ll run to the bottom. Too thick and it won’t drip at all. If it’s too thin, let it cool longer. If it’s too thick, gently warm it for 5-10 seconds.
- Stressing About Perfection: It’s a Monster High cake! It’s supposed to be a little chaotic and imperfect. Have fun with it!
Variations & Customizations (Unleash Your Inner Monster)

Make this cake your own creation!
- Frankie Stein’s Lab Cake: Swap the pink for electric blue gel coloring. Use silver sprinkles and make two “bolts” out of grey fondant or large silver gumballs to stick on the sides.
- Clawdeen Wolf’s Glam Ghouls Cake: Use purple and black for the cake layers. Use gold sprinkles, gold rock candy, and a gold drip (using yellow food coloring and gold luster dust in a white chocolate ganache).
- Surprise Inside: Before you bake, stir in some funfetti sprinkles to the batter for a confetti explosion when you cut into it. You can also put a candy surprise in the middle by cutting a hole in the middle cake layer and filling it with sprinkles or M&Ms.
Frequently Asked Questions (From the Ghoulishly Curious)
How do I get my black ganache so dark?
The secret is twofold: start with dark or semi-sweet chocolate, and use a high-quality black gel food coloring. Add a little at a time until you reach a true black.
Can I make this Monster High cake ahead of time?
Yes! Bake the layers up to two days in advance and store them, tightly wrapped, at room temperature. You can frost and decorate the cake the day before the party. Keep it refrigerated.
What’s the best way to get a good drip effect?
A cold cake and a slightly warm, perfectly consistent ganache. Test a drip on the side of a cold glass before you put it on the cake to check the consistency.
Where can I find a Monster High cake topper?
Etsy is your best friend for custom toppers. You can also find printable logos online that you can print on cardstock, attach to a toothpick, and stick right on top.
Can I use fondant to cover the cake?
You could, but it’s a lot more work and, IMO, doesn’t taste as good as buttercream. For this “ghoul-chic” look, the buttercream and drip are way cooler.
My cake layers baked with a dome on top! What do I do?

No problem! Just take a long, serrated knife and carefully level the tops of your cooled cake layers before you start stacking. Perfect, flat layers are key to a stable cake.
Is this cake recipe really okay for a beginner?
Yes! By using a doctored cake mix, we take the pressure off the baking part, so you can focus on the super fun decorating. Just follow the steps, especially the chilling times, and you’ll be golden.
Final Thoughts
You did it. You stared into the face of a themed birthday cake request and you didn’t flinch. You created a freaky-fabulous, drop-dead gorgeous, monstrously delicious cake that your kid will be talking about for years.
Now, go take a bow. You’ve earned the title of “coolest parent on the block.” Prepare for the screams of joy and the inevitable sugar crash that follows. It’s all part of the monstrously good fun.