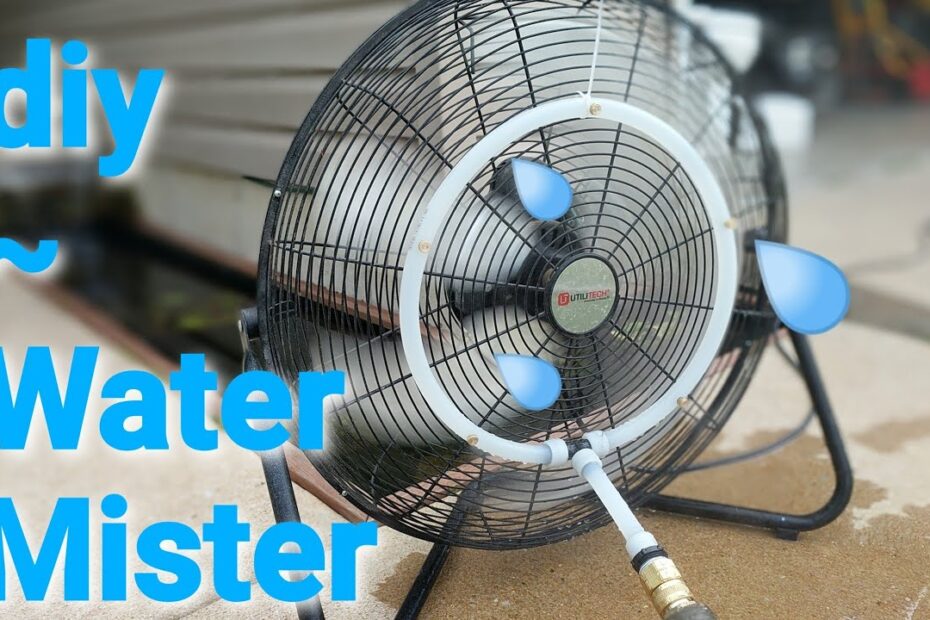
A DIY mister can be easily created using common household items, providing a simple and affordable way to stay cool in hot weather. With just a spray bottle, water, and optional additions like essential oils or a fan attachment, you can create your own refreshing mist to keep yourself comfortable outdoors.
This DIY solution offers a budget-friendly alternative to commercial misting devices while still offering the same cooling benefits. Plus, it allows you to customize the mist with scents that suit your preferences. Stay cool and beat the heat with this simple and effective DIY mister.
Credit: www.beveragecraft.com
Choosing The Right Components
Choosing the right components for your DIY mister is crucial to ensure its effectiveness. Carefully selecting and assembling the necessary parts will result in a well-functioning misting system that meets your specific needs.
When it comes to creating your own DIY mister, it’s crucial to choose the right components to ensure optimal performance and efficiency. Three key elements to consider are the misting nozzles, the pump, and the spray bottle. Understanding the different types of misting nozzles is the first step in creating a mister that suits your needs.
Understanding The Different Types Of Misting Nozzles
Misting nozzles play a vital role in the effectiveness of your DIY mister. They are responsible for creating a fine mist that cools the surrounding air. There are various types of misting nozzles to choose from, each with its own unique characteristics. Here are a few common types:
- Standard misting nozzles: These basic nozzles create a uniform mist pattern and are ideal for general outdoor use.
- Orifice misting nozzles: Designed for high-pressure systems, these nozzles produce an ultra-fine mist that evaporates quickly, resulting in maximum cooling effect.
- Fogging nozzles: If you’re looking to create a dense fog for a specific application, such as a greenhouse or terrarium, fogging nozzles are the way to go.
Depending on the purpose of your DIY mister, selecting the appropriate misting nozzle will ensure optimal performance and desired results. Once you have chosen the right nozzle, the next component to consider is the pump.
Selecting The Appropriate Pump

The pump is the heart of your DIY mister, responsible for pressurizing the water and forcing it through the misting nozzles. To select the appropriate pump for your mister, you need to consider the flow rate, pressure requirements, and power source. Here are a few pump options to consider:
- High-pressure pumps: These pumps are ideal for misting systems that require a strong and consistent flow of water at high pressure.
- Low-pressure pumps: If you’re creating a small-scale mister for personal use, a low-pressure pump may be sufficient.
- Battery-powered pumps: For portability and convenience, battery-powered pumps are a great option. They are easy to use and don’t require a power outlet.
Choosing the right pump ensures that your DIY mister operates smoothly and effectively. Lastly, don’t forget about the spray bottle, which is the final component of your mister.
Finding The Ideal Spray Bottle
The spray bottle is where the misting magic happens. It is important to find the ideal spray bottle that is compatible with your chosen misting nozzles and pump. Consider the following factors when selecting a spray bottle:
- Capacity: Determine how much water you want your spray bottle to hold, depending on the size of your mister and the duration of misting.
- Material: Opt for a durable and leak-proof material such as BPA-free plastic or stainless steel.
- Nozzle compatibility: Ensure that the spray bottle’s nozzle is compatible with your misting nozzles for a seamless connection.
By finding the ideal spray bottle, you will complete your DIY mister setup and be ready to enjoy the refreshing mist on a hot day.
Assembling Your Diy Mister
Creating your own DIY mister is not only a satisfying project, but it also provides a refreshing mist to help you beat the summer heat. The best part is that assembling it is easier than you might think. In this guide, we’ll walk you through the step-by-step process from nozzle installation to securing the spray bottle. So let’s get started!
Step-by-step Instructions For Nozzle Installation
- Begin by attaching the nozzle to the end of the tubing. Make sure it fits snugly to prevent any leaks.
- If your nozzle has adjustable settings, set it to the desired misting level. This will determine the size of the water droplets.
- Insert the nozzle into a small hole on the top of your enclosure or wherever you want the mist to be emitted.
- Secure the nozzle in place by tightening the nut or screw provided. Be careful not to overtighten, as this may damage the nozzle or tubing.
Attaching The Pump And Connecting The Tubing
- Choose a suitable location for the pump, keeping in mind that it needs to be close to a power source.
- Place the pump at the bottom of a bucket or any water container.
- Connect one end of the tubing to the outlet of the pump. Ensure a tight seal to avoid any water leaks.
- Stretch the tubing to the nozzle location, ensuring it is long enough to reach without any tension.
- Secure the tubing in place using clips or adhesive hooks, making sure it is elevated to allow the water to flow freely.
Securing The Spray Bottle To The Setup
- Find a suitable spot to attach the spray bottle within reach.
- Attach one end of the tubing to the nozzle on the spray bottle. Ensure a secure connection to avoid any leaking.
- If your spray bottle has an adjustable nozzle, set it to your preferred misting strength.
- Test the setup by turning on the pump. If water begins to flow through the tubing and mist from the nozzle, your DIY mister is ready for use!
By following these simple steps, you can easily assemble your DIY mister and enjoy the cooling mist on hot summer days. Experiment with different nozzle settings and spray bottle placements to find the perfect misting experience for you. So grab your tools and start building your own DIY mister today!
Enhancing The Mist Experience
Enhance your mist experience with a DIY mister. Create a refreshing atmosphere easily with this customizable and cost-effective solution. Immerse yourself in a new level of comfort and relaxation.
Adding Essential Oils Or Fragrance To The Mist
Enhance your misting experience by adding a touch of luxurious aroma to the air. With the DIY mister, you can easily incorporate your favorite essential oils or fragrances into the mist, creating a spa-like ambiance in your surroundings.
- Simply add a few drops of your chosen essential oil or fragrance to the water reservoir of your DIY mister.
- The mist will then carry the scent, dispersing it throughout the room or outdoor area, enveloping you in a calming and refreshing atmosphere.
- Whether you prefer the soothing scent of lavender, the invigorating aroma of citrus, or the relaxing smell of eucalyptus, you have the freedom to tailor the mist to your personal preferences.
Incorporating Cooling Fan For A More Refreshing Mist
Take your misting experience to the next level by incorporating a cooling fan into your DIY mister. This simple addition can provide an extra refreshing sensation, especially during hot summer days or in humid climates.
- The cooling fan aids in evaporating the mist, creating a cooler and more comfortable environment.
- The gentle breeze generated by the fan can also help to distribute the mist evenly, ensuring every corner of the space is refreshed.
- Feel the refreshing mist on your face as the fan cools the air, providing instant relief from the heat.
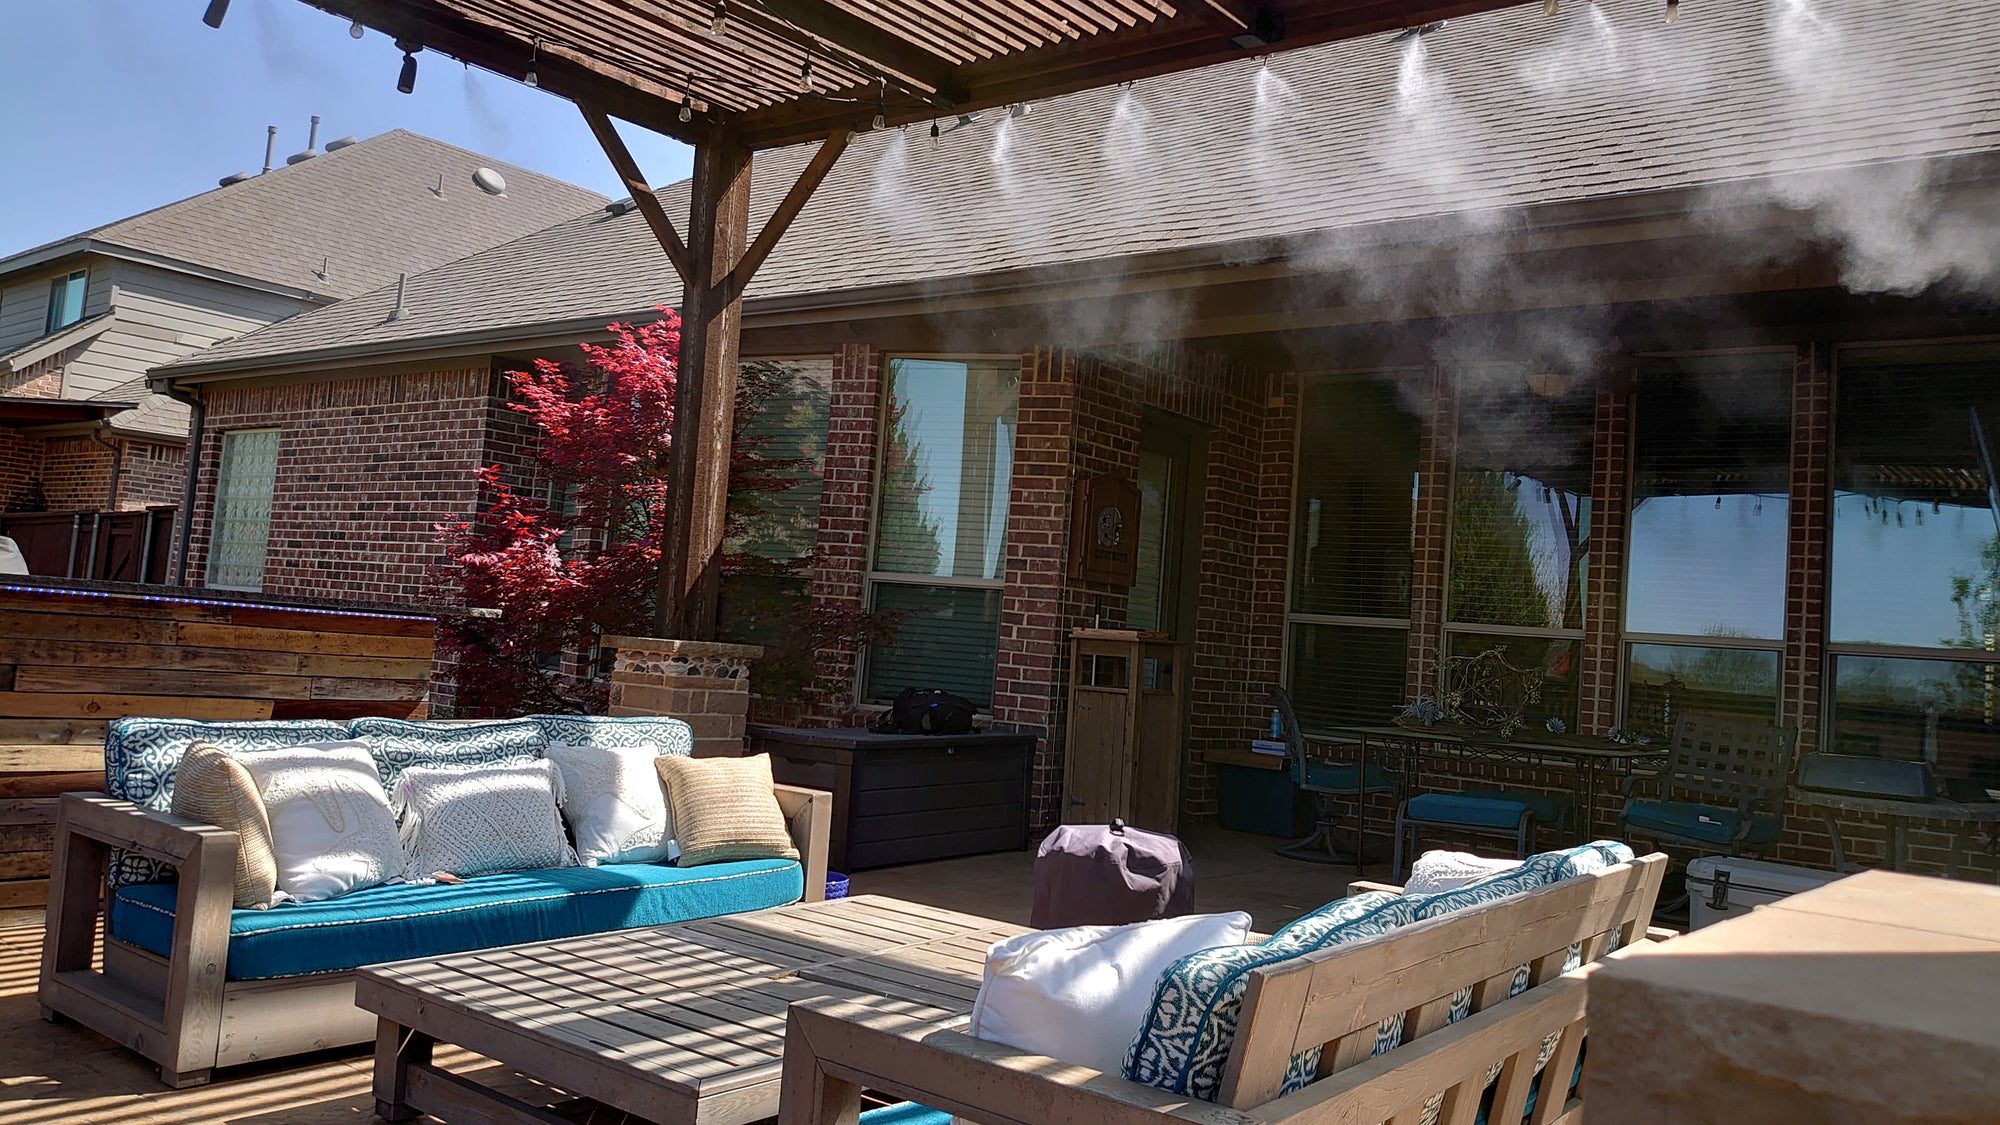
Creating A Portable Misting System
Make your misting experience versatile and convenient by creating a portable misting system with your DIY mister. This allows you to enjoy the benefits of mist wherever you go, whether it’s in your backyard, at a picnic, or while camping.
- Using lightweight materials, design a portable misting system that is easy to transport and assemble.
- Include a compact water reservoir that can be filled on the go, ensuring a constant supply of mist wherever you are.
- The portable misting system can also be equipped with a rechargeable battery, allowing for cordless operation and extended usage.
- Stay cool and refreshed wherever you are, all with the convenience of your portable DIY mister.

Credit: www.toppacksolution.com
Maintaining And Troubleshooting
Maintaining and Troubleshooting a DIY Mister is crucial to ensure its optimal performance and longevity. Regular cleaning, identification, and fixing of common issues, as well as component replacement, are essential tasks to keep your misting system running smoothly. In this section, we will explore the importance of cleaning and sanitizing the misting system, as well as how to identify and fix common issues that may arise. Additionally, we will discuss the process of replacing worn-out components to ensure your DIY mister continues to provide refreshing mist and cooling relief.
Cleaning And Sanitizing The Misting System
Regularly cleaning and sanitizing your DIY mister is vital to prevent clogs, bacterial growth, and unpleasant odors. By following these simple steps, you can maintain a clean and hygienic misting system:
- Turn off and disconnect the water supply to the misting system.
- Remove nozzles or misting heads from the system.
- Use a mixture of water and mild soap or vinegar to clean the nozzles or misting heads. Ensure all debris and residue are thoroughly removed.
- Rinse the nozzles or misting heads with clean water to remove any remaining soap or vinegar.
- Inspect the tubing for any blockages or build-up. If necessary, use a pipe cleaner or a small brush to remove any debris.
- Flush the tubing with clean water to ensure all blockages and residue are cleared.
- Reinstall the nozzles or misting heads into the system.
- Turn on the water supply and check for proper misting function.
Identifying And Fixing Common Issues
Even with regular maintenance, certain issues may arise with your DIY mister. Here are some common problems and how to address them:
| Issue | Possible Cause | Solution |
|---|---|---|
| No mist or low pressure | Clogged nozzles or insufficient water supply | Clean or replace clogged nozzles; check and adjust the water supply |
| Leaking misting heads | Loose connections or worn-out O-rings | Tighten connections or replace O-rings if necessary |
| Inconsistent misting | Uneven nozzle spacing or improper nozzle angles | Ensure proper nozzle spacing and adjust angles for uniform mist distribution |
| Unusual noises or vibrations | Loose fittings or damaged components | Tighten fittings or replace damaged components |
Replacing Worn-out Components
Over time, certain components of your DIY mister may wear out and require replacement. Here are the key components to consider:
- Nozzles or misting heads: Replace if clogged, damaged, or worn-out to maintain proper misting function.
- Tubing: Inspect for cracks or leaks, and replace sections as needed to ensure efficient water flow.
- Pump: If the pump is producing insufficient pressure or fails to operate, it may need replacement.
- Filter: Regularly clean or replace the filter to prevent clogs and maintain water quality.
- Timer or control system: If the timer or control system malfunctions, replacement may be necessary for proper misting operation.
By properly maintaining and troubleshooting your DIY mister, you can enjoy its cooling benefits for years to come. Regular cleaning and sanitizing, identifying and fixing common issues, and timely replacement of worn-out components will ensure an optimal misting experience.

Credit: www.amazon.com
Frequently Asked Questions On Diy Mister
How Can I Make A Diy Mister For Plants?
To create a DIY mister for plants, start by cleaning an empty spray bottle thoroughly. Fill it with water, add a few drops of liquid fertilizer if desired, and tighten the cap. Shake well before misting your plants, ensuring to cover both the leaves and soil.
This will help to maintain the humidity needed for healthy plant growth.
What Are The Benefits Of Using A Mister For Plants?
Using a mister for plants provides several benefits. It helps to increase humidity, which is essential for tropical and moisture-loving plants. Misting also assists in preventing dry soil and reduces the risk of pest infestations. Additionally, it can aid in combating dry indoor air caused by heating or air conditioning systems.
How Often Should I Mist My Plants With A Diy Mister?
The frequency of misting your plants depends on various factors such as the type of plant, humidity levels, and environmental conditions. In general, misting your plants 2-3 times a week is sufficient. However, it’s recommended to monitor your plants closely and adjust the frequency accordingly, ensuring the leaves are lightly moist but not soaked.
Can I Use Tap Water In My Diy Plant Mister?
Using tap water in your DIY plant mister is generally safe, but it’s important to consider the mineral content in your water. Some plants are sensitive to certain minerals, which may lead to leaf discoloration or other issues. If you notice any adverse effects on your plants, consider using filtered or distilled water instead.
Conclusion
To sum up, creating a DIY mister is an excellent way to beat the heat and stay cool during hot summer days. By following these simple steps and using easily available materials, you can enjoy the refreshing mist wherever you go.
So, get creative and build your own mister to make your outdoor activities more enjoyable and comfortable. Stay cool and have fun!
- Why Ease of Use is Crucial in Trucking Dispatch Software - September 22, 2024
- Better Communication With Dispatchers: How Trucking Dispatch Software Can Optimize Operations - September 7, 2024
- Maximizing Efficiency: The Importance of Accurate Location Tracking for Trucking Operations - August 23, 2024