Como Fazer Brownie (How to Make the Best Fudgy Brownies!)
So, you’re asking the most important question a person can ask in any language: “como fazer brownie?” (That’s “how to make a brownie?” for my non-Portuguese-speaking friends, and welcome to the club). You’re clearly a person of taste and distinction. You’re tired of the sad, dry, cakey imposters that come from a box. You’re ready for the real deal.
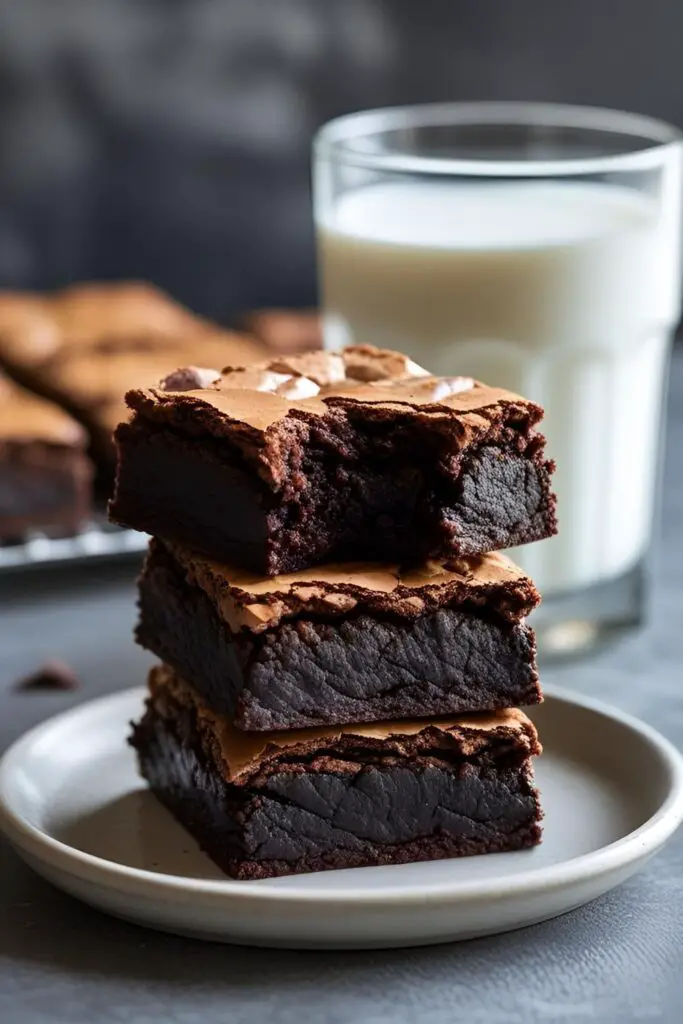
You’ve come to the right place. We are about to embark on a journey to create the ultimate brownie: a rich, decadent, and ridiculously fudgy brownie with that signature, shiny, paper-thin crackly top. We’re making a brownie so good, it should probably be illegal.
So, are you ready to ditch the box mix forever and become a true brownie master? Let’s get chocolatey.
Why This Recipe is Awesome
In a world full of brownie recipes, this one is the undisputed champion. Here’s why.
- It’s a One-Bowl Wonder: That’s right. We’re not here to create a mountain of dirty dishes. This entire, glorious recipe comes together in one single bowl. It’s maximum fudginess with the absolute minimum amount of cleanup. It’s a win-win.
- The Texture is Absolute Perfection: This is not a cake pretending to be a brownie. This is a true, dense, fudgy brownie with a gooey, melt-in-your-mouth center and that beautiful, paper-thin, crackly crust. It’s a textural masterpiece.
- It’s Practically Foolproof: This recipe is designed for success. It’s a simple, no-fuss method that uses melted butter (no waiting for it to soften!) and delivers professional-bakery-level results every single time. You will feel like a chocolate wizard.
Ingredients
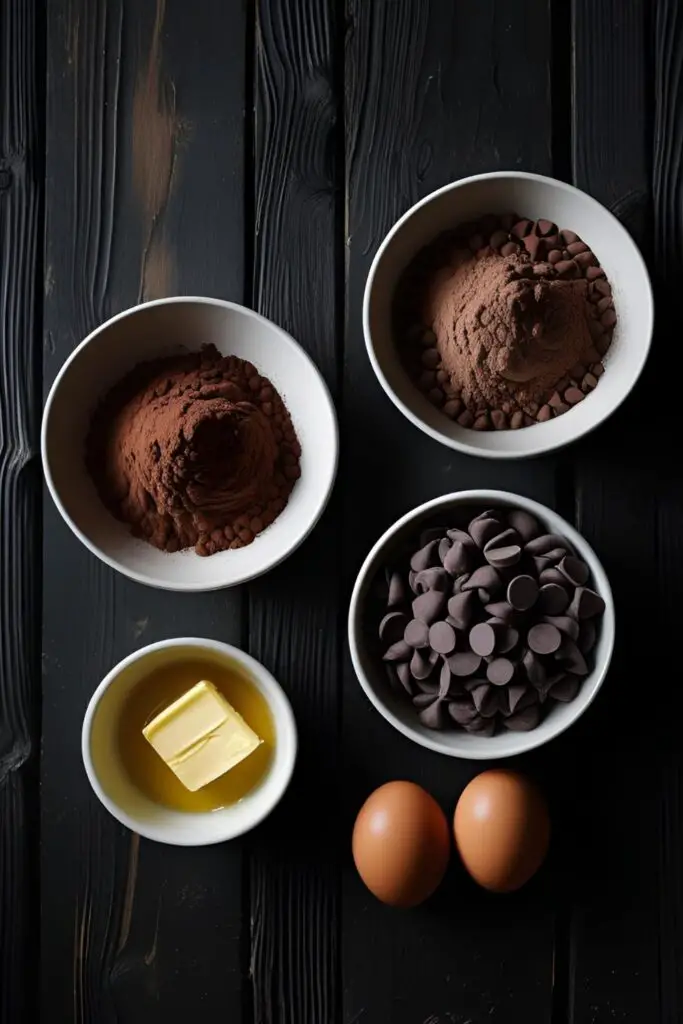
The key to a truly great brownie is using good quality, simple ingredients.
- 1 cup (2 sticks) unsalted butter, melted
- 1 ¼ cups granulated sugar
- ¾ cup packed light brown sugar
- 4 large eggs, at room temperature
- 1 cup unsweetened cocoa powder, sifted
- 1 teaspoon pure vanilla extract
- 1 teaspoon salt
- ½ cup all-purpose flour
- 1 cup semi-sweet or dark chocolate chips
Tools & kitchen gadgets used

You don’t need a lot of fancy equipment to achieve brownie greatness.
- An 8×8 inch or 9×9 inch square baking pan
- Parchment Paper
- A Large Mixing Bowl
- A Whisk
- A Silicone Spatula
- Measuring Cups and Spoons
- A Wire Cooling Rack
Step-by-step instructions
Follow these simple steps, and you’ll be on your way to the best brownies of your life.
Step 1: Prep Your Pan and Oven Preheat your oven to 350°F (175°C). Take your baking pan and line it with parchment paper, leaving an overhang on two sides to act as “handles.” This is the secret to lifting the entire slab of brownies out later for easy, clean cutting.
Step 2: The Sugar and Butter Union In your large bowl, pour in the hot melted butter. Add both the granulated and brown sugars and whisk vigorously for about a minute. The mixture will look like a grainy, glossy paste. This step is one of the secrets to getting that shiny top!
Step 3: Add the Eggs and Vanilla Add all 4 room temperature eggs to the butter and sugar mixture. Now, whisk like you mean it. Whisk for a full minute until the batter is thick, smooth, and has lightened in color. This vigorous whisking is the second secret to that beautiful crackly crust. Stir in the vanilla extract.
Step 4: The Chocolatey Goodness Sift your cocoa powder directly into the bowl and whisk it in until it’s completely combined and there are no dry lumps.

Step 5: Fold in the Flour Now, add your flour and salt. Switch from the whisk to your silicone spatula. Gently fold the flour and salt into the chocolate mixture until it’s just combined. You should see just a few streaks of flour remaining. Do not overmix!
Step 6: More Chocolate. Always More Chocolate. Pour in your chocolate chips and fold them into the batter until those last few streaks of flour disappear. Your batter should be thick, glossy, and absolutely decadent.
Step 7: Bake It Off Pour the batter into your prepared pan and use your spatula to spread it into an even layer. Bake for 30 to 35 minutes. This is important: the brownies are done when a wooden toothpick inserted into the center comes out with moist, fudgy crumbs attached. If it comes out clean, you’ve over-baked them!
Step 8: The Agonizing but Mandatory Cool Down This is the hardest, most crucial step of the entire process. You must let the brownies cool completely in the pan on a wire rack. I know it smells incredible and you have zero self-control, but a warm brownie is a gooey, falling-apart mess. A cooled brownie is a perfect, fudgy, sliceable masterpiece. You must wait at least 2-3 hours.
Calories & Nutritional Info
It’s a brownie. It’s a decadent treat. Let’s just enjoy it.
- Serving Size: 1 brownie (assuming you cut the pan into 16 squares)
- Estimated Calories: Around 280-320 kcal.
- Rich in: Chocolate, happiness, and the smug satisfaction of knowing you just made the best brownies ever.
Common Mistakes to Avoid
Avoid these brownie-baking blunders for a perfect, fudgy result every single time.
- Over-baking Your Brownies into Sad, Dry Bricks: The difference between a fudgy, gooey brownie and a dry, cakey one is a matter of a few minutes in the oven. The goal is to slightly under-bake them. A toothpick inserted into the center should come out with moist, fudgy crumbs attached, not clean. A clean toothpick is the sign of a brownie tragedy.
- Overmixing the Batter After Adding the Flour: Flour is the enemy of fudginess if you mess with it too much. As soon as you add the flour, your goal is to mix as little as possible. Fold the flour in with a spatula until you just can’t see it anymore, and then stop.
- Cutting into Warm, Molten Brownies: I know the temptation is immense. The house smells like a chocolate paradise, and you want that warm, gooey brownie now. But for clean, perfect squares, they must be completely cool. For super-pro, ultra-clean cuts, you can even chill them in the fridge for 30 minutes before slicing.
- Using Cold Eggs Straight from the Fridge: Room temperature eggs are crucial for this recipe. They emulsify into the batter much better than cold eggs, which helps to dissolve the sugar and create that signature shiny, crackly top we all crave.
Variations & Customizations

This brownie is a perfect canvas. Once you’ve mastered it, you can get creative.
- “Brigadeiro” Style Brownies: For a truly Brazilian twist on your “como fazer brownie” adventure, let the brownies cool completely. Then, top them with a layer of homemade brigadeiro (a simple mixture of sweetened condensed milk, butter, and cocoa powder, cooked until thick) and cover with chocolate sprinkles.
- Spicy “Pimenta” Brownies: Add a ½ teaspoon of ground cinnamon and a pinch (about ⅛ teaspoon) of cayenne pepper or chili powder to your batter along with the cocoa powder. The subtle warmth and spice is an incredible contrast to the rich chocolate, reminiscent of a Mexican hot chocolate.
- Salted Caramel Swirl Brownies: After you’ve poured your brownie batter into the pan, drop spoonfuls of a thick, good-quality salted caramel sauce on top. Use a butter knife to gently swirl the caramel into the top of the batter before baking. Sprinkle with a little flaky sea salt when they come out of the oven.
FAQ Section
All your fudgy, chocolatey questions, answered.
1. What makes a brownie “fudgy” versus “cakey”? It’s all about the fat-to-flour ratio! Fudgy brownies, like this recipe, have a higher ratio of fat (butter, chocolate, egg yolks) to flour. Cakey brownies have more flour and often more chemical leaveners, giving them a lighter, more cake-like texture.
2. How do you get that shiny, crackly top on brownies? The secret is twofold: 1) Dissolving the sugar well into the hot butter at the beginning, and 2) Vigorously whipping the eggs into that sugar mixture. This creates a thin, meringue-like layer on top of the batter that bakes into that beautiful, paper-thin crust.
3. Can I use a different size pan? Yes, but you’ll need to adjust the baking time. A 9×13 inch pan will create thinner brownies and will need less time (around 20-25 minutes). A 9-inch round pan will work as well, but you’ll need to start checking for doneness around the 30-minute mark.
4. Can I add nuts to this recipe? Absolutely! Walnuts and pecans are classic choices. Fold in about 1 cup of toasted, chopped nuts along with the chocolate chips.
5. How do I properly store homemade brownies? Store them in an airtight container at room temperature. They will stay fudgy and delicious for up to 4 days. (Though, let’s be honest, they’ve never lasted that long in my house).
6. Can I double this recipe? Yes, you can double this recipe and bake it in a 9×13 inch pan. You will need to increase the baking time to around 40-45 minutes.
7. Why are my brownies dry? The most likely culprit is that you over-baked them. Remember, you want to pull them out of the oven when they still seem a tiny bit gooey in the center. The second most likely reason is that you measured your flour incorrectly (packing it into the measuring cup instead of spooning it in lightly).
Final Thoughts
E pronto! And there you have it. You now know “como fazer brownie” like a seasoned professional. You have created a pan of pure, decadent, chocolatey perfection that will ruin all other brownies for you forever. The box mix is officially dead to you.
Now go on, cut yourself a big square (from the center, of course, where it’s fudgiest), pour a tall glass of cold milk, and pat yourself on the back. You are a true brownie boss.