Classic Peanut Butter Blossoms (The Ultimate Holiday Cookie)
Alright, let’s talk about cookie royalty. In the vast and delicious kingdom of cookies, there are the everyday citizens, the nobles, and then there’s the undisputed monarch of the holiday cookie platter. It’s the one your eyes scan for first, the perfect marriage of two of the world’s greatest inventions: the soft peanut butter cookie and the milk chocolate kiss.
I’m talking, of course, about the legendary, the iconic, the absolutely irresistible peanut butter blossoms. These aren’t just cookies; they’re edible nostalgia. They’re the taste of childhood holidays, of cookie exchanges, of pure, unadulterated joy. Ready to bake a batch of happiness that will transport you right back to the good old days, even if you’re sweating through another humid day in Khulna? Let’s do this.
Why This Recipe is a Certified Mood-Booster
Why are these little guys so universally beloved? What makes them the MVP of the cookie world?
First, the flavor combination is scientifically perfect. Okay, maybe not scientifically, but it feels like it should be. The salty, nutty, savory peanut butter cookie provides the perfect soft and chewy stage for the sweet, creamy milk chocolate kiss to shine. It’s a match made in heaven.
Second, they are adorably impressive with zero artistic skill required. You don’t need fancy piping bags or the steady hands of a surgeon. You just need to be able to press a piece of chocolate into a cookie. The final product looks super cute and intentional, every single time.

Finally, they are insanely easy to make. The dough comes together in a flash, and the whole process is simple enough to be a fantastic baking project with kids. It’s a low-stress, high-reward situation, which is exactly what we need in our lives, right?
The A-List Ingredient Lineup
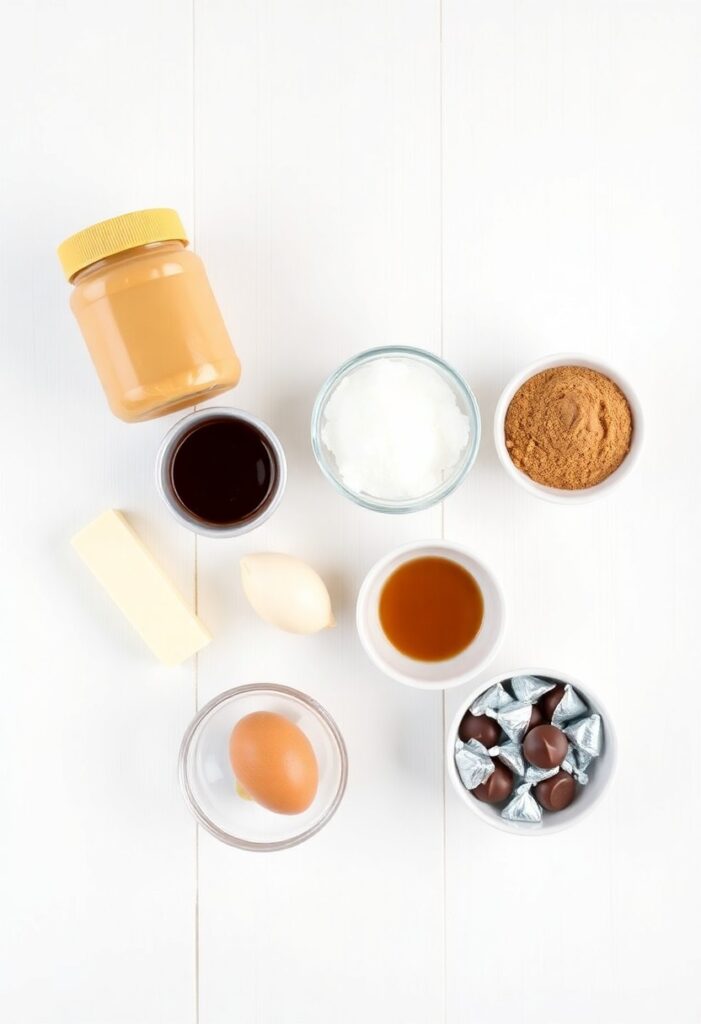
This recipe uses classic, no-fuss ingredients that you probably already have hanging around your kitchen. This will make about 3 dozen cookies.
For the Cookie Dough:
- ½ cup (1 stick) Unsalted Butter, softened: Make sure it’s properly at room temperature!
- ¾ cup Creamy Peanut Butter: Use a standard commercial brand like Jif or Skippy. The natural, oily kind can make the cookies too crumbly.
- ⅓ cup Granulated Sugar:
- ⅓ cup Packed Light Brown Sugar: This adds moisture and chewiness!
- 1 Large Egg:
- 2 tablespoons Milk:
- 1 teaspoon Vanilla Extract:
- 1 ½ cups All-Purpose Flour:
- 1 teaspoon Baking Soda:
- ½ teaspoon Salt:
For the Finishing Touches:
- ¼ cup Granulated Sugar, for rolling: This gives the cookies a lovely sparkly exterior.
- About 36 Hershey’s Kisses, unwrapped: The “blossom” of our cookie!
Your Cookie-Making Arsenal
No need for a professional bakeshop. Just grab these trusty tools.
- Electric Mixer (Stand Mixer or Hand Mixer): Essential for properly creaming the butter and sugars.
- Mixing Bowls: One for your wet ingredients, one for your dry.
- Rubber Spatula: For scraping the bowl and making sure everything is incorporated.
- Measuring Cups and Spoons: Baking is a science, after all.
- Baking Sheets: You’ll likely need two.
- Parchment Paper or Silicone Baking Mats: For a non-stick guarantee and ridiculously easy cleanup.
- A Small Cookie Scoop (about 1 tablespoon): The secret to getting perfectly uniform cookies.
Let’s Get Blossoming: The Step-by-Step Guide
Ready to create some edible joy? Let’s get to it!
Step 1: Prep Your Station (And Your Chocolate!)
First, preheat your oven to 375°F (190°C). Line your baking sheets with parchment paper. Now for the most important prep step of all: Unwrap all of your Hershey’s Kisses and have them ready in a bowl next to your workstation. Trust me, you do not want to be frantically fumbling with tiny foil wrappers while your cookies are at their perfect, hot-from-the-oven stage.
Step 2: Make the Cookie Dough
In a large bowl (or the bowl of your stand mixer), beat the softened butter, creamy peanut butter, granulated sugar, and brown sugar together on medium speed until the mixture is light and fluffy, about 2-3 minutes.

Beat in the egg, milk, and vanilla extract until everything is well combined. Scrape down the sides of the bowl to make sure it’s all mixed in.
In a separate medium bowl, whisk together the flour, baking soda, and salt. With the mixer on low speed, gradually add the dry ingredients to the wet ingredients and mix until just combined. Do not overmix!
Step 3: Scoop and Roll
Place the extra ¼ cup of granulated sugar in a small, shallow bowl. Using your cookie scoop, form the dough into 1-inch balls. Roll each ball between your hands to make it smooth, then roll it in the granulated sugar to coat it completely.
Place the sugar-coated dough balls about 2 inches apart on your prepared baking sheets.
Step 4: The First Bake
Bake the cookies for 8 to 10 minutes. They should be puffed up and the edges should look set, but the centers will still be soft. You might see some slight cracking on the surface.
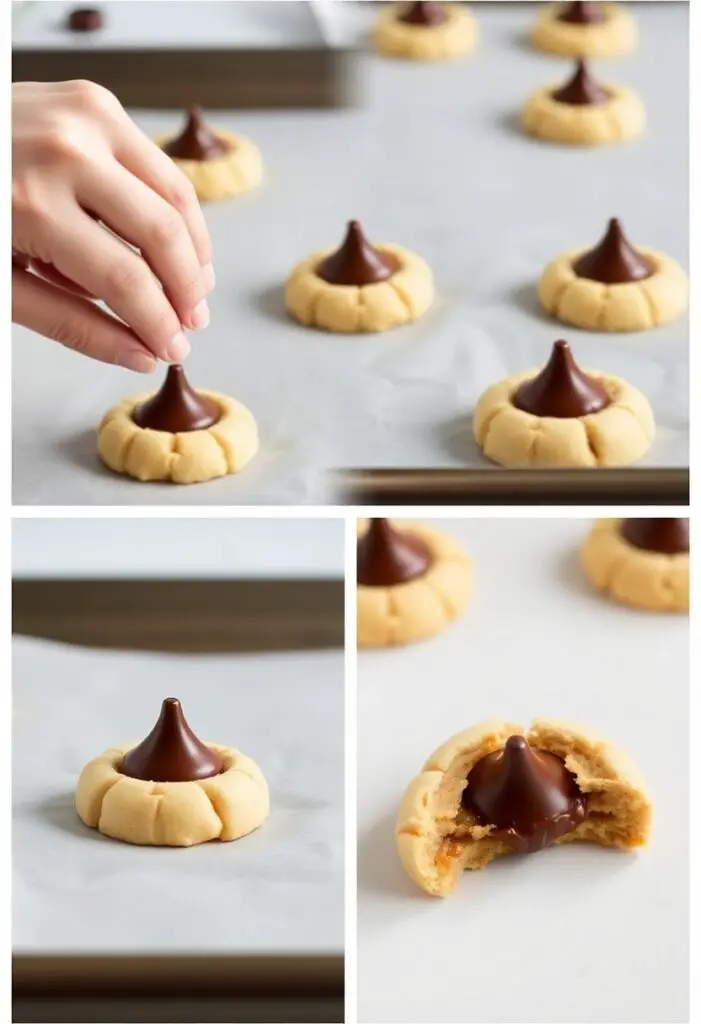
Step 5: The Grand Finale – The Blossom Press!
This is the dramatic and time-sensitive part. As soon as you pull the cookies out of the oven, while they are still hot and puffy on the baking sheet, firmly press one unwrapped Hershey’s Kiss into the center of each cookie. The cookie will crack and “blossom” around the chocolate. It’s so satisfying!
Step 6: Cool and Set
The chocolate kisses will get soft and melty from the heat of the cookie. This is normal! Do not touch them. Let the cookies cool on the baking sheet for about 5 minutes before carefully transferring them to a wire rack to cool completely. As the cookies cool, the chocolate will firm up again.
Calories & Nutritional Info
This is a classic, indulgent cookie. Here is a rough estimate for one cookie:
- Calories: Approximately 100-120 kcal
- Fat: Around 5-7g
- Carbohydrates: Roughly 12-15g
- Protein: About 2g
- Note: These are perfect little bites of joy. Enjoy them as the treat they are!
Common Mistakes to Avoid (Blossom Blunders)
- Not Unwrapping the Kisses in Advance: I will say it again because it is that important. You have a very short window of prime pressing time when the cookies are hot. Unwrap all your chocolates before the cookies go in the oven!
- Pressing the Kiss into a Cool Cookie: If you wait too long, the cookie will have already set. When you press the chocolate in, the cookie will just break and crumble into a sad mess instead of creating those beautiful cracks. Press the chocolate in while the cookies are hot and puffy right out of the oven.
- Using Natural Peanut Butter: It’s great on toast, but for this classic cookie, the oils in natural peanut butter can make the dough too soft or cause the cookies to be dry and crumbly. Stick to a commercial brand like Jif or Skippy.
- Overbaking the Cookies: You want the cookies to be soft when they come out of the oven so they can properly blossom around the kiss. If the edges are dark brown, you’ve gone too far.
Variations & Customizations
Feel like putting a new spin on a classic? Go for it!
- Chocolate Peanut Butter Blossoms: For the ultimate chocolate-peanut butter experience, use a chocolate fudge cookie dough base instead of peanut butter.
- A Different Kind of Blossom: Don’t have Hershey’s Kisses? You can press in a mini Reese’s Peanut Butter Cup, a Rolo for a caramel surprise, or even a chocolate star.
- Holiday Spice Blossoms: Add a ½ teaspoon of cinnamon and a ¼ teaspoon of nutmeg to your dry ingredients for a warm, festive spice that pairs beautifully with the peanut butter and chocolate.
FAQ Section (Your Blossom Inquiries)
1. Why do my peanut butter blossoms crack so much? A little cracking is what makes them “blossoms”! But if they are crumbling apart, your dough might be a bit too dry. Make sure you are measuring your flour correctly (spoon and level, don’t pack it in).
2. Can I use a different kind of chocolate, like dark chocolate Kisses? Absolutely! Dark chocolate, caramel-filled, or Hugs (the white and milk chocolate striped ones) all make delicious and beautiful variations.
3. Do I need to chill the dough for this recipe? For this particular recipe, chilling is not necessary. The dough should be firm enough to roll right away. If your kitchen is very warm and the dough feels sticky, you can chill it for about 30 minutes.
4. How do you keep the Hershey’s Kisses from melting into a puddle? The key is to press them in after the cookies have baked. The residual heat from the hot cookie is just enough to soften the base of the Kiss and make it adhere, but not enough to melt it completely. It will re-harden as it cools.
5. How far in advance can I make these cookies? Peanut butter blossoms store very well! You can keep them in an airtight container at room temperature for up to a week.
6. Can I freeze peanut butter blossom cookies? Yes! They freeze beautifully. Let them cool completely, then place them in a single layer in a freezer-safe container or bag. They will last for up to 3 months. Let them thaw at room temperature.
7. Why are they called “blossoms”? They get their name from the way the soft, hot cookie “blossoms” or cracks around the chocolate candy when it’s pressed into the center.
Final Thoughts
Congratulations! You’ve just baked a batch of pure, unadulterated joy. You have mastered a timeless classic that is guaranteed to bring smiles to faces and warmth to hearts. These aren’t just cookies; they’re little tokens of happiness.
So go on, share them with people you love. Bring them to your next gathering and watch them disappear in record time. And be prepared for everyone to ask for the recipe. Just smile and tell them it’s an old family secret. 😉