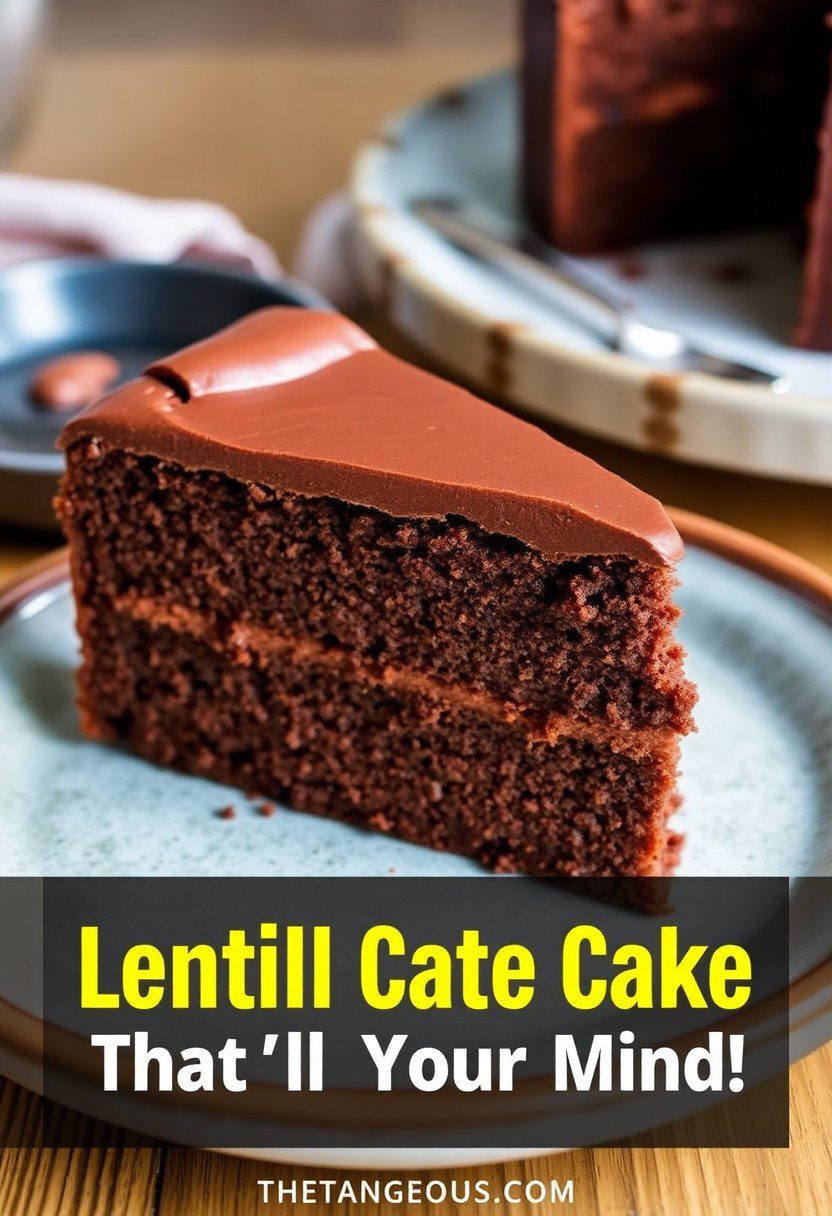
The Ultimate Guide to Chocolate Truffle Cake Designs (It’s Pure Decadence)
Let’s be brutally honest for a moment. There’s chocolate cake, and then there’s chocolate truffle cake. One is a lovely dessert. The other is a life-altering, soul-affirming experience of pure, unadulterated chocolate bliss. If you’re a true chocoholic, you know the difference. Today, we’re not just making a cake; we’re crafting an icon of indulgence and exploring decadent chocolate truffle cake designs that will make you look like a pro.
Forget dry, crumbly cakes with overly sweet frosting. We’re diving deep into a world of rich, moist chocolate sponge and silky, luxurious chocolate ganache. This is the cake you make when you want to impress someone. This is the cake you make when you need to celebrate a big win. This is the cake you make for yourself on a random Wednesday, just because you deserve it.
Why This Recipe is a Chocolate Lover’s Dream
Still on the fence about embracing this level of decadence? Allow me to persuade you.
- It’s an Intense Chocolate Experience: This cake is not for the faint of heart. We use cocoa powder and hot coffee in the cake for a deep flavor, and the filling and frosting are made from pure chocolate ganache. It’s the flavor of a luxurious chocolate truffle in cake form.
- Surprisingly Simple: It looks and sounds incredibly fancy, but the secret is that it’s actually very straightforward. The ganache is just two ingredients! The elegance comes from the quality of the ingredients, not from a complicated process.
- It’s a Showstopper: Whether you go for a minimalist drip or a crown of truffles, this cake has a sophisticated “wow” factor. It’s the little black dress of the dessert world—timeless, elegant, and always appropriate.
The Ingredient List: The Anatomy of Decadence
To achieve true chocolate nirvana, we need high-quality ingredients. This is where you don’t want to skimp.
For the Rich, Moist Chocolate Cake:
- All-Purpose Flour: 1 ¾ cups.
- Granulated Sugar: 2 cups.
- Good-Quality Unsweetened Cocoa Powder: ¾ cup.
- Baking Soda & Baking Powder: 1 ½ tsp of each.
- Salt: 1 tsp.
- Large Eggs: 2, at room temperature.
- Buttermilk: 1 cup, at room temperature.
- Vegetable Oil: ½ cup.
- Vanilla Extract: 2 tsp.
- Hot Brewed Coffee or Hot Water: 1 cup. The coffee deepens the chocolate flavor without making it taste like coffee, I swear.
For the Silky Chocolate Ganache (The ‘Truffle’ Part):
- Good-Quality Dark or Semi-Sweet Chocolate (60-70% cacao): 16 ounces. Use bars or wafers (callets), not chocolate chips. This is the most important part!
- Heavy Cream: 2 cups.
Tools & Kitchen Gadgets: The Chocolatier’s Kit
You don’t need a ton of fancy gear, but a few key items will make the process much smoother.
- Two 8-inch Round Cake Pans: For our glorious layers.
- A Stand Mixer or Hand Mixer: For the cake batter.
- A Heatproof Bowl and a Small Saucepan: For making the ganache.
- A Whisk and a Rubber Spatula: Your ganache-making essentials.
- A Cake Turntable: Makes frosting the cake so much easier.
- An Offset Spatula and a Bench Scraper: For achieving that smooth, professional ganache finish.
- A Chocolate Shaver or Vegetable Peeler: For one of the design options.
- Piping Bag and a Large Star Tip: For another design option.
Step-by-Step Instructions: The Path to Chocolate Glory
Ready to create a masterpiece? Let’s do this.
Phase 1: Bake the Chocolate Sponge
- Prep: Preheat your oven to 350°F (175°C). Grease and flour your two 8-inch cake pans, and line the bottoms with parchment paper.
- Mix the Dry Stuff: In a large bowl or the bowl of your stand mixer, whisk together the flour, sugar, cocoa powder, baking soda, baking powder, and salt.
- Add the Wet Stuff: Add the eggs, buttermilk, oil, and vanilla. Beat on medium speed for about 2 minutes. The batter will be thick.
- The Final Touch: Reduce the speed to low and carefully pour in the hot coffee or water. The batter will become very thin. This is correct! Don’t be alarmed.
- Bake: Pour the batter evenly between your two pans. Bake for 30-35 minutes, or until a toothpick inserted into the center comes out clean. Let the cakes cool completely on a wire rack.
Phase 2: Create the Luscious Ganache
- Finely chop your high-quality chocolate and place it in a heatproof bowl.
- In a small saucepan, heat the heavy cream until it just begins to simmer around the edges. Do not let it come to a rolling boil.
- Pour the hot cream directly over the chopped chocolate. Let it sit, untouched, for 5 minutes. This allows the hot cream to gently melt the chocolate.
- After 5 minutes, gently whisk the mixture, starting from the center and working your way out, until it becomes a smooth, silky, glossy ganache.
- Let it cool. This is a test of patience. The ganache needs to cool at room temperature for at least 2-3 hours, or until it has thickened to a spreadable, peanut-butter-like consistency.
Phase 3: Assemble and Frost the Cake
- Level your cooled cake layers if needed. Place one layer on your cake stand.
- Spread about 1 cup of the thickened ganache over the first layer. Top with the second cake layer.
- Use the remaining ganache to frost the top and sides of the cake. Use your offset spatula and bench scraper to get the sides as smooth (or as rustically textured) as you like.
Phase 4: Choose Your Elegant Design
Now, let’s decorate. Here are three stunning and achievable options.
Design 1: The Minimalist Chocolate Drip
- After frosting your cake, chill it in the fridge for 30 minutes until the ganache is firm.
- Gently re-warm a small amount (about ½ cup) of your leftover ganache in the microwave for 5-10 seconds until it’s just barely pourable. It should not be hot.
- Using a spoon, carefully drip the ganache around the top edge of the cake, letting it run artfully down the sides. Pour the rest on top and smooth it out.
Design 2: The Chocolate Shard Forest
- Take a bar of room-temperature chocolate. Run a vegetable peeler or a sharp knife along the side of the bar to create beautiful, delicate chocolate curls and shards.
- Gently press these shards and curls all over the top and sides of your freshly ganached cake. It creates a stunning, rustic, and wonderfully textured look.
Design 3: The Truffle Crown
- Take any leftover, thick ganache and chill it until it’s firm enough to scoop. Use a small spoon or melon baller to scoop out small balls and roll them in cocoa powder to create quick, rustic truffles.
- Fit a piping bag with a large star tip and fill it with some of your frosting-consistency ganache. Pipe 8-10 large rosettes around the top edge of the cake.
- Place one homemade truffle on top of each rosette. It’s elegant, impressive, and uses up all your delicious ganache.
Calories & Nutritional Info (A Moment of Honesty)
This cake is the definition of indulgence. It’s a special occasion treat, not a daily snack. But for the sake of transparency…
- Calories: A slice will likely set you back 600-700 kcal.
- Primary Food Group: Happiness.
- Best Paired With: A special occasion, a glass of red wine, and zero regrets.
Common Mistakes to Avoid (Chocolate Catastrophes)
- Using Chocolate Chips in Your Ganache: Most chocolate chips contain stabilizers to help them hold their shape, which means they don’t melt smoothly. This can result in a waxy or grainy ganache. Use good-quality baking bars or wafers.
- A Broken Ganache: If your ganache looks oily or separated, it has “broken.” This usually happens if the cream was too hot or it was agitated too much. The fix: add a tablespoon of room temperature milk or corn syrup and whisk gently until it comes back together.
- Frosting with Warm Ganache: Patience is a virtue. If you try to frost the cake while the ganache is still warm and liquidy, you will have a chocolate puddle, not a cake. It needs to cool and thicken to the consistency of Nutella or peanut butter.
- A Runny Drip: For the drip design, your drip ganache must be the right temperature. Test it on the side of a cold glass. If it runs to the bottom instantly, it’s too hot. If it doesn’t move, it’s too cold.
Variations & Customizations (The Chocolate Lab)
Feel like experimenting? Here are a few ideas.
1. The Mocha Truffle Cake
Add 2 teaspoons of instant espresso powder to your hot coffee before adding it to the cake batter. You can also add a teaspoon of espresso powder to your ganache for a rich mocha flavor.
2. The Spicy Aztec Chocolate Cake
Add ½ teaspoon of cinnamon and ¼ teaspoon of cayenne pepper to your dry cake ingredients. The subtle warmth and spice is an incredible contrast to the rich, dark chocolate.
3. The Salted Caramel Surprise
Before you place the second cake layer on top, drizzle a generous amount of thick, high-quality salted caramel sauce over the ganache filling. It’s a decadent secret hidden inside.
FAQ: Your Most Decadent Questions
What’s the difference between a chocolate truffle cake and a regular chocolate cake?
The main difference is the frosting. A regular chocolate cake usually uses a buttercream frosting. A chocolate truffle cake uses a rich chocolate ganache for both the filling and the frosting, mimicking the texture and intense flavor of a chocolate truffle.
What kind of chocolate is really the best for ganache?
A good-quality dark or semi-sweet chocolate with a cacao percentage between 60% and 72% is ideal. Brands like Ghirardelli, Callebaut, Valrhona, or Scharffen Berger are excellent choices.
Can I use milk chocolate or white chocolate for the ganache?
Yes, but you’ll need to change the ratio. Because they have more milk solids and sugar, you’ll need more chocolate per part of cream.
- For milk chocolate: Use a 2.5:1 or 3:1 ratio of chocolate to cream.
- For white chocolate: Use a 3:1 or 3.5:1 ratio of chocolate to cream.
How do I store a chocolate truffle cake?
If your house is cool, it can be stored in an airtight container at room temperature for up to 2 days. If it’s warm, or for longer storage, it’s best to keep it in the refrigerator. The ganache will become very firm when chilled, so let the cake sit at room temperature for at least 30-60 minutes before serving.
Can I make this cake ahead of time?
Absolutely. The cake layers can be baked, cooled, and wrapped tightly in plastic wrap up to 2 days in advance. The ganache can also be made a day or two ahead and stored in the fridge; just gently re-warm it to a spreadable consistency before using.
My ganache is too hard. How do I soften it?
Place it in a microwave-safe bowl and heat it in 5-10 second bursts at 50% power, stirring in between, until it reaches the consistency you want. Be very careful not to overheat it.
Why is my ganache grainy?
This usually means the chocolate was either poor quality (with additives) or it was overheated at some point. It’s very difficult to fix a grainy ganache, which is why starting with good chocolate and gently heating the cream is so important.
Final Thoughts
You have done it. You have created the chocolate cake to rule all chocolate cakes. This is a monument to decadence, a testament to your excellent taste, and a very, very delicious dessert.
Go forth and share your creation with people who will truly appreciate it. Or, don’t. Keep it all for yourself. After creating a masterpiece like this, you’ve certainly earned it.