The Ultimate “Cake to Go” Recipe (Because Plates are Overrated)
Let’s be honest, we’ve all been there. You’re at a picnic or a casual party, balancing a wobbly paper plate with a giant slice of cake that’s threatening to topple over at any moment. You’re trying to cut it with a flimsy plastic fork, a gust of wind comes, and suddenly your delicious dessert is one with nature. It’s a tragedy. What if I told you there’s a better, chicer, and infinitely more convenient way to enjoy cake? Welcome, my friend, to the glorious world of cake to go.
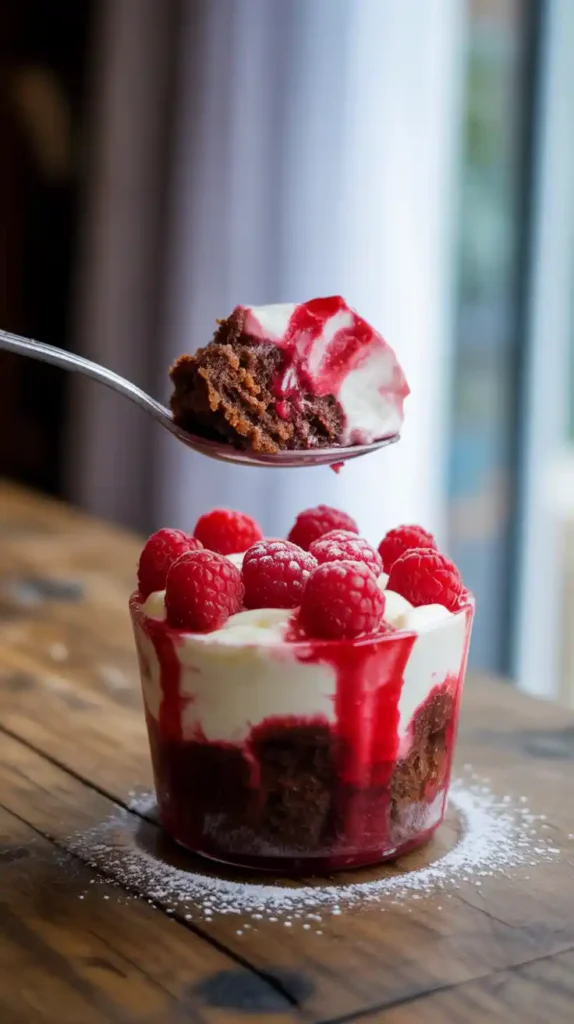
This isn’t just cake in a cup; it’s a revolution in dessert portability. We’re talking beautiful, distinct layers of moist cake, creamy frosting, and fruity filling, all neatly contained in a personal-sized, easy-to-carry cup. It’s the perfect, no-mess, no-fuss way to have your cake and eat it too… wherever you happen to be.
Why This is Your New Favorite Dessert Hack
So, why should you ditch the traditional slice for these adorable and convenient cups?
- It’s Perfectly Portable and Portion-Controlled: This is the ultimate dessert for picnics, parties, bake sales, or as a super thoughtful homemade gift. No cutting, no serving, no mess. Just grab a cup and a spoon.
- It Looks Incredibly Impressive: Those beautiful, distinct layers visible through the clear cup look like they came from a fancy gourmet shop. It’s an incredibly elegant presentation that’s secretly so easy to achieve.
- Endlessly Customizable: This recipe is more of a method than a strict rulebook. You can swap out the cake flavor, the frosting, the filling—whatever your heart desires! You are the architect of your own personal cake masterpiece.
The Ingredient List: The “Build-a-Cup” Blueprint
We’re going to create a classic and crowd-pleasing Strawberry Shortcake-inspired cup, but feel free to mix and match!
The Cake Component (The Foundation):
- All-Purpose Flour: 2 cups.
- Granulated Sugar: 1 ½ cups.
- Baking Powder: 2 teaspoons.
- Salt: ½ teaspoon.
- Unsalted Butter: ½ cup, melted and cooled.
- Large Eggs: 2.
- Milk: 1 cup.
- Vanilla Extract: 2 teaspoons.
- The Speedy Shortcut: A box of vanilla or yellow cake mix, baked in a sheet pan, works perfectly. You can also use a store-bought pound cake or angel food cake!
The Creamy Component (The Cloud):
- Heavy Whipping Cream: 2 cups, very cold.
- Cream Cheese: 8 ounces (1 block), softened. This is the secret to stabilizing the cream!
- Powdered Sugar: 1 cup, sifted.
- Vanilla Extract: 1 teaspoon.
The Fruity Component (The Jewel):
- Fresh or Frozen Strawberries: 2 cups, hulled and chopped.
- Granulated Sugar: ¼ cup.
- Lemon Juice: 1 tablespoon.
Tools & Kitchen Gadgets: Your Assembly Line
The right tools are key to getting those beautiful, clean layers.
- A 9×13 inch Sheet Pan: For baking a thin, even layer of cake.
- Clear Plastic Cups or Small Jars: The star of the show. 8 to 10-ounce cups are a great size.
- A Round Cookie or Biscuit Cutter: This is crucial. It should be slightly smaller than the diameter of your cups.
- A Stand Mixer or Hand Mixer: Especially helpful for the whipped cream frosting.
- Piping Bags: One for the frosting. This is the secret to clean layers.
- A Small Saucepan: For the fruit compote.
- Lids for your cups and cute spoons: For the full “to-go” experience.
Step-by-Step Instructions: The Assembly Line of Deliciousness
Ready to build the cutest dessert on the planet? Let’s get layering.
Step 1: Bake Your Foundation
- Preheat your oven to 350°F (175°C). Grease and line a 9×13 inch sheet pan with parchment paper.
- Whisk together your dry cake ingredients. In a separate bowl, whisk the wet ingredients. Combine them until just mixed, then pour the batter into the prepared sheet pan.
- Bake for 20-25 minutes, until golden and a toothpick comes out clean. Let the cake cool completely in the pan.
Step 2: Prep Your Components
- The Fruit: While the cake cools, combine the chopped strawberries, sugar, and lemon juice in your small saucepan. Cook over medium heat, mashing the berries, until you have a thick, jammy compote (about 10-15 minutes). Let it cool completely.
- The Cream: In your stand mixer, beat the softened cream cheese until smooth. On low speed, slowly stream in the very cold heavy cream. Once it’s all in, add the powdered sugar and vanilla, then whip on high speed until it’s thick, fluffy, and holds stiff peaks.
Step 3: The Assembly Line
This is where the magic happens!
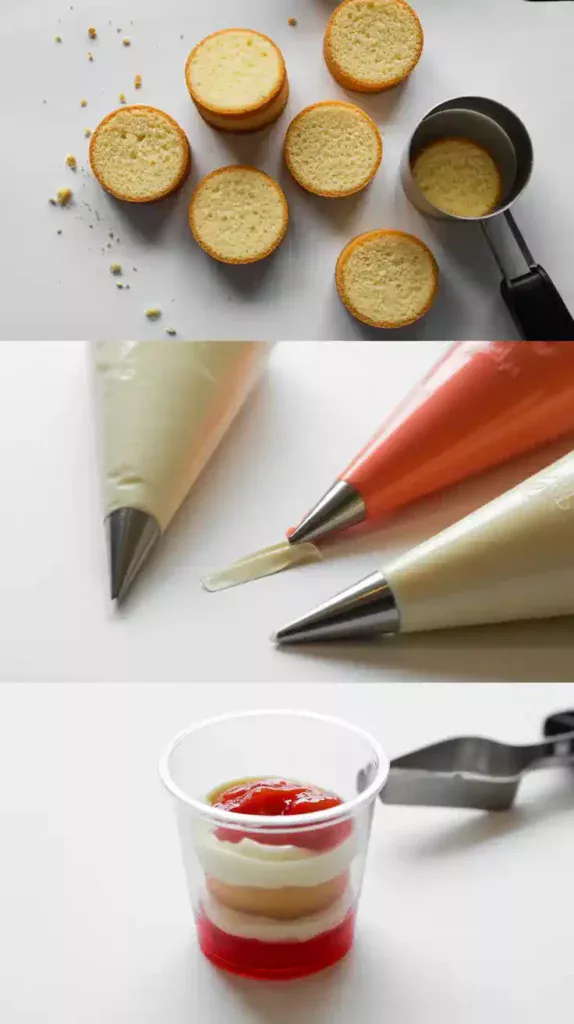
- Once your sheet cake is cool, use your round cookie cutter to stamp out as many cake circles as you can. You’ll need 2-3 circles per cup.
- Transfer your cooled fruit compote and your whipped cream frosting into separate bowls or piping bags. Using a piping bag for the cream is the secret to clean, beautiful layers.
- Start Layering:
- Place one cake circle in the bottom of your cup.
- Pipe a generous spiral of whipped cream frosting on top.
- Spoon a layer of the strawberry compote over the cream.
- Add your second cake circle, pressing down gently.
- Repeat with another layer of cream and another layer of compote.
- Finish with a final, beautiful piped swirl of cream and a fresh strawberry slice or a sprinkle of cake crumbs on top.
Step 4: Chill and Serve
Pop a lid on your “cake to go” cups and chill them in the refrigerator for at least an hour to let the flavors meld and the layers set. They are now ready to grab and go!
Calories & Nutritional Info (Per Cup)
This is a perfectly portioned treat. You don’t have to share if you don’t want to.
- Serving Size: One glorious cup of cake.
- Calories: Approximately 400-500 kcal, depending on the size of your cup.
- Best Enjoyed: Anywhere and everywhere.
Common Mistakes to Avoid (To-Go Tragedies)
- A Crumbly, Broken Mess: Do not try to cut the cake circles while the cake is even a little bit warm. It will tear and crumble. It must be completely cool. Chilling the cake for 20 minutes before cutting makes it even easier.
- Soggy Bottoms: If your fruit compote is too thin or runny, it will soak through the cream and turn your bottom cake layer into mush. Make sure you cook the compote down until it’s nice and thick, and always have a layer of cream as a barrier between the cake and the fruit.
- Sloppy, Smeared Layers: The secret to those beautiful, distinct layers you see in bakeries is using a piping bag for the frosting. Trying to spoon it in will just smear it all over the sides of the cup.
- Choosing the Wrong Cutter: Make sure your round cookie cutter is slightly smaller than the diameter of your cup. If it’s too big, you’ll have to squish the cake circle to get it in, which will ruin your beautiful layers.
Variations & Customizations (Choose Your Adventure Cup)
This layering method is a blank canvas for your creativity.
1. The Death by Chocolate Cup
Use a chocolate sheet cake. For the fillings, alternate layers of rich chocolate pudding or mousse and a chocolate whipped cream frosting. Top with a sprinkle of dark chocolate shavings. It’s pure, portable decadence.
2. The Lemon Blueberry Bliss Cup
Use a lemon-zested sheet cake. Make a simple blueberry compote for the fruit layer. For the cream, make a lemon-infused cream cheese frosting. The combination of tart lemon and sweet blueberry is a classic for a reason.
3. The Tiramisu To-Go
This is a brilliant, easy twist on the classic. Use your vanilla sheet cake circles, but brush each one with strong, cold coffee before you layer it. For the filling, use a simple mixture of mascarpone cheese, powdered sugar, and whipped cream. Dust the top generously with cocoa powder.
FAQ: Your Most Pressing Portable Cake Questions
What are the best containers to use for “cake to go”?
Clear plastic disposable cups (8-10 oz) with lids are perfect for parties and bake sales. For a more sustainable or gift-able option, small, straight-sided glass jars or mason jars are fantastic.
How do I get my layers to look so clean and neat?
Two secrets: 1. Use a piping bag for your creamy layers. This allows you to apply it cleanly without touching the sides of the cup. 2. Wipe the rim. After you add each layer, you can use a paper towel to quickly wipe the inside rim of the glass to clean up any small smudges.
Can I make these ahead of time?
Yes! They are the perfect make-ahead dessert. You can assemble them completely, put the lids on, and store them in the refrigerator for up to 2 days. The flavors will actually meld and get even better.
How do I use leftover cake scraps for this?
This is the best way to use up leftover cake! Just crumble the cake scraps and use the crumbles as your cake layers instead of the neat circles. A “crumble cup” is just as delicious.
Can I freeze these cake cups?
Yes, most variations will freeze beautifully. Just make sure to use a freezer-safe container with a tight-fitting lid. Let them thaw in the refrigerator for a few hours before enjoying.
How should I transport these for a party?
A standard cupcake or muffin carrier is the perfect vehicle for transporting your cake cups. The little indentations will hold them snugly in place.
Can I make a savory version?
That’s a fun idea! You could do layers of cornbread, pulled pork, and a dollop of coleslaw in a cup for a fun BBQ-themed appetizer. The possibilities are endless!
Final Thoughts
You have now mastered the art of the “cake to go.” You are an innovator, a trendsetter, a hero to anyone who has ever tried to eat cake on a windy day. You’ve created the most convenient, chic, and delicious way to get your cake fix, anytime, anywhere.
So go forth and layer. Make them for a party, gift them to a friend, or stock your fridge for a week of perfectly-portioned personal desserts. Welcome to the future of cake. It’s delicious, and it fits perfectly in your cup holder.


