The Ultimate Brawl Stars Cake: Your Battle Plan for a Legendary Win
So, it’s happened. The birthday request has been made, and the theme is set. You’ve been tasked with creating a Brawl Stars cake. Your mind might be racing. Do you have to sculpt a tiny El Primo? Do you know what color Spike is supposed to be? How do you make a cake look like it’s ready for a showdown in Gem Grab? Deep breaths. You don’t need a Star Power to win this game; you just need a solid battle plan.
Forget the panic. You’re in the right place. This is your ultimate guide to creating a ridiculously cool, totally achievable, and delicious Brawl Stars cake that will make you the MVP of the party. We’re not aiming for a stressful, hyper-realistic sculpture. We’re aiming for a cake that’s fun, captures the chaotic energy of the game, and most importantly, won’t make you want to rage-quit halfway through.
Get ready to level up your baking skills. It’s time to brawl!
Why This Recipe Is a Legendary Drop
In the fast-paced arena of kids’ birthday parties, why is this specific Brawl Stars cake your best brawler?
First, the theme is epic and easy. We’re creating a “Gem Grab” arena cake. This design relies on fun textures like “dirt” and “grass,” shiny rock candy “gems,” and cool character toppers. It looks action-packed and impressive without requiring you to be a master cake artist. You can absolutely nail this design.

Second, the flavor is a total crowd-pleaser. We’re making a Funfetti cake! Why? Because the colorful sprinkles look just like a loot box full of gems and coins exploding. It’s a fun, celebratory flavor that kids and adults genuinely love. This is the perfect flavor for a fun Brawl Stars cake.
Finally, it’s built for battle. This cake recipe is sturdy and reliable. It holds up well to decorating, meaning you can focus on the fun stuff without worrying about your cake crumbling under pressure. A reliable recipe is your best teammate for any Brawl Stars cake.
Your Inventory: The Ingredients
Gather your resources! You’ll need these items for your mission.
For the “Gem Drop” Funfetti Cake:
- 2 1/2 cups all-purpose flour
- 2 1/2 teaspoons baking powder
- 1/2 teaspoon salt
- 1 cup unsalted butter, softened
- 1 3/4 cups granulated sugar
- 4 large eggs, room temperature
- 1 tablespoon vanilla extract
- 1 cup whole milk, room temperature
- 3/4 cup rainbow sprinkles (jimmies, not nonpareils)
For the Buttercream “Terrain”:
- 2 cups (4 sticks) unsalted butter, softened
- 6-7 cups powdered sugar, sifted
- 1/4 cup heavy cream or milk
- 2 teaspoons vanilla extract
- Pinch of salt
- Gel Food Coloring: Green and brown (or use cocoa powder for brown).
For the Arena Decorations:
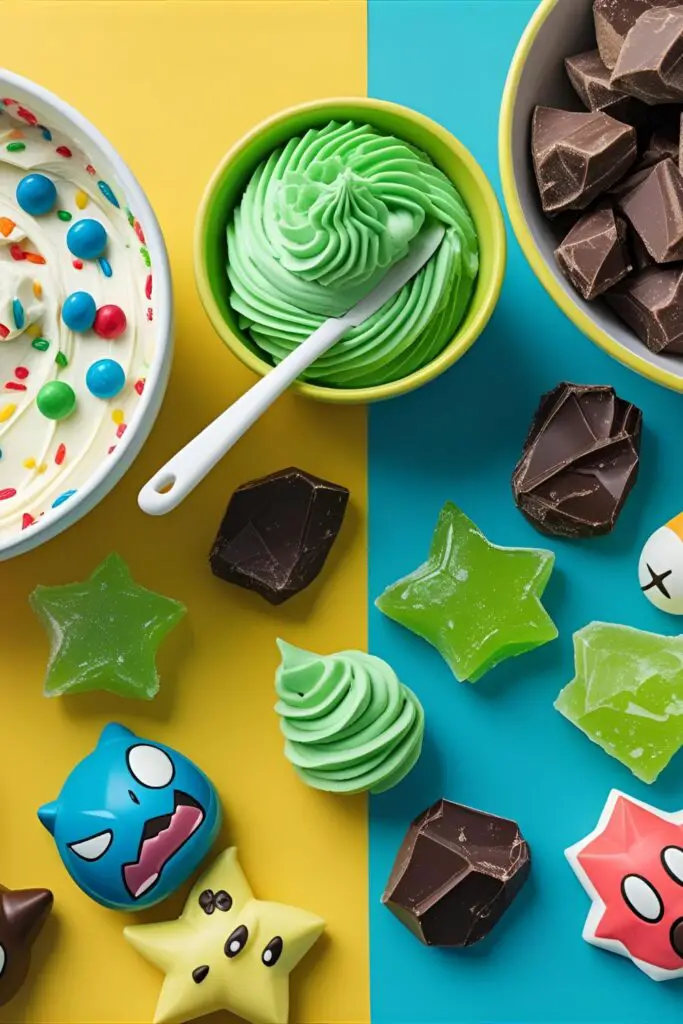
- Green Rock Candy: These are your gems! Crush them slightly.
- Chocolate Rocks: For adding texture to the terrain.
- Crushed Oreo Cookies: For patches of “dirt.”
- Brawl Stars Figurines or Toppers: The ultimate shortcut!
The Gadgets: Your Baker’s Arsenal

Every brawler needs their gear. Here’s what you’ll need for this cake battle.
- A Stand Mixer: Your heavy-hitter for whipping up fluffy buttercream. A KitchenAid Stand Mixer will win the fight for you.
- Round Cake Pans: Two 8-inch round cake pans to create your arena.
- An Offset Spatula and Bench Scraper: The essential combo for creating a smooth base for your terrain.
- Green Rock Candy: This is your main objective! You can find green rock candy crystals online or at candy stores.
- Brawl Stars Cake Toppers: Using official Brawl Stars figurines or printable toppers is the easiest way to bring the characters to your cake without stress.
The Game Plan: Step-by-Step Instructions
Time for the showdown! Follow these phases to achieve a flawless victory.
Phase 1: Build the Arena (The Cake)
Step 1: Prepare Your Spawn Point Preheat your oven to 350°F (175°C). Grease and flour your two 8-inch cake pans.
Step 2: Mix Your Power-Ups In a bowl, whisk together the flour, baking powder, and salt. In your stand mixer, cream the butter and sugar for 5 minutes until very light and fluffy. Beat in the eggs one at a time, then the vanilla.
Step 3: Combine Forces On low speed, alternate adding the dry ingredient mixture and the milk, starting and ending with the dry. Mix only until combined. Gently fold in the rainbow sprinkles with a spatula.
Step 4: Deploy and Bake Divide the batter between the pans and bake for 30-35 minutes. Let the cakes cool completely. A warm cake is an instant loss.
Phase 2: Create the Terrain (The Frosting)

Step 5: Whip the Buttercream Beat the softened butter until creamy. Gradually add the sifted powdered sugar, cream, vanilla, and salt. Beat until very light and fluffy.
Step 6: Color Your World Divide the buttercream into two bowls. Leave one white or tint it brown (by adding cocoa powder or brown gel coloring). Tint the other half a grassy green.
Phase 3: The Final Showdown (Decorating Your Brawl Stars Cake)
Step 7: Base Coat the Arena Level your cooled cakes and stack them with a layer of frosting in between. Apply a thin crumb coat and chill for 20 minutes. Then, frost the entire cake with your brown or white frosting.
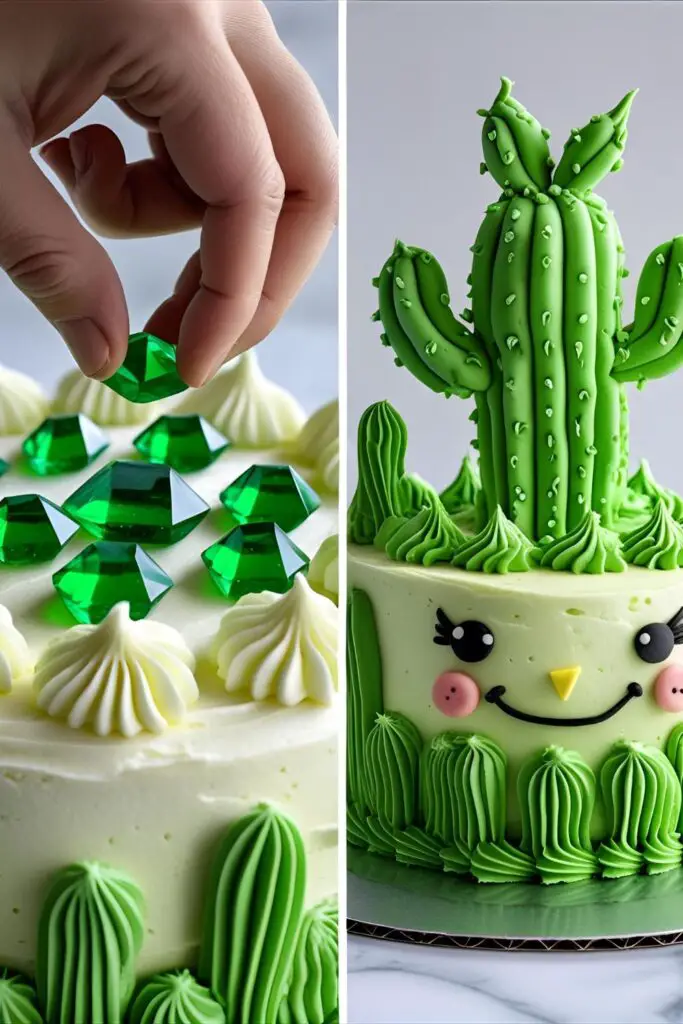
Step 8: Create the Gem Mine This is the central feature of your Brawl Stars cake. Using a spoon, gently scoop out a small, shallow circle or oval from the center of the top of the cake.
Step 9: Landscape the Arena Using your green frosting, pipe or spread patches of “grass” around the top and sides of the cake. Leave some brown areas exposed. Sprinkle the crushed Oreo “dirt” on the brown patches.
Step 10: Place the Gems and Brawlers! Fill the “gem mine” you scooped out with the crushed green rock candy. Scatter a few chocolate rocks around the terrain. Finally, place your character figurines on the cake as if they are in the middle of a battle. And boom! A legendary Brawl Stars cake is yours!
Player Stats: Calories & Nutritional Info
A look at the stats for this epic loot.
- Serving Size: 1 Brawler-sized slice
- XP Gained: +1000 Cool Parent/Friend Points
- Calories: Enough to respawn with full health. (Realistically, around 700 per slice. It’s a party, not a health spa.)
- Special Ability: Instantly makes you the center of attention.
Common Mistakes to Avoid (Don’t Get Wrecked)
Avoid these rookie mistakes to secure your win.
- “Friendly Fire” (A Melty Mess): You tried to frost a cake that was still warm. Your cake must be completely, 100% cool before frosting, or you’ll have a buttercream landslide.
- “Bad Randoms” (A Cluttered Design): You tried to put every single brawler you own on the cake. Pick 2-3 favorite characters to highlight. A clean, focused design looks better than a chaotic mess.
- The Gem Sinkhole: You put the heavy rock candy on very soft, fresh frosting. Chill your frosted cake for a bit before adding the heavy decorations to give the buttercream time to firm up.
- “Low Signal” (Pale, Sad Colors): You used liquid food coloring. For vibrant, game-accurate colors, you need to use concentrated gel food coloring.
Game Mods: Variations & Customizations
Want to customize your brawler? Here are some different builds for your Brawl Stars cake.
- The Spike Cake: For a different character-focused cake, make a Spike cake! Frost the cake in a vibrant green. Use a large star tip to pipe a cactus-like texture. Use black and white frosting or fondant to create his iconic face. It’s a super popular choice for a Brawl Stars cake.
- The Starr Drop Surprise: Create a surprise-inside cake. Before stacking your layers, cut a hole in the center of the bottom layer. Fill it with a mix of candy “gems,” Pop Rocks, and sprinkles. When you cut the first slice, the “loot” will spill out!
- Brawler Cupcakes: An awesome and easy alternative. Make a batch of Funfetti cupcakes. Frost them with different colors and use printable toppers or simple fondant shapes to represent different brawlers or their logos.
FAQ: Your Game Guide
Got questions? Here’s the tutorial you need.
1. What’s a good flavor for a Brawl Stars cake? Funfetti is a great choice because the sprinkles look like gems! Classic chocolate or vanilla are also always winners with kids.
2. How can I decorate a game-themed cake easily? The easiest way is to create a “scene” from the game, like we did with the Gem Grab arena. Use crushed cookies for dirt, candy for elements like gems or rocks, and use high-quality toy figurines as toppers.
3. Where can I find Brawl Stars cake toppers? You can find official figurines online or in toy stores. You can also find tons of printable, food-safe cake toppers on sites like Etsy, or even print them yourself and attach them to toothpicks.
4. How do you make edible gems for a cake? Crushed green rock candy is the quickest and most effective way to create the look of the gems from Brawl Stars.
5. Can I make this Brawl Stars cake ahead of time? Yes! The cake layers can be baked and wrapped well for up to two days. The fully decorated cake can be made the day before the party and stored in the fridge. Just add the character toppers before serving.
6. What are the main colors for a Brawl Stars theme? Vibrant green (for grass and gems), brown (for dirt), and the bright colors of the brawlers themselves—especially the iconic yellow of the logo.
7. What are some other easy Brawl Stars cake ideas? A super simple idea is to frost a cake in the game’s signature yellow color, create a black drip, and place the Brawl Stars logo on top. It’s minimalist, modern, and instantly recognizable.
Victory!
You did it! You’ve faced the final boss of birthday cakes and emerged victorious. You’ve created a Brawl Stars cake that’s fun, delicious, and guaranteed to be a legendary hit. You’ve proven that with the right battle plan, even the most intimidating themes are totally achievable.
Now go, present your masterpiece, and get ready for the roar of the crowd. You’ve officially won the birthday brawl. Star Player, indeed.