The Best Gluten-Free Chocolate Cake (That Doesn’t Taste Like Sadness)
Let’s have an honest conversation about the term “gluten-free cake.” For too long, those words have conjured images of dry, crumbly, flavorless bricks that taste vaguely of cardboard and disappointment. We’ve all been there, politely nibbling a slice at a party while secretly mourning the joyous, gluten-filled cakes of our past. Well, my friend, I am here today to stage a revolution. This is the recipe for a gluten free chocolate cake so moist, so fudgy, and so ridiculously decadent that your gluten-eating friends will be begging for the recipe, completely unaware of its “special” status.
Why This Recipe is a Total Game-Changer
So, what makes this cake different from all the other sad GF cakes out there? It’s a miracle of modern baking science, that’s what. First, this cake is unbelievably moist and rich. We’re using a few secret weapons—namely oil, buttermilk, and hot coffee—to ensure a tender, fudgy crumb that will make you weep with joy. This is not a dry, crumbly mess that requires a gallon of milk to choke down.
Second, the chocolate flavor is deep and intense, thanks to a little trick called “blooming” the cocoa powder. The result is a cake that tastes like it came from a fancy bakery, not a science experiment. And the best part? It’s a straightforward, no-fuss recipe. You don’t need a PhD in chemistry to make a gluten-free cake that doesn’t suck. You just need this recipe. Trust me.
Ingredients (Your Arsenal for Gluten-Free Glory)

Gather your supplies! Using a good quality 1-to-1 flour blend is the key to success here.
For the Fudgy Chocolate Cake:
- 1 ¾ cups high-quality 1-to-1 gluten-free all-purpose baking flour (make sure it contains xanthan gum!)
- ¾ cup unsweetened cocoa powder, sifted
- 1 ½ teaspoons baking soda
- 1 teaspoon baking powder
- 1 teaspoon salt
- 2 cups granulated sugar
- 2 large eggs, at room temperature
- 1 cup buttermilk, at room temperature (see substitutions for a DIY version!)
- ½ cup vegetable oil (or any neutral oil)
- 2 teaspoons vanilla extract
- 1 cup hot, strong-brewed coffee (or just hot water)
For the Dreamy Chocolate Buttercream:
- 1 cup (2 sticks) unsalted butter, softened
- ¾ cup unsweetened cocoa powder, sifted
- 4 cups powdered sugar, sifted
- ⅓ cup milk or heavy cream
- 2 teaspoons vanilla extract
- ¼ teaspoon salt
Key Substitutions:
- Gluten-Free Flour: This recipe is designed for a blend like Bob’s Red Mill 1-to-1 or King Arthur Measure for Measure that already contains xanthan gum. Do not just use a single GF flour like almond or coconut.
- Buttermilk: No buttermilk? No problem! Just add 1 tablespoon of lemon juice or white vinegar to 1 cup of regular or dairy-free milk. Let it sit for 5-10 minutes to curdle. Voila, DIY buttermilk!
- Dairy-Free/Vegan: Use your favorite vegan butter sticks, a dairy-free milk alternative for the buttermilk and frosting, and substitute the eggs with 2 flax eggs (2 tbsp ground flaxseed + 6 tbsp water).
Tools & Kitchen Gadgets Used:
You don’t need a lab, just a few kitchen staples.
- Two 9-inch Round Cake Pans: For a classic layer cake.
- Parchment Paper: Your best friend for preventing sticking.
- Electric Stand Mixer or Hand Mixer: Essential for making a light and fluffy buttercream.
- Mixing Bowls (at least 2): One for dry ingredients, one for wet.
- Whisk & Silicone Spatula: The dynamic duo of baking.
- Sifter or Fine-Mesh Sieve: To get the lumps out of your cocoa and powdered sugar.
- Offset Spatula: For getting that smooth, professional frosting look.
- Wire Cooling Rack: A must-have for properly cooling your cakes.
Step-by-Step Instructions (Let’s Bake the Impossible)
Ready to create a gluten-free masterpiece that defies all expectations? Let’s do this.
Part 1: Making the Cake
- Prep Your Station: Preheat your oven to 350°F (175°C). Grease and flour (with GF flour) your two 9-inch round cake pans. Line the bottoms with circles of parchment paper for extra insurance.
- The Flavor Bomb (Bloom the Cocoa): In a large mixing bowl, whisk together the sugar, sifted cocoa powder, baking soda, baking powder, and salt. Pour the hot coffee over the dry ingredients and whisk until smooth. This “blooming” process deepens the chocolate flavor immensely. Let it sit for a couple of minutes.
- Combine the Wet Ingredients: In a separate medium bowl, whisk together the eggs, buttermilk, oil, and vanilla extract.
- Mix It All Up: Pour the wet ingredients into the chocolate mixture and whisk until just combined.
- Add the Flour: Add the gluten-free flour blend to the wet ingredients and mix on low speed (or by hand) until the batter is smooth. Do not overmix! Scrape down the sides and bottom of the bowl to make sure everything is incorporated.
- Divide and Bake: Pour the batter evenly between your two prepared pans. Bake for 30-35 minutes, or until a wooden skewer inserted into the center comes out clean.
- Cool It Down: Let the cakes cool in the pans for about 15 minutes before carefully inverting them onto a wire rack. Peel off the parchment paper and let them cool completely. This is not a suggestion, it’s a command!
Part 2: Whipping Up the Buttercream
- Cream the Butter: In the bowl of your stand mixer, beat the softened butter on medium speed until it’s smooth and creamy.
- Add the Cocoa: Add the sifted cocoa powder and beat on low speed until combined, then increase to medium and beat for another minute.
- The Sugar Rush: With the mixer on low, gradually add the sifted powdered sugar, alternating with the milk/cream, until everything is incorporated.
- Flavor and Fluff: Add the vanilla extract and salt. Increase the speed to medium-high and beat for a full 3-5 minutes until the buttercream is light, fluffy, and spreadable.
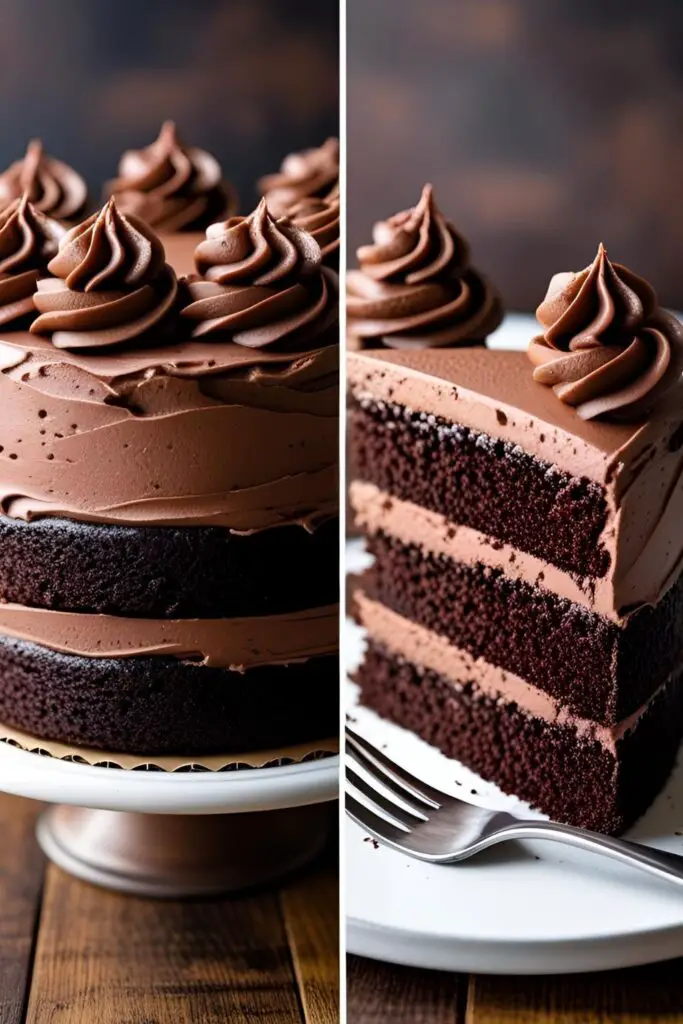
Part 3: Assembly
- First Layer: Place one completely cooled cake layer on your serving plate or cake stand. Spread a generous layer of buttercream on top.
- Second Layer: Carefully place the second cake layer on top.
- Frost Away: Use your offset spatula to frost the top and sides of the cake. Make it smooth and sleek or create pretty swirls. You’re the artist!
Calories & Nutritional Info (It’s a Cake, Not a Kale Smoothie)

This is a rich, decadent cake, and it’s proud of it. But if you must know…
- Serving Size: 1 slice (assuming 16 slices)
- Estimated Calories: 450-550 per slice
- Fat: ~25g
- Carbohydrates: ~60g
- Sugar: ~45g
Common Mistakes to Avoid (Read This and Save Your Cake)
- Using the Wrong GF Flour: I cannot stress this enough. You need a 1-to-1 blend that contains xanthan gum. Using just almond flour or coconut flour will not work and you will have a sad, crumbly mess.
- Overbaking: This is the #1 killer of all cakes, but it’s especially deadly for GF cakes. Start checking for doneness a few minutes early. A moist crumb is what you’re after.
- Skipping the Coffee: The hot coffee (or water) is crucial for blooming the cocoa and adding moisture. Don’t skip it! Your cake won’t taste like coffee, it will just taste more intensely chocolatey.
- Frosting a Warm Cake: Do you want a melted, sliding, soupy mess? No? Then let your cakes cool completely.
Variations & Customizations (Get a Little Wild)
- Mocha Madness: Amp up the coffee flavor! Use strong espresso instead of regular coffee in the cake batter. You can also dissolve a tablespoon of instant espresso powder into the milk for the frosting.
- Mexican Chocolate Twist: Add 1 ½ teaspoons of ground cinnamon and a ¼ teaspoon of cayenne pepper to the dry ingredients of the cake batter for a warm, spicy kick that is absolutely divine with the chocolate.
- Raspberry Chocolate Dream: Add a layer of raspberry jam between the two cake layers before frosting. Garnish the top of the cake with fresh raspberries. The tartness of the fruit is a perfect counterpoint to the rich chocolate.
FAQ Section (Your Gluten-Free Queries, Answered)
1. What is the best gluten-free flour for chocolate cake? A high-quality “1-to-1” or “measure for measure” gluten-free baking blend is best. These are designed to be a direct substitute for all-purpose flour and already contain binders like xanthan gum.
2. How do you make a gluten-free cake moist and not crumbly? The secret is fat and acid! Using oil instead of just butter, along with an acidic ingredient like buttermilk and hot coffee, adds a ton of moisture and creates a tender crumb that holds together beautifully.
3. Does this cake need xanthan gum? Yes, but you shouldn’t have to add it yourself. Make sure the 1-to-1 flour blend you buy already contains xanthan gum. It’s the magical ingredient that mimics gluten and prevents your cake from becoming a pile of crumbs.
4. Why did my gluten-free cake sink in the middle? This can happen for a few reasons: opening the oven door too early, underbaking, or an issue with your leavening agents (baking soda/powder). Make sure your ingredients are fresh and resist the urge to peek!
5. Can I make this cake ahead of time? Yes! This cake is actually fantastic the next day, as the flavors have time to meld. You can bake the layers a day ahead, let them cool, and wrap them tightly at room temperature. Frost the day you plan to serve.

6. Can I make this into cupcakes? Absolutely! This recipe will make about 24 cupcakes. Fill the liners about ⅔ full and bake for 18-22 minutes, or until a toothpick comes out clean.
7. Seriously, will people know this is gluten-free? Honestly? No. I’ve served this to many unsuspecting gluten-eaters, and they have all been shocked when I revealed its secret identity. It’s just a ridiculously good chocolate cake, full stop.
Final Thoughts (Go Forth and Convert the Skeptics!)
You are now in possession of a powerful secret: a gluten-free chocolate cake recipe that doesn’t just “not suck,” but is actively, outrageously delicious. This is your go-to for birthdays, celebrations, or any random Tuesday that calls for a serious chocolate fix. It’s your answer to every potluck dilemma and your way to show the world that gluten-free can be glorious.
So go on, bake this cake. Share it with your most skeptical, gluten-loving friends and watch their faces as they take their first bite. The delicious revolution starts now. 😉