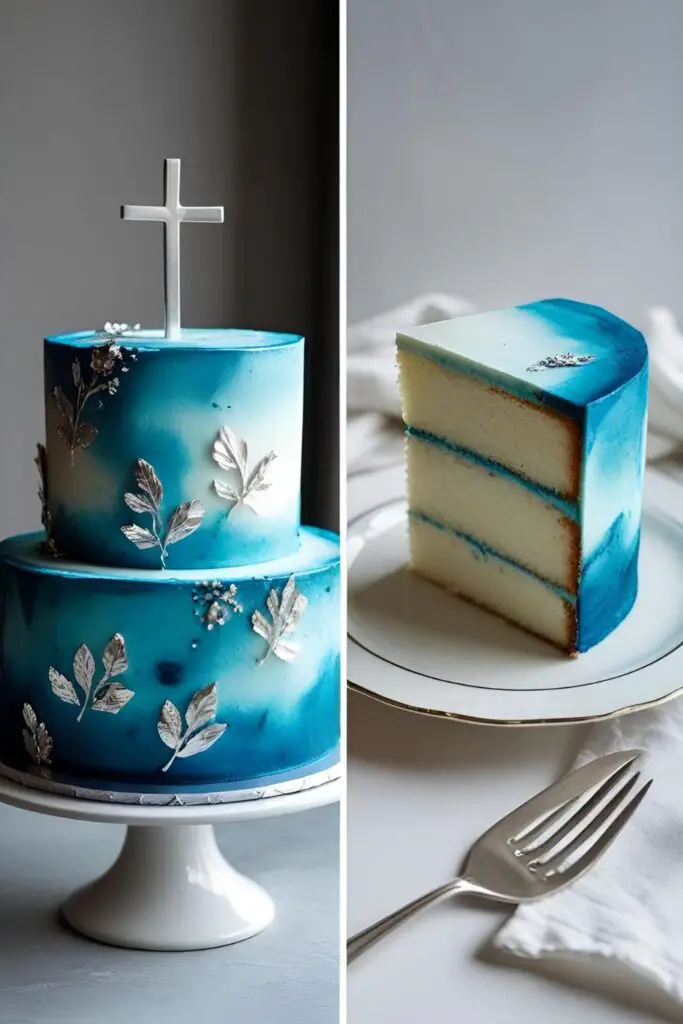
An Elegant Christening Cake for a Boy (A Simple & Stunning Recipe!)
There are certain family occasions that feel a little more… formal. A christening or baptism is one of them. It’s a beautiful, traditional ceremony steeped in meaning, and frankly, it requires a cake that understands the assignment. This isn’t the time for a novelty-shaped, brightly-colored cartoon character. You need something elegant, timeless, and beautiful to mark a truly special day. And if you’re looking for the perfect christening cake for a boy, you’ve come to the right place.
You’re probably picturing a multi-tiered, impossibly smooth creation from a fancy bakery with a price tag to match. But what if I told you that you could create a cake that is just as stunning, just as elegant, and tastes a million times better, right in your own kitchen?
Forget the stress and the bakery quotes. We’re about to create a beautiful, heartfelt centerpiece that’s surprisingly simple to make. You’ve got this.
Why This Recipe is a Blessing
This cake is designed to be the perfect, stress-free centerpiece for a very special day.
First, it’s timelessly elegant, not trendy. We’re using a delicate blue watercolor technique on a pristine white buttercream canvas. It’s a design that is sophisticated, beautiful, and won’t look dated in photos twenty years from now. It’s classic, with a modern, artistic touch.

Second, the flavor is absolutely heavenly. Underneath that beautiful exterior is a White Velvet Cake. It’s incredibly soft, with a fine, velvety crumb and a delicate flavor of vanilla with a hint of almond. Paired with a silky, not-too-sweet Swiss Meringue Buttercream, it’s a flavor combination that is universally adored by kids and adults alike.
Finally, it’s impressively achievable. I know that a cake this beautiful looks intimidating, but the watercolor technique is one of the most forgiving decorating styles out there. It’s not about perfection; it’s about creating a beautiful, blended effect. You don’t need to be a professional to get a stunning result.
The Angelic Ingredients List
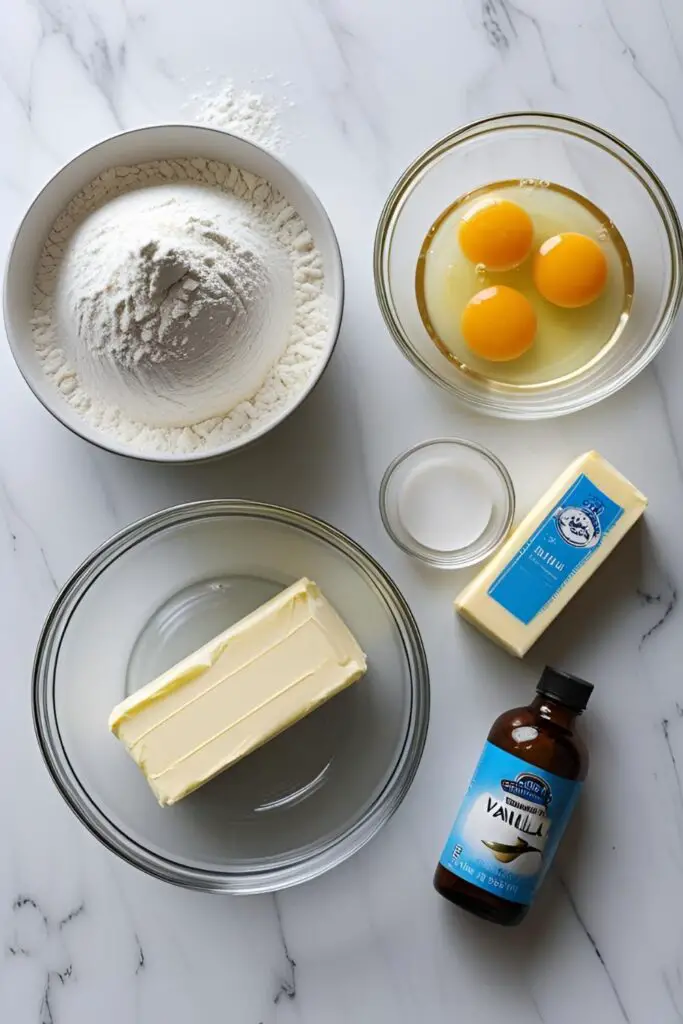
For a cake this special, we’re using high-quality, classic ingredients.
For the White Velvet Cake:
- 221 cups (285g) cake flour, sifted
- 121 cups (300g) granulated sugar
- 1 tablespoon baking powder
- 21 teaspoon salt
- 43 cup (170g) unsalted butter, softened and cut into cubes
- 4 large egg whites, at room temperature
- 1 cup (240ml) buttermilk, at room temperature
- 1 teaspoon pure vanilla extract
- 21 teaspoon almond extract (This is the secret to that classic “bakery” flavor!)
For the Silky Swiss Meringue Buttercream:
- 5 large egg whites
- 121 cups (300g) granulated sugar
- 2 cups (452g) unsalted butter, cubed and softened
- 2 teaspoons clear vanilla extract (to keep the buttercream perfectly white)
- A pinch of salt
For the Elegant Decorations:
- Sky Blue and Royal Blue Gel Food Coloring
- Edible silver leaf
- Silver or white sprinkles, sugar pearls, or dragees
- A simple cake topper (a silver cross, the baby’s name, or a “God Bless” banner)
The Chapel of Tools: Kitchen Gadgets
Having the right equipment will make this process a peaceful, meditative experience.
- Stand Mixer: I cannot recommend this enough, especially for the White Velvet Cake (which uses a specific mixing method) and the Swiss Meringue Buttercream.
- Kitchen Scale: For accurately measuring your flour, which is key to a light, velvety texture.
- Two 8-inch Round Cake Pans: For a classic, two-layer cake.
- A Double Boiler (or a saucepan and a heatproof bowl): For the buttercream.
- Instant-Read Thermometer: To ensure your meringue reaches the right temperature.
- Sifter or Fine-Mesh Sieve: Non-negotiable for a lump-free cake.
- Offset Spatula & Bench Scraper: Your keys to a smooth, professional frosting job.
- Cake Turntable: The ultimate tool for easy, even frosting.
- Small, food-safe paintbrush or palette knife: For applying the decorative touches.
Step-by-Step: A Guide to Cake Heaven
Let’s break this down into simple, manageable steps.
H3: Part 1: The Angelic White Velvet Cake
- Prep Your Pans: Preheat your oven to 350°F (175°C). Grease and flour your two 8-inch cake pans, and line the bottoms with parchment paper.
- The Reverse Creaming Method: In the bowl of your stand mixer, sift together the cake flour, sugar, baking powder, and salt. With the paddle attachment on low speed, add the cubed, softened butter one piece at a time, mixing until the mixture resembles coarse, sandy crumbs.
- Combine the Liquids: In a separate bowl, whisk together the egg whites, buttermilk, and both the vanilla and almond extracts.
- Mix the Batter: Pour about half of the wet ingredients into the dry ingredients and mix on low speed until combined. Increase the speed to medium and beat for about 90 seconds. Scrape down the bowl, then add the remaining wet ingredients in two additions, mixing for about 20-30 seconds after each, just until combined. Do not overmix!
- Bake and Cool: Divide the batter evenly between your prepared pans. Bake for 30-35 minutes, or until a toothpick inserted into the center comes out clean. Let the cakes cool in the pans for 15 minutes before turning them out onto a wire rack to cool completely.
H3: Part 2: The Buttercream and Assembly
- Make the Swiss Meringue: Heat the egg whites and sugar in your heatproof bowl over simmering water, whisking constantly until the mixture is hot to the touch (160°F / 71°C) and the sugar has fully dissolved.
- Whip It Good: Transfer the bowl to your stand mixer and whip on high speed until you have a stiff, glossy meringue and the outside of the bowl is cool to the touch.
- Add the Butter: Switch to the paddle attachment. On low speed, slowly add the cubed, softened butter one piece at a time. It may look curdled—don’t worry, just keep mixing and it will come together into a silky, smooth frosting. Mix in the clear vanilla and salt.
- Stack and Crumb Coat: Level your cooled cake layers. Place one layer on your cake turntable, top with a layer of buttercream, then add the second layer. Apply a thin coat of the white buttercream all over the cake to trap any crumbs, then chill in the fridge for 30 minutes until firm.
H3: Part 3: The Watercolor Masterpiece
- The Blank Canvas: Apply a final, smooth coat of the white buttercream to your chilled cake. Use your bench scraper to get the sides as straight as possible and your offset spatula for a level top.
- Mix Your Blue: Take a small amount of the remaining buttercream (about 41 cup) and tint it with a tiny drop of sky blue gel food coloring. You want a very pale, delicate blue.
- Apply the Color: Using a small palette knife or the back of a spoon, dab small, random patches of the pale blue buttercream onto your chilled white cake. Less is more here.
- The Blending Swoosh: Now for the magic. Hold your bench scraper against the side of the cake. With firm, even pressure, spin your turntable in one or two smooth, continuous motions. This will gently blend the blue into the white, creating a beautiful, soft watercolor effect. Don’t do more than two passes, or you’ll lose the effect.
- Finishing Touches: While the frosting is still soft, gently apply your silver leaf, sprinkles, or dragees. Top with your chosen cake topper.
Nutritional Info (A Moment of Reflection)
A breakdown of this special treat.
- Serving Size: 1 slice (assuming 16 small, party-sized slices)
- Estimated Calories: Around 550 kcal
- Key Components: Love, celebration, and a significant amount of butter.
- Note: A christening is a once-in-a-lifetime event. This is a cake for making memories, not for counting calories.
Common Mistakes to Avoid (Avoiding Unholy Errors)
- A Yellow “White” Cake: You used whole eggs. For a true, pristine white velvet cake, you must use only egg whites.
- Greenish-Blue Frosting: You used a standard American buttercream. The yellow from the butter will mix with the blue dye. A pure white Swiss Meringue is the key to achieving a true, delicate blue.
- A Dense, Heavy Cake: You overmixed the batter. The reverse creaming method is fantastic for a fine crumb, but it’s sensitive. Once the liquids are in, mix only until just combined.
- A Monotone Blue Cake: You got carried away with the bench scraper and over-blended. The beauty of the watercolor effect comes from the patches of white still showing through. One or two passes is all you need.
- A Meltdown at the Altar: You tried to frost a warm cake. It will melt, it will slide, it will be a tragedy. Your cake layers must be completely cool before you begin assembly.
Variations & Customizations (Other Blessings)

If the watercolor look isn’t for you, here are other elegant options.
- Classic White on White: A timeless and pure option. Skip the blue food coloring entirely and finish the cake in pristine white buttercream. You can add texture with a patterned bench scraper or pipe on delicate pearl borders.
- Simple Blue Ombré: For a more structured look. Divide your buttercream into three bowls. Leave one white, tint one pale blue, and one a slightly darker blue. Pipe rings of each color onto the cake, from darkest at the bottom to white at the top, and smooth with a bench scraper for a clean gradient.
- A Hint of Lemon: For a bright, fresh flavor, add the zest of one lemon to the cake batter. It pairs beautifully with the delicate almond and vanilla notes.
Frequently Asked Questions (Your Christening Cake Counsel)
What is the best flavor for a christening cake?
Classic, light flavors are usually the best choice. White cake, vanilla, lemon, or almond are all crowd-pleasers. This White Velvet recipe with a hint of almond is a perfect, traditional choice.
How do you create a watercolor buttercream effect?
You apply small patches of colored frosting onto a chilled, white base coat. Then, you use a bench scraper to make one or two smooth passes around the cake, which gently smears and blends the colors together.
What’s the difference between a white cake and a white velvet cake?
A standard white cake is light and fluffy. A white velvet cake, often made with the reverse creaming method, buttermilk, and only egg whites, has a much finer, tighter, and more tender crumb, giving it a “velvety” texture.
How far in advance can I make this cake for the christening?
You can bake the cake layers up to two days ahead. Wrap them well and store them at room temperature. The entire cake can be assembled and decorated the day before the event and stored in the refrigerator.
How do I safely transport a layer cake?
A cake box is your best friend. Drive carefully, as if you have a precious, fragile baby in the car (which you might!). Place the box on a flat, level surface in your car, like the floor of the passenger seat, not the seat itself.
Can I make this cake with fondant?

Absolutely. A fondant-covered cake provides a very clean, traditional look. You would still frost the cake with a layer of buttercream underneath the fondant. You could then paint on it with diluted food coloring for a watercolor effect.
How do I know how much cake I need for my guests?
A standard two-layer 8-inch round cake, like this one, will typically yield about 16 small, party-sized slices. If you have a larger guest list, consider making a larger 10-inch cake or a second, smaller cake.
Final Thoughts
You’ve done it. You’ve created a beautiful, elegant, and heartfelt centerpiece for a truly momentous occasion. This cake is more than just a dessert; it’s a celebration of family, tradition, and a precious new life.
Take a moment to admire your work. You’ve created something special that will be a part of cherished family memories (and photos!) for years to come. Now go on, let them eat cake. This cake. The one you made with love.