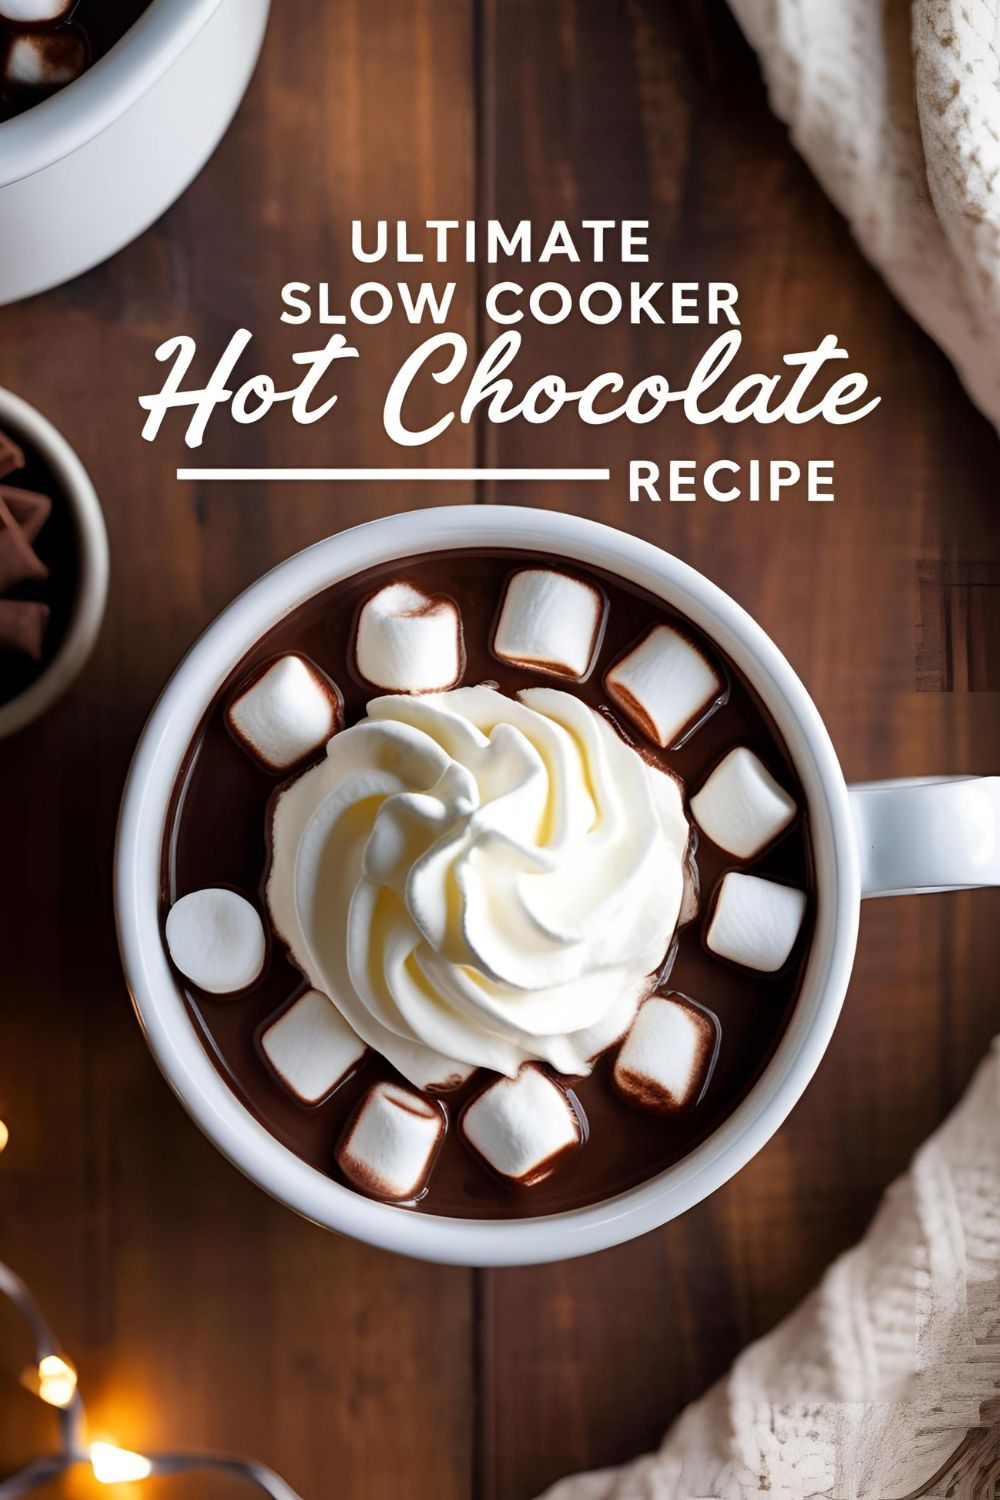
The Ultimate Cozy Slow Cooker Hot Chocolate That Will Ruin Store-Bought Forever
Let’s be real for a second: nothing beats wrapping your hands around a warm mug of hot chocolate when the temperature drops. But that packet stuff? Please. We’re adults now. It’s time for an upgrade. Enter: slow cooker hot chocolate – the rich, velvety, chocolate dream that will make you question why you ever settled for less.
I discovered this slow cooker hot chocolate recipe after hosting a winter game night where my sad packet mix left everyone politely nodding but clearly disappointed. Never again, I promised myself. So I experimented until I found this liquid gold that now has friends “coincidentally” dropping by whenever there’s a chill in the air.
Why This Slow Cooker Hot Chocolate Will Change Your Life
Let’s talk about why this slow cooker hot chocolate deserves a permanent spot in your winter recipe collection:
First, it’s ridiculously easy. Toss ingredients in, stir occasionally, and boom – chocolate nirvana. Who doesn’t love a “set it and forget it” situation when you’re hosting?
Second, the flavor is unmatched. The slow cooking allows the chocolate to melt gradually, creating a depth of flavor that those powdered packets can only dream about. It’s like comparing a kindergarten crayon drawing to the Mona Lisa.
Third, this recipe makes your entire home smell like a chocolate wonderland. Who needs expensive candles when you have this brewing?
And finally, the customization options are endless. Want it boozy? Go for it. Prefer dairy-free? I’ve got you covered. Like it spicy? Let’s make it happen.
So, ready to elevate your hot chocolate game from “meh” to “where has this been all my life”? Let’s dive in!
Ingredients for Slow Cooker Hot Chocolate

Here’s everything you’ll need to make this liquid happiness:
- 6 cups whole milk (the fat content matters for creaminess)
- 2 cups heavy cream (yes, we’re going all in)
- 1 ½ cups semi-sweet chocolate chips (or chopped chocolate bars)
- ½ cup unsweetened cocoa powder (Dutch-processed for deeper flavor)
- ⅔ cup granulated sugar (adjust to taste)
- 1 tablespoon vanilla extract
- ¼ teaspoon salt (trust me on this one)
- Optional: 2 cinnamon sticks
- For serving: whipped cream, marshmallows, chocolate shavings, candy canes
Substitution Notes:
- For dairy-free version: Swap milk and cream for coconut milk and coconut cream
- Lower sugar option: Use ⅓ cup sugar and increase cocoa powder to ⅔ cup
- Chocolate options: Dark chocolate creates a richer drink, while milk chocolate makes it sweeter
Tools & Kitchen Gadgets You’ll Need
Before we start, make sure you have these essential tools on hand:
- 6-quart slow cooker (smaller works too, just reduce quantities)
- Measuring cups and spoons
- Whisk (for breaking up any cocoa clumps)
- Ladle (for serving without making a chocolate tsunami on your counter)
- Heat-resistant rubber spatula
- Insulated mugs (keeps the goodness warm longer)
- Optional: Chocolate grater (for those Instagram-worthy toppings)
- Optional: Frother (if you want to get fancy with your whipped cream)
- Optional: Mason jars (for gifting premixed dry ingredients)
Step-by-Step Instructions for Slow Cooker Hot Chocolate
Step 1: Prep Your Ingredients
Measure everything out before starting. I know it seems like extra work, but trust me—trying to measure sugar with chocolate-covered fingers is not the vibe.
Step 2: Combine Base Ingredients
Add milk, heavy cream, and sugar to your slow cooker. Whisk until sugar begins to dissolve. This creates the creamy base for our chocolate masterpiece.
Step 3: Add Chocolate Components
Sift the cocoa powder (to avoid those dreaded lumps that never seem to disappear) and add it to the slow cooker along with chocolate chips. If using cinnamon sticks, toss those in now too.
Step 4: Set It and (Mostly) Forget It
Cover and cook on LOW for 2 hours. Yes, two whole hours. Good things come to those who wait, and great hot chocolate comes to those who don’t rush the process.
Step 5: The Crucial Stir

Stir every 30 minutes to prevent the chocolate from settling at the bottom and potentially burning. Nobody wants to drink burnt chocolate. Nobody.
Step 6: Final Flavor Boost
After 2 hours, add vanilla extract and salt. Stir well to incorporate. Let it cook for another 15 minutes to let the flavors meld together in chocolate harmony.
Step 7: Serve That Liquid Gold
Ladle into mugs and top with your choice of whipped cream, marshmallows, chocolate shavings, or crushed candy canes. For extra points, serve with a cinnamon stick as a stirrer.
Step 8: Keep It Warm
Switch your slow cooker to the WARM setting if you’re hosting. This keeps it at the perfect temperature without continued cooking, which could make it too thick.
Calories & Nutritional Info

Let’s be honest—this isn’t a diet drink. But hey, it’s winter, and we need the insulation, right?
- Calories: Approximately 320 per 8 oz serving
- Fat: 22g (14g saturated)
- Carbohydrates: 28g (24g from sugar)
- Protein: 6g
- Calcium: 20% of daily value
- Iron: 6% of daily value
Good to know: The real dairy provides calcium and protein, while dark chocolate contains antioxidants. See? It’s practically a health drink. (Wink, wink)
Common Mistakes to Avoid
Don’t let these rookie errors ruin your chocolate experience:
Using cheap chocolate – This is not the time to cut corners. The quality of your chocolate directly affects the flavor. That bargain bin chocolate might save you a dollar now but cost you in disappointment later.
Cooking on HIGH – Patience is a virtue, especially with chocolate. High heat can scorch the bottom layer and give you that burnt taste that no amount of whipped cream can hide.
Forgetting to stir – I know the slow cooker is supposed to be hands-off, but this recipe needs occasional attention. Set a timer if you’re prone to disappearing into a Netflix vortex.
Skipping the salt – It seems weird to add salt to a sweet drink, but it enhances the chocolate flavor. Missing this tiny ingredient makes a noticeable difference.
Using cold milk – Starting with room temperature ingredients helps everything melt and blend more evenly. Cold milk takes longer to heat and can lead to uneven cooking.
Variations & Customizations
The Adult Version
Add 1 cup of your favorite liquor after cooking. Bourbon, rum, or Baileys Irish Cream all work magnificently. Just remember to add it at the end—alcohol evaporates when cooked too long.
Mexican Hot Chocolate
Add 1 teaspoon of ground cinnamon, ¼ teaspoon of cayenne pepper, and a pinch of nutmeg for a spicy kick that warms you from the inside out. Pair with cinnamon sticks for stirring.
White Chocolate Peppermint
Replace half the chocolate with white chocolate chips and add ½ teaspoon of peppermint extract (a little goes a long way). Garnish with crushed candy canes for that festive touch.
Mocha Madness
Add ¼ cup of espresso or 1 tablespoon of espresso powder for a caffeinated version that’s perfect for morning gatherings. Top with coffee-flavored whipped cream if you’re feeling extra.
Frequently Asked Questions About Slow Cooker Hot Chocolate
Can I make this ahead of time?
Absolutely! You can make this up to 2 days ahead and store it in the refrigerator. Reheat it on the stovetop over medium-low heat, stirring frequently to prevent scorching. The flavor actually improves overnight as the chocolate deepens.
Why is my hot chocolate grainy?
Graininess usually happens when the chocolate seizes. This could be from overheating or not stirring enough. Try adding a splash of warm cream and whisking vigorously to smooth it out. Next time, make sure to stir more frequently.
Can I use plant-based milk instead?
Yes! Coconut milk or oat milk work best because of their creaminess. Almond milk is a bit thin, so if using it, reduce the quantity by 1 cup and compensate with additional plant-based cream.
How long can I keep it warm in the slow cooker?
The “WARM” setting is safe for about 3-4 hours. After that, the chocolate can start to break down, affecting texture and taste. If you need it longer, consider turning the slow cooker off and reheating portions as needed.
Can I use cocoa powder only instead of chocolate chips?
You can, but the texture won’t be as rich. If using only cocoa powder, increase to ¾ cup and add 4 tablespoons of butter or coconut oil to compensate for the missing cocoa butter in the chips.
Is this recipe kid-friendly?
Completely! The slow cooking mellows any bitterness in the chocolate, making it appealing to all ages. For extra kid appeal, set up a toppings bar with sprinkles, mini marshmallows, and chocolate straws.
Can I freeze leftover hot chocolate?
Yes, but the texture may change slightly. Pour cooled hot chocolate into ice cube trays and freeze. Pop a few cubes into warm milk when you want a quick cup, or blend with ice cream for a hot chocolate milkshake!
Final Thoughts on Slow Cooker Hot Chocolate
Look, we could pretend that perfectly good hot chocolate comes from those little packets with the freeze-dried marshmallows, but we’d be lying to ourselves. This slow cooker hot chocolate is the difference between watching a movie on your phone versus experiencing it in IMAX.
Once you’ve served this to friends and family, be prepared for repeat requests. You might even find yourself being volunteered to bring hot chocolate to every winter gathering from now until forever. Consider yourself warned.
But honestly? There are worse things in life than being known as the person who makes chocolate magic happen. So embrace your new title, stock up on chocolate chips, and get ready to ruin store-bought hot chocolate for everyone you know.
Now go forth and sip happily! And if anyone asks for your secret recipe, remember: sharing is caring, but a little mystery keeps them coming back for more