Ever gazed lovingly at your air fryer, pondering its magical ability to turn almost anything into crispy, golden perfection? Me too. This kitchen wizard, this culinary superhero, has probably saved your dinner more times than you can count. But let’s be real, even superheroes get a little… grungy. And when your trusty air fryer starts looking less like a sleek appliance and more like a crime scene from last night’s chicken wing massacre, you know it’s time for an intervention. You’ve probably mumbled to yourself, “How on earth do I actually clean this thing without ruining it?” Well, my fellow air fryer fanatic, you’ve hit the jackpot. I’ve personally waged war against baked-on grease and rogue crumbs more times than I care to admit, and I’m spilling all the tea on how to clean an air fryer like a pro.
Why Bother? The Unsung Importance of a Sparkling Clean Air Fryer
Okay, first things first. Is this just about avoiding the dreaded “mystery smell” that wafts from your air fryer every time you turn it on, making guests wonder if you’re secretly fermenting old socks? Partly, yes. Nobody wants a house that smells vaguely of stale oil and desperation. But the truth is, a clean air fryer isn’t just about olfactory pleasantries. Oh no, there’s a whole universe of benefits you might be missing out on!
Think about it: your air fryer relies on a constant, efficient flow of hot air to work its magic. When grease, crumbs, and all sorts of other delicious detritus build up inside, they become roadblocks. They literally block the airflow, making your precious machine work harder and less effectively. Ever wondered why your fries aren’t quite as crispy as they used to be? Bingo. Dirty air fryer. You’re essentially stifling its potential!
Furthermore, those burnt-on bits don’t just sit there looking ugly. They can actually impart weird, stale, or even bitter flavors to your fresh food. Imagine biting into a perfectly air-fried spring roll, only to get a delightful hint of yesterday’s burnt cheese. Shudder. Not exactly appetizing, is it? Plus, and this is a serious point, excessive grease buildup can pose a minor fire hazard. So, yeah, a little bit of cleaning effort now genuinely saves you a lot of headache (and potentially burnt dinners, or worse!) down the line. It’s an investment in your crispy future, IMO.
The Daily Grind: Your “After Every Use” Air Fryer Spa Treatment
I hear your groans. “Clean it every time?! Are you mad?” Look, I get it. We’re all busy, and sometimes the idea of cleaning another kitchen gadget after a long day of adulting feels like a personal affront. But trust me on this: a quick clean after every use is your secret weapon against the dreaded deep-clean battle. It’s like doing five minutes of core exercises versus having to run a marathon later. Much preferred, right?

Here’s my non-negotiable routine for keeping that everyday grime at bay:
- Safety First, Always Unplug: Before you even think about touching anything, always, always, always unplug your air fryer from the wall. This isn’t just a suggestion; it’s a golden rule. We want clean hands, not zapped hands.
- Cool Down, Hot Stuff: Resist the immediate urge to dunk a piping hot air fryer basket into cold water. That sudden temperature change is a big no-no for non-stick coatings, potentially causing them to warp, crack, or flake off. Nobody wants microplastics in their nuggets, do they? Let it cool down for at least 15-20 minutes. Go scroll TikTok, read a book, do anything but touch that hot basket.
- Deconstruct for Success: Most air fryers have a removable basket that sits inside a larger drawer or pan. Take them both out. Sometimes, there’s even a little silicone stopper or rubber feet on the basket that you can pop off for easier cleaning around them.
- Warm, Soapy Water is Your Bestie: Now, the actual washing part. Grab your trusty dish soap and some warm water. Use a non-abrasive sponge or a soft brush. Think soft bristles, not steel wool! We are protecting that precious non-stick coating. Gently wash the basket and the drawer.
- The Soak Strategy for Stubborn Spots: What about those truly stuck-on bits? Maybe you air-fried some cheese sticks, and a bit melted onto the basket. Ugh, the worst. For these moments, simply fill the basket with warm, soapy water and let it soak for 10-15 minutes. Seriously, that’s usually all it takes to loosen even the most stubborn, petrified food remnants. It’s almost like magic.
- Wipe Down the Main Unit: While your basket and drawer are soaking or air-drying, grab a lightly damp cloth (and I mean damp, not dripping wet!) and wipe down the interior and exterior of the air fryer. Pay special attention to the inside walls and around where the basket sits. Do not use abrasive cleaners or scourers on the outside either; just a soft cloth.
- The Heating Element Sneak Peek: Take a quick look at the heating element, usually a coil at the top of the air fryer’s interior. If it looks suspiciously splattered, give it a gentle wipe with your barely damp cloth. More on this crucial part in the deep clean section!
- Dry Everything Thoroughly: This step is crucial, folks. Moisture and electronics are like oil and water – they just don’t mix. Use a clean, dry kitchen towel to thoroughly dry the basket and drawer. Then, let everything air dry for a good 15-30 minutes before you even think about putting it back together or plugging it back in. Trust me, patience here prevents future problems.
See? Not so daunting when you break it down, right? This routine, performed regularly, keeps your air fryer happy and ready for its next culinary adventure.
The Deep Dive: When Your Air Fryer Needs Serious Intervention
Okay, so maybe you’ve had a few busy weeks. Or perhaps you went on a deep-fried (oops, I mean air-fried) spree of particularly greasy items. Whatever the reason, sometimes your air fryer needs more than just a quick wipe. That’s when we bring out the heavy artillery for a deep clean. I usually aim for this once a month, depending on how heavily I use my air fryer.
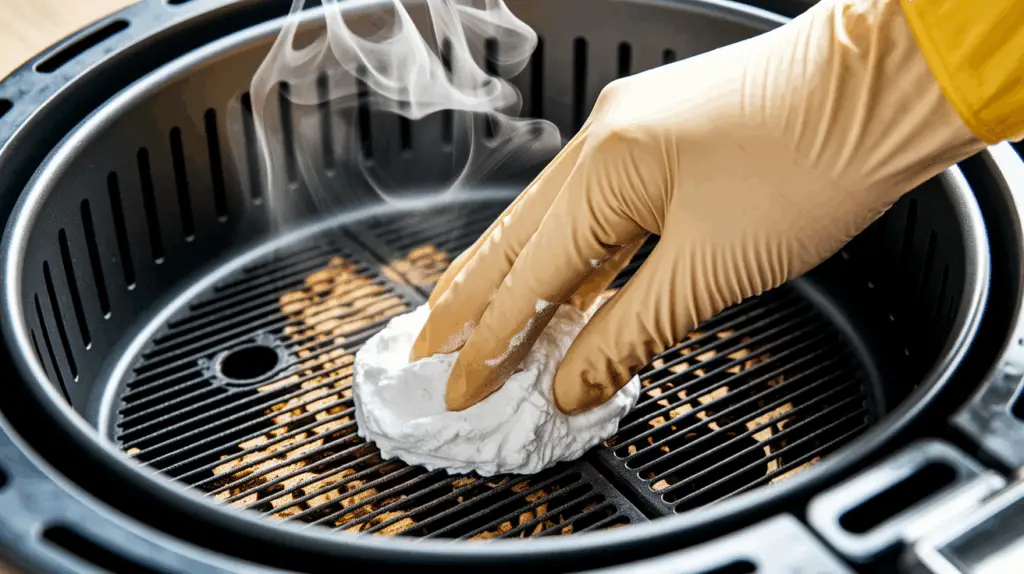
Baking Soda: Your Greasy Nemesis
This is my absolute favorite trick for those truly baked-on, cement-like layers of grime. Baking soda is a gentle abrasive and a powerful deodorizer. It’s like the unsung hero of the kitchen.
- Prep Time (Unplug & Cool!): You know the drill. Unplug it. Let it cool. No shortcuts here.
- The Magical Baking Soda Paste: In a small bowl, mix a few tablespoons of baking soda with just enough water to create a thick, spreadable paste. We’re talking toothpaste consistency here.
- Apply Liberally: Using a spoon or your fingers (gloves recommended if you have sensitive skin, though baking soda is pretty mild), spread this paste over all the stubborn, greasy, baked-on areas of your air fryer basket and drawer. Don’t be shy; cover it all up.
- Let the Science Happen: This is the most crucial part. Let the baking soda paste sit there for at least 30 minutes to an hour. For really, truly awful situations, I’ve even left it overnight. The baking soda works to break down the grease and loosen the food particles. You’ll practically hear the grime begging for mercy.
- Gentle Scrub, Big Results: After its spa treatment, grab that trusty non-abrasive sponge or a soft scrub brush. You’ll be amazed at how easily the grime comes off now. The baking soda paste does most of the heavy lifting for you!
- Rinse Like Your Life Depends On It: Rinse every single part thoroughly under warm running water. You want to make sure every last speck of baking soda residue is gone. Any leftover paste can leave a weird powdery residue or taste.
- Dry, Dry, Dry: Last but not least, dry everything meticulously. A clean towel followed by some air-drying time is perfect.
Tackling the Intimidating Heating Element
Okay, this part might be the part that makes most people sweat. The heating element! It’s right there, coiled up, often looking a little… unapproachable. But trust me, it’s not as scary as it looks, and cleaning it is vital for both performance and safety.
- Unplugged and Chill: Seriously, if you take one thing from this article, it’s unplugging the air fryer. And make sure it’s completely cool.
- Flip it Over (Carefully!): This is often the easiest way to access the heating element. Gently turn your air fryer upside down. Most models are stable enough for this.
- The Damp Cloth Strategy: Get a clean cloth, dampen it slightly with warm water, and add a tiny drop of dish soap if you’re facing serious grease. Wring it out until it’s barely damp! You absolutely do not want any water dripping onto the electrical components. Carefully wipe down the heating coil itself and the surrounding internal surfaces.
- Brush Off the Crud: For those really hard-to-reach crevices or baked-on crusts on the element itself, a dedicated soft-bristled brush (like a clean toothbrush or even a small, unused paintbrush) is your best friend. Gently brush away any loosened bits. Avoid harsh scrubbing or metal brushes, as you don’t want to damage the element.
- Final Wipe Down and Air Dry: Once you’ve scrubbed away the visible grime, give the element and interior another wipe with a clean, slightly damp cloth to remove any soap residue. Then, leave the air fryer upside down (or tilted) for several hours to allow the interior and heating element to completely air dry. I mean, completely. This step is non-negotiable for safety.
Don’t Forget the Outsid… Duh!
While you’re obsessing over the inside, why ignore the part everyone sees? A quick wipe-down of the exterior with a damp cloth keeps your air fryer looking great on your countertop. If you have a stainless steel model, a quick spray of stainless steel cleaner and a buff with a microfiber cloth will make it sparkle like new. Nobody wants a perfectly clean basket sitting in a greasy, fingerprinted shell. Gross.
My Personal Air Fryer Cleaning Wisdom & Hard-Won Lessons

Over the years, I’ve learned a few things that make the whole air fryer cleaning saga a bit less… saggy.
- Parchment Paper Liners are Life: For particularly messy foods (hello, chicken wings, fatty bacon, anything with sauce!), invest in air fryer parchment paper liners. They’re pre-cut circles that fit perfectly into the basket. They catch most of the grease and crumbs, making your post-meal cleanup laughably easy. Just remember to always put food on top of the liner so it doesn’t fly up into the heating element when the air circulates. Safety first, folks!
- Manual Matters: Dishwasher or Not? This is a big one. Some air fryer baskets and drawers are indeed dishwasher safe. Mine isn’t, sadly. But always, always, ALWAYS check your specific model’s manual. Don’t assume. If it says hand-wash only, stick to it. Putting non-dishwasher safe items in there can ruin the non-stick coating and even void your warranty. And we don’t want that, do we? :/
- The Little Brush That Could: For those intricate mesh patterns on the basket or the tiny crevices, a small, dedicated bottle brush or even a clean toothbrush (one you only use for cleaning, obviously) is your best friend. They reach where sponges fear to tread.
- Consistency Trumps All: Seriously, the secret to an always-clean air fryer isn’t some magic potion; it’s consistency. A five-minute wipe-down after every use is infinitely easier and more effective than waiting until you need a chisel to remove baked-on crud. Think of it as preventative maintenance for your crispy dreams.
- Lemon Power: For lingering smells or a quick deodorize, you can run a few lemon slices in the air fryer for 5-10 minutes. It won’t clean grease, but it’s a nice little aromatic refresh. Just make sure the basket is already mostly clean.
Wrapping Up: Your Sparkling Clean Air Fryer Awaits!
So, there you have it. The full lowdown on how to clean an air fryer – from the daily quick rinse to the full-on deep clean, tackling every nook and cranny. It might seem like a bit of work upfront, but trust me, a clean air fryer means better-tasting food, a more efficient appliance, and less hassle in the long run. Plus, there’s something incredibly satisfying about looking at a sparkling clean kitchen gadget, isn’t there? You’ve invested in this fantastic piece of kitchen tech, so give it the love and care it deserves. Now go forth, conquer that grime, and enjoy all the crispy, delicious goodness your clean air fryer is ready to deliver! You’ve totally got this. 🙂
Frequently Asked Questions
- What is the best way to clean an air fryer? The best way to clean an air fryer involves a combination of daily light cleaning and occasional deep cleaning. After every use, unplug the air fryer, let it cool, and handwash the removable basket and drawer with warm, soapy water and a non-abrasive sponge. For a deep clean, use a baking soda paste to tackle stubborn grease and carefully wipe the heating element with a damp cloth after unplugging and cooling the unit.
- How do you deep clean a very dirty air fryer? To deep clean a very dirty air fryer, create a thick paste using baking soda and water. Apply this paste generously to all greasy and baked-on areas of the basket and drawer, allowing it to sit for at least 30 minutes (or longer for very tough spots) to break down the grime. Then, gently scrub with a non-abrasive sponge and rinse thoroughly. For the heating element, ensure the unit is unplugged and cool, then carefully wipe with a barely damp, soapy cloth.
- Can you put air fryer parts in the dishwasher? While some air fryer baskets and drawers are designed to be dishwasher safe, it is crucial to always consult your specific air fryer model’s user manual to confirm if its parts are dishwasher safe. Placing non-dishwasher safe components in the dishwasher can damage the non-stick coating and may void your warranty. Handwashing is generally recommended to prolong the life of the non-stick surfaces.
- How do you get burnt on grease off an air fryer heating element? To safely remove burnt-on grease from an air fryer heating element, first ensure the air fryer is unplugged and completely cool. Gently flip the unit over if possible for better access. Use a clean cloth, dampened only slightly with warm water and a tiny drop of dish soap (make sure it’s well-wrung out). Carefully wipe the heating coil and surrounding areas. For stubborn spots, a soft-bristled brush, like a clean toothbrush, can help gently dislodge dried-on residue. Always allow the element to air dry completely before reassembling or plugging in the air fryer.
- How often should you clean your air fryer? You should aim to perform a light cleaning of your air fryer’s removable basket and drawer after every single use to prevent grease buildup. A more thorough deep clean, addressing the entire interior, including the heating element, is recommended about once a month or as needed, depending on your frequency of use and the types of food you cook.
- Is it safe to put water in air fryer? It is not safe to immerse the main air fryer unit in water or run it under a tap, as this can damage the electrical components and pose a shock hazard. However, the removable parts like the basket and drawer are typically designed to be washed with warm, soapy water. When cleaning the interior of the main unit, always use a damp cloth only, ensuring it is not dripping wet.