How to Cook Ribeye Steak on the Stove (Steakhouse Perfection at Home!)
Let’s talk about the undisputed king of steaks: the ribeye. It’s the cut dreams are made of—marbled, tender, and bursting with rich, beefy flavor. It’s also the steak that often comes with a hefty price tag at a fancy restaurant. But what if I told you that you could achieve that same mind-blowing, perfectly cooked, steakhouse-quality ribeye at home, using nothing but your stove? Forget the grill, forget the complicated techniques. Today, you are going to learn how to cook ribeye steak on the stove, and this simple method is going to change your life.
Why This Recipe Is Awesome (It’s Your Ticket to Steak Nirvana)
Why are we making this our go-to method for the king of steaks? Because a cast-iron skillet and your stovetop are a ribeye’s best friends. This recipe is awesome because:
- The Crust is Legendary: The high, even heat of a skillet creates an unbeatable, edge-to-edge, deeply browned crust. That Maillard reaction is where all the flavor lives, my friends.
- Butter-Basted Bliss: The technique of basting the steak with butter, garlic, and herbs in the final minutes infuses it with an incredible, rich, and aromatic flavor that is pure luxury.
- Total Control: Unlike a grill with its unpredictable flare-ups, the stovetop gives you complete control over the temperature, ensuring a perfectly cooked steak every single time.
- It’s FAST: From start to finish, you’re looking at a 15-minute meal that tastes like it should have cost a fortune. It’s the ultimate way to treat yourself on a Monday evening in Khulna.
This isn’t just cooking; it’s about paying proper respect to a magnificent cut of meat and achieving a result that will have you feeling like a true steak master.
Ingredients: The A-Team of Flavor
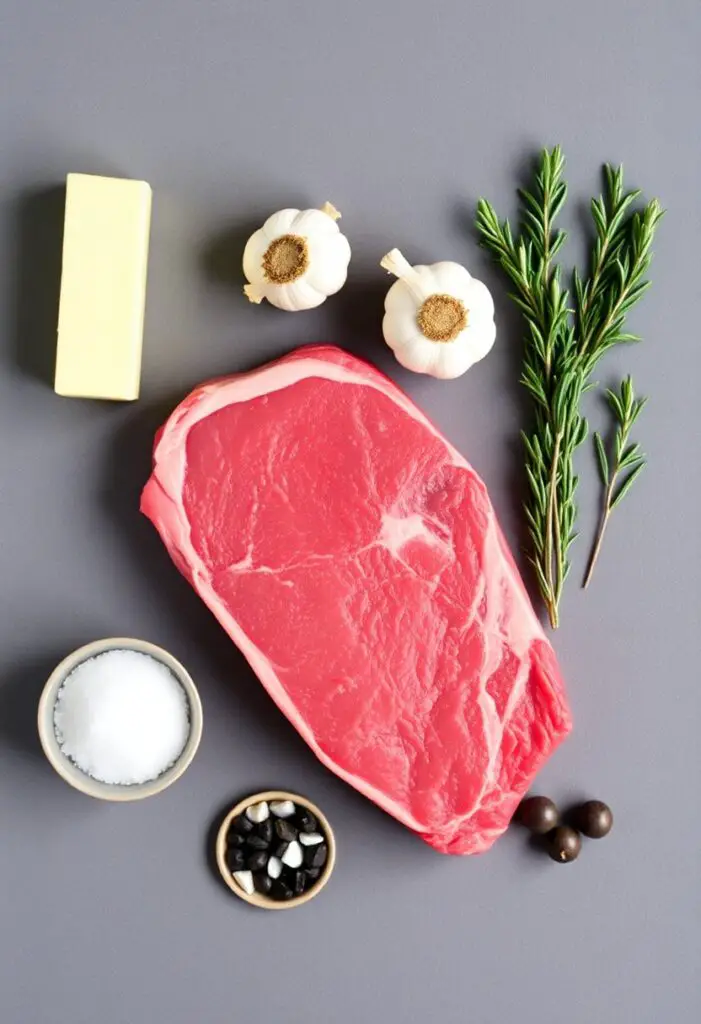
For a steak this good, you let the ingredients speak for themselves. Simplicity is key.
- 1 (1.5 to 2-inch thick) boneless ribeye steak (about 12-16 ounces)
- 1 tablespoon high-smoke-point oil (like avocado, grapeseed, or canola oil)
- 2 tablespoons unsalted butter
- 2-3 large cloves garlic, smashed but not peeled
- 2 sprigs fresh rosemary or thyme
- Kosher salt, to taste
- Freshly cracked black pepper, to taste
The Golden Rules of Your Ribeye:
- Thickness is Non-Negotiable: A thick-cut steak (1.5 to 2 inches) is essential. It allows you to develop that deep, dark crust on the outside before the inside overcooks. A thin ribeye is a sad ribeye.
- Marbling is Your Friend: Look for a steak with plenty of white flecks of fat (marbling) running through the meat. That fat equals flavor and tenderness.
Tools & Kitchen Gadgets Used: Your Searing Station
- A 12-inch Cast-Iron Skillet: This is the undisputed champion for this task. Its ability to get screaming hot and retain heat is unmatched.
- An Instant-Read Meat Thermometer: This is not optional; it is your single most important tool for guaranteeing a perfectly cooked steak.
- Long Tongs: For flipping the steak without piercing it.
- A Large Spoon: For the glorious butter-basting.
- Paper Towels: For getting your steak bone-dry.
Step-by-Step Instructions: The Path to Ribeye Perfection

This process is fast and furious. Have everything ready to go before you light that flame.
Act 1: The Prep (Setting the Stage for Success)
- The Room Temp Rest: Take your beautiful ribeye out of the fridge at least 45-60 minutes before cooking. A room-temperature steak cooks far more evenly than a cold one.
- Pat It DRY (The Most Important Step!): Use paper towels to pat the entire surface of the steak completely and utterly dry. A dry surface is the key to a perfect crust. Moisture is the enemy of the sear.
- Season Like a Pro: Just before you’re ready to cook, season the steak aggressively on all sides (including the edges!) with kosher salt and freshly cracked black pepper. The salt will help form that incredible crust.
Act 2: The Sear and the Baste (The Flavor Symphony)
- Get That Pan HOT: Place your cast-iron skillet over high heat. Let it preheat for a good 5-7 minutes. You want it screaming hot, just starting to send up wisps of smoke.
- The Sear: Add the oil to the hot pan. Carefully place your seasoned steak in the skillet. You should hear a loud, aggressive sizzle. Let it sear, without moving it, for 3-4 minutes on the first side until a deep, dark brown crust has formed.
- The Flip: Use your tongs to flip the steak. Sear the second side for another 3-4 minutes.
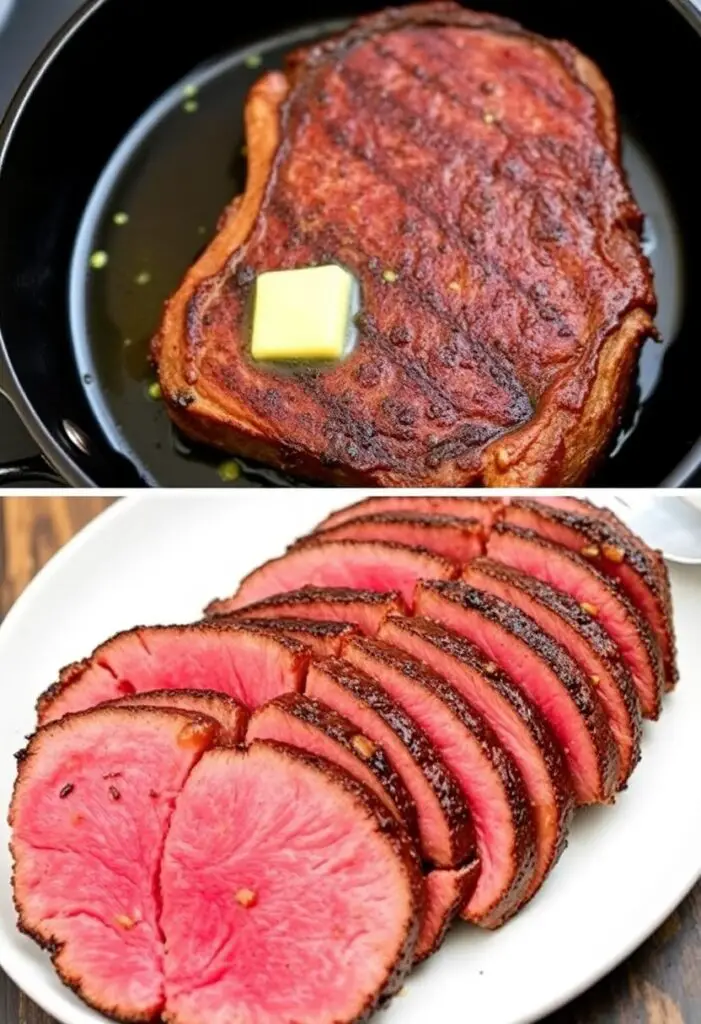
- The Butter Bath: Reduce the heat to medium-low. Add the butter, smashed garlic cloves, and herb sprigs to the pan. The butter should melt and foam immediately.
- Baste, Baste, Baste: Tilt the pan towards you so the butter pools at the bottom. Use your large spoon to continuously scoop the fragrant, foaming butter and pour it over the top of the steak. Do this for about 1-2 minutes, bathing the steak in all that incredible flavor.
Act 3: The Rest (The Hardest, Most Crucial Part)
- Check the Temp: This is where you grab your meat thermometer. Insert it into the thickest part of the steak. You’re looking for:
- Medium-Rare (Recommended): 130-135°F (54-57°C)
- Medium: 135-145°F (57-63°C)
- Pull the steak from the pan when it’s about 5 degrees below your target temperature.
- LET IT REST: Transfer the steak to a cutting board and tent it loosely with foil. You must let it rest for 10 minutes. This allows the juices to redistribute throughout the meat. If you slice it immediately, all that flavor will run out onto your board. Don’t do it. I’m watching you.
- Slice and Serve: After resting, slice the steak against the grain. You can pour any of the remaining butter from the pan over the slices. Enjoy your perfect, homemade steakhouse dinner.
Calories & Nutritional Info (Per 6-ounce Serving)
This is a rich, satisfying, and protein-packed meal.
- Estimated Calories per serving: ~450-600 calories
- Protein: ~40g
- Fat: ~35-45g (A glorious mix of beef fat and butter!)
Common Mistakes to Avoid: Don’t Mess Up a Perfect Ribeye!
You’ve invested in a great cut of meat. Don’t make these rookie mistakes.
- Cooking a Cold Steak: This leads to an unevenly cooked steak. Let it come to room temperature first.
- A Wet Steak: A wet surface steams, it doesn’t sear. Pat it completely dry.
- A Lukewarm Pan: You will get a sad, gray steak with no crust. Your pan needs to be smoking hot.
- Using a Fork to Flip: Piercing the meat lets all those precious juices escape. Use tongs.
- The Biggest Sin: Skipping the Rest. This is the difference between a juicy steak and a dry one. You must let it rest for 10 minutes.
Variations & Customizations: Your Steak, Your Signature
The classic is perfect, but if you want to get creative…
- Peppercorn Crusted Ribeye: Before searing, press a generous amount of coarsely cracked black peppercorns into both sides of the steak for a classic Steak au Poivre.
- Gorgonzola Topping: After the steak has rested, top the warm slices with a generous crumble of gorgonzola or blue cheese. The residual heat will soften it beautifully.
- Quick Red Wine Pan Sauce: After you remove the steak to rest, pour off the excess fat from the pan. Deglaze with a splash of red wine, scraping up the browned bits. Let it reduce by half, then turn off the heat and whisk in a pat of cold butter. Pour this luxurious sauce over your sliced steak.
FAQ Section: All Your Ribeye Questions, Answered
You have questions about the king of steaks. I have the answers.
- Q: Why is a cast-iron skillet so important for steak? A: It gets incredibly hot and, more importantly, it retains that heat, which is what gives you a consistent, deep, even sear across the entire surface of the steak.
- Q: Can I cook a bone-in ribeye this way? A: Yes! A bone-in ribeye (or “cowboy steak”) is fantastic. It will just need a few extra minutes of cooking time. Use your meat thermometer to be sure.
- Q: How can I tell when my steak is done without a thermometer? A: While a thermometer is best, you can use the “touch test.” A medium-rare steak will feel soft but spring back when poked, similar to the fleshy part of your thumb. However, this takes a lot of practice. A thermometer is foolproof, IMO.
- Q: My kitchen gets so smoky! How can I prevent that? A: A little smoke is a good sign—it means your pan is hot enough! To minimize it, make sure you use a high-smoke-point oil, turn on your exhaust fan, and open a window.
- Q: Should I salt my steak overnight (dry brine)? A: You can! A dry brine (salting it and leaving it uncovered in the fridge overnight) can lead to an even drier surface and more flavor. However, a generous salting right before cooking, as described here, is also fantastic and requires less planning.
- Q: What does “slicing against the grain” mean? A: Look at your cooked steak. You’ll see the muscle fibers all running in one direction. You want to slice perpendicular to those lines. This makes every bite more tender.
- Q: What should I do with the leftover garlic and herbs from the pan? A: Spoon them right over your sliced steak! That butter is now a delicious, infused sauce.
Final Thoughts: Welcome to the Steakhouse at Home
You did it. You have successfully cooked a ribeye steak that would make any professional chef proud. You’ve mastered the sear, the baste, and the all-important rest. So go on, pour yourself a nice glass of red wine, and enjoy the incredible satisfaction of a perfectly cooked steak that you made yourself. Your wallet (and your taste buds) will thank you.