The Only Chocolate Chip Cookies Recipe You’ll Ever Need (Seriously)
Ever found yourself staring into the abyss of an empty cookie jar, lamenting your life choices and questioning why you didn’t just bake some cookies earlier? Been there, done that, bought the oversized t-shirt. But what if I told you that perfect, gooey, slightly crisp-edged chocolate chip cookies recipe is not only achievable but also ridiculously easy? You’re about to unlock the secret to bakery-level bliss right in your own kitchen, no magic wand required. Prepare to become everyone’s favorite person, because these cookies? They’re pure gold, IMO.
Why This Recipe Is Awesome (And Will Make You a Legend)
Let’s be real: there are approximately a zillion chocolate chip cookie recipes out there. So, why this one, you ask? Because it’s the Goldilocks of cookies – not too chewy, not too crispy, but just right. This recipe delivers on flavor, boasting that rich, buttery goodness with melty pockets of chocolate that make your taste buds sing. Plus, it’s shockingly easy to throw together, even if your culinary skills usually involve calling for takeout. Impress your friends, win over your in-laws, or simply treat yourself to a moment of pure, unadulterated joy. You deserve it, champ.
Ingredients: Your Path to Cookie Nirvana
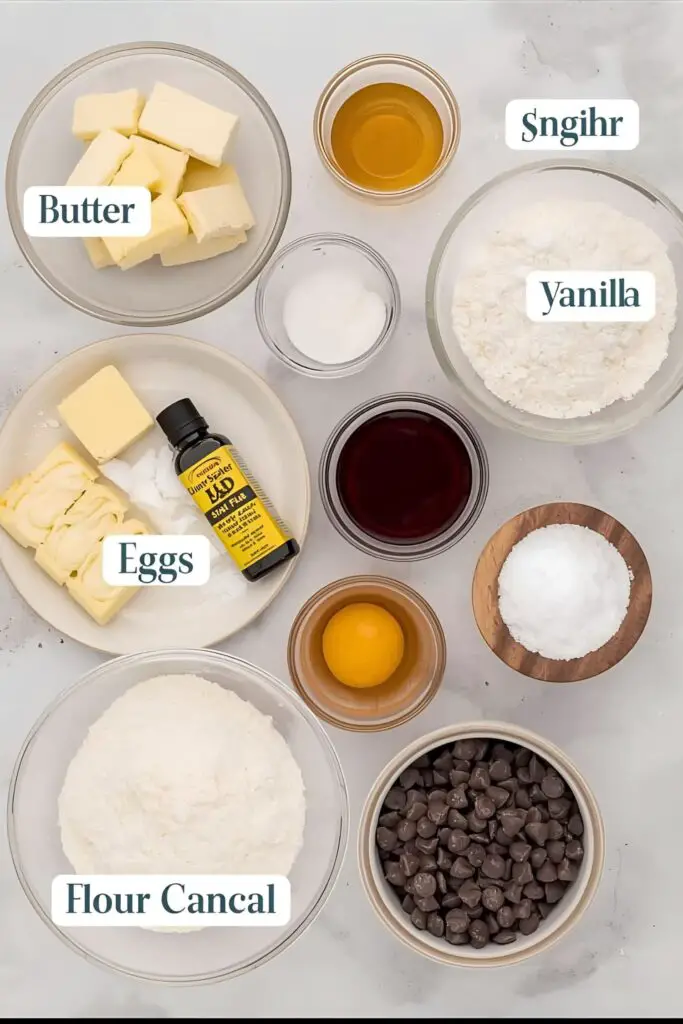
Here’s what you’ll need to transform into a cookie wizard. Don’t skimp on quality, people; your taste buds will thank you.
- 1 cup (2 sticks) unsalted butter, softened (Don’t even think about margarine, you heathen.)
- ¾ cup granulated sugar
- ¾ cup packed light brown sugar
- 2 large eggs, room temperature (This really does make a difference, FYI.)
- 1 teaspoon vanilla extract (Real vanilla, please. Imitation is a crime against humanity.)
- 2 ¼ cups all-purpose flour
- 1 teaspoon baking soda
- ½ teaspoon salt (Balances the sweetness – crucial!)
- 1 ½ cups chocolate chips (A mix of milk and semi-sweet is my personal jam, but you do you.)
- Optional: A sprinkle of flaky sea salt for finishing (Trust me on this one.)
Substitutions?
- Gluten-Free Flour: You can swap in a 1:1 gluten-free baking blend, but the texture might be slightly different.
- Dairy-Free Butter: Use your favorite plant-based butter alternative.
- Chocolate Chunks: Feel free to use chopped chocolate bars for bigger, more dramatic melty puddles. YOLO!
Tools & Kitchen Gadgets Used: Your Arsenal for Deliciousness
To conquer this cookie quest, you’ll need a few trusty sidekicks. Get ready to put these workhorses to good use:
- Large mixing bowls (At least two, because adulting means more dishes.)
- Electric mixer (Handheld or stand mixer – your arms will thank you.)
- Rubber spatula (For scraping down those bowls like a pro.)
- Measuring cups and spoons (Precision matters, even for cookies.)
- Baking sheets (Heavy-duty ones are the best, prevents burning!)
- Parchment paper or silicone baking mats (Non-stick heroes.)
- Wire cooling rack (Let those beauties breathe!)
- Cookie scoop (For perfectly uniform cookies, because we’re fancy.)
Step-by-Step Instructions: Let’s Get Baking, Buttercup!
Okay, aspiring cookie master, let’s break this down. Follow these steps, and you’ll be swimming in chocolatey goodness before you know it.
- Preheat & Prep: First things first, get that oven humming to 375°F (190°C). Line your baking sheets with parchment paper or silicone mats. Don’t skip this; nobody likes a stuck cookie.
- Cream the Fats: In your large mixing bowl, beat the softened butter with the granulated sugar and brown sugar using your electric mixer. Beat it on medium speed until it’s light and fluffy, about 2-3 minutes. This incorporates air, which means fluffier cookies!
- Egg-cellent Addition: Crack in your eggs, one at a time, beating well after each addition. Then, stir in the vanilla extract. Scrape down the sides of the bowl to make sure everything gets cozy.
- Dry Mix Fun: In a separate medium bowl, whisk together the flour, baking soda, and salt. Give it a good whisk to evenly distribute everything. This prevents weird pockets of salt or baking soda in your cookies. Gross, right?
- Combine the Worlds: Gradually add the dry ingredients to the wet ingredients, mixing on low speed until just combined. Do not overmix! Overmixing develops gluten, and that means tough cookies. We want tender, people!
- Chocolate Time! Fold in your beloved chocolate chips with a rubber spatula. Mix until they’re evenly distributed throughout the dough. Try not to eat too much raw dough, even though it’s tempting AF.
- Scoop & Space: Use your cookie scoop to drop rounded tablespoons of dough onto your prepared baking sheets, leaving about 2 inches between each cookie. They spread, trust me.
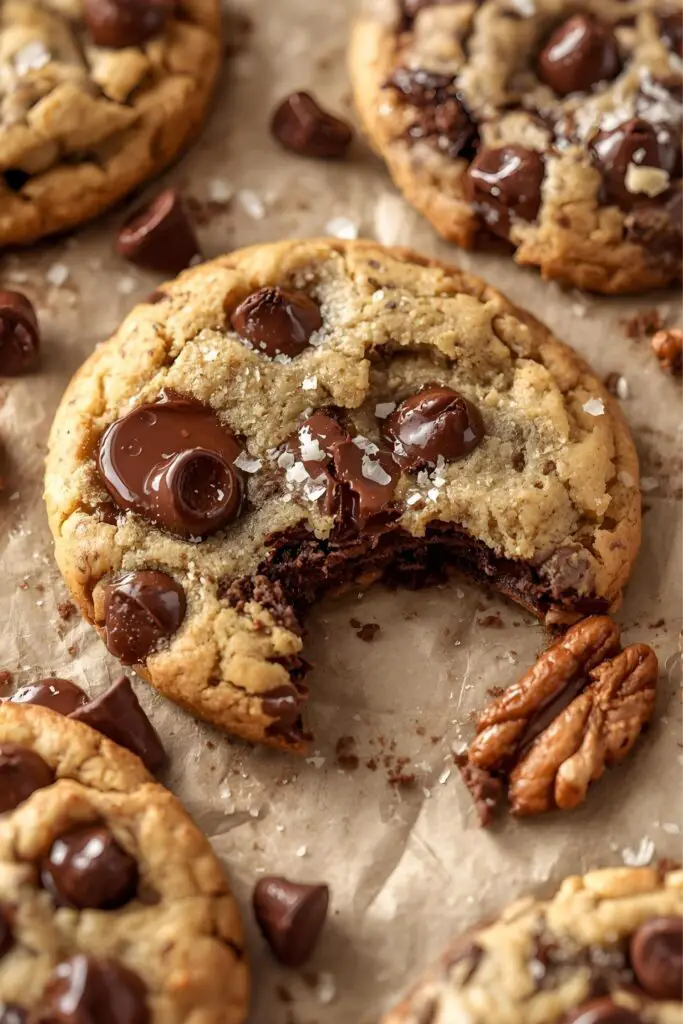
- Bake It ‘Til You Make It: Pop those bad boys into the preheated oven for 9-12 minutes. Keep an eye on them! You want the edges to be golden brown and the centers to still look a little soft. That’s the secret to gooey perfection.
- Cool Down: Once they’re done, let the cookies cool on the baking sheets for about 5 minutes before transferring them to a wire rack to cool completely. This helps them set up and prevents them from falling apart. If you can wait that long, you’re a stronger person than I am.
- Optional Finish: If you’re feeling fancy (and you should be!), sprinkle a tiny pinch of flaky sea salt on top of the warm cookies. It elevates the flavor like you wouldn’t believe.
Calories & Nutritional Info: The Nitty-Gritty (Don’t Freak Out)
Look, these are cookies, not kale. But hey, knowledge is power, right? Here’s a rough estimate per serving (assuming about 24 cookies from the batch).
- Estimated Calories per cookie: ~200-220 calories
- Fat: ~10-12g
- Carbohydrates: ~25-30g
- Protein: ~2-3g
- Sugar: ~15-20g
Nutritional Notes:
- This recipe is undeniably a treat! Enjoy in moderation, or don’t, I’m not your mom.
- The actual values can vary based on specific brands of ingredients and exact portion sizes.
- Good source of joy, IMO.
Common Mistakes to Avoid: Don’t Be That Person!
We’ve all made cookie blunders. Learn from my past mistakes (and probably yours too).
- Using Cold Butter or Eggs: Seriously, room temperature is your friend here. Cold ingredients don’t cream properly, leading to a denser, less appealing cookie. Plan ahead, people!
- Overmixing the Dough: I cannot stress this enough. Once you add the flour, mix until just combined. Overmixing makes your cookies tough and sad. Are we making bread or cookies? Exactly.
- Not Chilling the Dough (Sometimes): While this recipe works without chilling, a 30-minute chill can actually help prevent spreading and deepen the flavor. If you have the time, do it! If not, they’ll still be delish.
- Baking on Hot Sheets: Always let your baking sheets cool down between batches. Putting dough on a hot sheet makes the butter melt too quickly, leading to flat, sad cookies. Nobody wants flat, sad cookies.
- Under-baking (or Over-baking): The sweet spot is when the edges are golden, and the center still looks a bit soft. Take them out too early, and they’re raw. Too late, and they’re dry. It’s a delicate balance, my friend.
Variations & Customizations: Get Creative, You Culinary Genius!
This classic chocolate chip cookies recipe is just the beginning. Feel free to play around and make it your own!
- Nutty Perfection: Add ½ cup of chopped walnuts or pecans for extra crunch and a delightful flavor boost. Toasted nuts are even better, just sayin’.
- Double Chocolate Delight: Replace ¼ cup of flour with ¼ cup of unsweetened cocoa powder and use all dark chocolate chips for a rich, deeply chocolatey experience.
- Spice It Up: Add ½ teaspoon of cinnamon or a pinch of cayenne pepper to the dry ingredients for a subtle warmth and a surprising kick. It’s surprisingly good!
- Salted Caramel Swirl: Drizzle a tablespoon of store-bought or homemade salted caramel sauce over the dough before baking. Swirl it gently with a toothpick for a marbled effect. Yum!
FAQ Section: Your Burning Cookie Questions, Answered
Got questions? I’ve got answers. Probably.
- Q: Can I use salted butter? A: Yes, but if you do, reduce the added salt in the recipe by about ¼ teaspoon. You don’t want a salt lick, do you?
- Q: How long do these chocolate chip cookies last? A: If stored in an airtight container at room temperature, they usually last for 3-5 days. But honestly, good luck having them last that long!
- Q: Can I freeze the cookie dough? A: Absolutely! Scoop the dough onto a parchment-lined baking sheet and freeze until firm. Then transfer the frozen dough balls to a freezer-safe bag. Bake from frozen, adding a couple of extra minutes to the baking time.
- Q: Why are my cookies flat? A: Common culprits include using melted butter, over-creaming the butter and sugar, or not chilling the dough. Make sure your butter is softened, not melted, and follow the creaming instructions carefully.
- Q: What kind of chocolate chips are best? A: IMO, a mix of good quality semi-sweet and milk chocolate chips gives the best flavor and texture. But use what you love!
- Q: Can I make these ahead of time? A: Yes! You can prepare the dough and refrigerate it for up to 2-3 days. Bring it closer to room temperature before scooping and baking for best results.
- Q: My cookies are too crumbly. What went wrong? A: This often happens if you used too much flour or didn’t have enough fat. Double-check your measurements, especially the flour, and make sure your butter was accurately measured.
Final Thoughts: Go Forth and Conquer!
So there you have it, folks. The ultimate chocolate chip cookies recipe. You now possess the power to bake happiness, one delicious, chewy, chocolate-packed cookie at a time. Say goodbye to sad, store-bought imposters and embrace your inner baking superstar. Go ahead, make a batch, and let me know how it goes! Tag me in your cookie pics; I live for that stuff. And seriously, don’t be surprised if your friends start showing up unannounced with milk. You’ve been warned.