How to Make Donuts at Home Easy (And Become a Breakfast Legend)
We need to talk about that primal urge that hits when you see a box of fresh donuts. It’s a powerful force, isn’t it? But the thought of making them yourself probably conjures images of complicated recipes and a kitchen splattered with hot oil. Well, I’m here to smash those fears into a million delicious, sugary pieces. Today, I’m going to show you how to make donuts at home easy. Yes, you—the person who maybe burns toast sometimes—are about to create soft, fluffy, perfectly glazed rings of pure joy. Your life will never be the same.
Why This Homemade Donut Recipe Is a Certified Banger
First of all, a donut that is literally minutes old is a life-altering experience. It’s warm, it’s pillowy, and it melts in your mouth in a way that no day-old, store-bought donut ever could. This recipe is awesome because it demystifies the whole yeasted-donut process, breaking it down into simple, manageable steps. Imagine waking up on a Saturday and saying, “I think I’ll make donuts.” The sheer power! You’ll be a hero to your family, a legend to your friends, and your taste buds will build a tiny shrine in your honor. It’s a fun project that ends with you eating fresh donuts. What’s the downside? (Spoiler: there isn’t one).
Your Donut-Making Shopping List
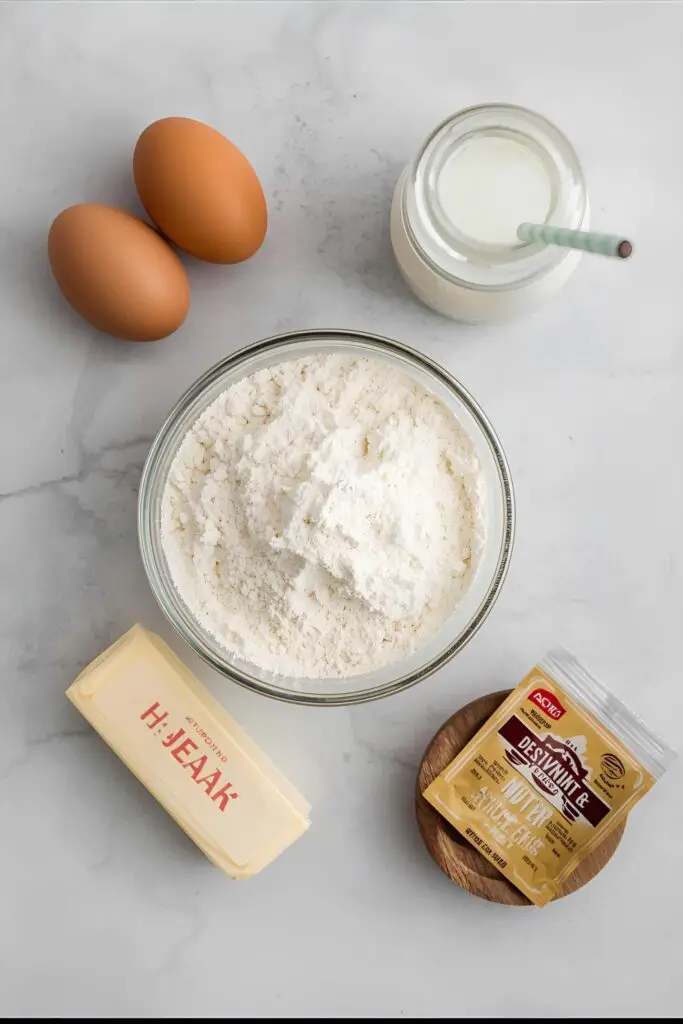
This isn’t as complicated as you think. Most of this stuff is probably already hanging out in your kitchen.
For the Donuts:
- Whole Milk: 1 ½ cups, warmed to about 105-115°F (40-46°C). Like a nice, warm bath for our yeast.
- Active Dry Yeast: One packet, or 2 ¼ teaspoons. This is what gives our donuts their fluffy superpower.
- Granulated Sugar: ¼ cup, plus a pinch for the yeast.
- Large Eggs: 2, at room temperature.
- Unsalted Butter: 6 tablespoons, melted and slightly cooled.
- All-Purpose Flour: 4 ½ cups, plus more for dusting. You can use bread flour for an even chewier donut, but AP is perfect.
- Salt: 1 teaspoon.
- Ground Nutmeg: ½ teaspoon. This is the secret weapon! It’s that subtle, warm spice that makes a classic donut taste like a classic donut.
For the Simple Glaze:
- Powdered Sugar: 2 cups, sifted.
- Whole Milk or Cream: 3-4 tablespoons.
- Vanilla Extract: 1 teaspoon.
The Tools of the Donut Trade

Having the right gear will make you feel like a pro and ensure your donuts don’t turn into sad, oily pucks.
- Stand Mixer with a Dough Hook: Seriously, this makes the kneading part a breeze. You can do it by hand, but prepare for an arm workout.
- Large Bowl: For the dough’s beauty sleep (aka the first rise).
- Deep, Heavy-Bottomed Pot or Dutch Oven: Crucial for maintaining a steady oil temperature.
- Deep-Fry Thermometer: The most important tool on this list. Do not try to guess the oil temp. Just don’t.
- Rolling Pin: To get that dough to the perfect thickness.
- Donut Cutter: This makes life easy. If you don’t have one, a 3-inch and a 1-inch round cookie cutter work perfectly.
- Spider Strainer or Slotted Spoon: For safely rescuing your donuts from their hot oil bath.
- Wire Rack: Place it over a baking sheet for mess-free draining and glazing.
Let’s Make the Donuts! A Step-by-Step Adventure
Alright, roll up your sleeves. It’s go time.
H3: Step 1: Get That Yeast Going
In the bowl of your stand mixer, sprinkle the yeast and a pinch of sugar over the warm milk. Give it a gentle stir and let it hang out for 5-10 minutes. You’re looking for it to get foamy and smell, well, yeasty. This is how you know it’s alive and ready to party. If it’s just sitting there doing nothing, your yeast has passed on. RIP. Start over.
H3: Step 2: Mix Up the Dough
Once the yeast is bubbly, add the ¼ cup of sugar, eggs, melted butter, salt, and nutmeg. Mix with the paddle attachment (or a spoon) until just combined. Now, switch to the dough hook. With the mixer on low, gradually add the 4 ½ cups of flour. Mix until a soft, slightly sticky dough forms.
H3: Step 3: Knead and Let It Rise
Increase the mixer speed to medium and let it knead the dough for 5-8 minutes. The dough should be smooth, elastic, and pull away from the sides of the bowl. Place the dough in a large, oiled bowl, cover it with plastic wrap, and put it in a warm place to rise for 1-2 hours, or until it has doubled in size. This is a great time to take a nap.
H4: Step 4: Roll and Cut
Gently punch down the risen dough and turn it out onto a lightly floured surface. Roll it out to ½-inch thickness. This is important! Too thin and you get crispy disks; too thick and they might be raw inside. Use your donut cutter (or two round cutters) to cut out your donuts. Place them on a parchment-lined baking sheet, and don’t forget to save those donut holes!
H5: Step 5: The Second Rise (The Final Wait)

Cover the cut donuts loosely with plastic wrap and let them rise again in a warm spot for another 45-60 minutes. They should look puffy and feel light. This second proof is crucial for that airy texture.
H6: Step 6: Time to Fry!
While the donuts are proofing, pour your oil into the Dutch oven until it’s about 2-3 inches deep. Heat the oil over medium heat until your thermometer reads 365-375°F (185-190°C). This is your golden window. Carefully place 2-3 donuts at a time into the hot oil. Don’t overcrowd the pot! Fry for 1-2 minutes per side, until they are a beautiful golden brown.
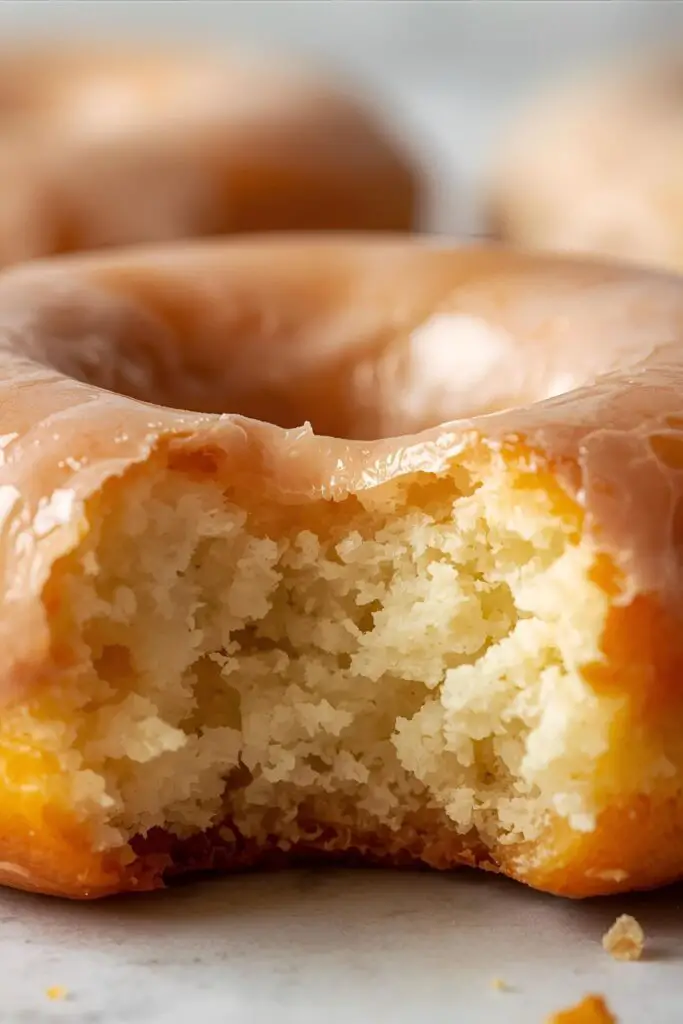
H7: Step 7: Glaze and Glorify
Use your spider strainer to remove the donuts and place them on the wire rack to drain for a minute. While they are still warm, it’s time to glaze. Whisk together the powdered sugar, milk, and vanilla until smooth. Dip the top of each warm donut into the glaze, let the excess drip off, and place it back on the wire rack to set. Repeat with all the donuts and donut holes.
Calories & Nutritional Info: A Brief Interruption
Look, we’re making deep-fried dough covered in sugar. This is not a health food. But for science, here’s a ballpark for one glorious glazed donut:
- Calories: Approximately 250-300 kcal
- Fat: Around 15-20g
- Carbohydrates: Roughly 25-30g
- Sugar: Let’s just say… a lot.
- Joy Factor: Immeasurable.
Eat the donut. Enjoy your life. That’s my professional opinion.
Common Mistakes to Avoid: Don’t Let This Happen to You!
Save yourself from donut despair by avoiding these common slip-ups.
- Incorrect Oil Temperature: I’m going to say it again. Use a thermometer. Oil that’s too cool makes greasy, heavy donuts. Oil that’s too hot burns the outside while the inside remains a doughy mess.
- Impatience with Proofing: You must let the dough rise properly, both times. Under-proofed donuts will be dense and sad. Over-proofed donuts might collapse when you fry them.
- Rolling the Dough Too Thin: You want your donuts to be light and fluffy, not flat and crispy. Don’t go thinner than ½-inch.
- Overcrowding the Pan: Frying too many donuts at once will cause the oil temperature to drop dramatically, leading to—you guessed it—oily donuts. Give them some personal space.
Variations & Customizations: Pimp Your Donut

The classic glaze is divine, but why stop there?
- Chocolate Glazed Donuts: Create a simple chocolate glaze by melting 1 cup of chocolate chips with 2 tablespoons of butter and a splash of milk until smooth. Dip away!
- Classic Cinnamon Sugar: Skip the glaze entirely. While the donuts are still hot, toss them in a bowl filled with a mixture of granulated sugar and a generous amount of cinnamon.
- Easy Baked Donuts: Don’t want to deep-fry? You can bake these! Place the proofed donuts on a baking sheet and bake at 375°F (190°C) for 10-12 minutes, or until golden. They will have a more cake-like texture, but are still delicious.
FAQ Section: Your Donut Questions, Answered
Let’s clear up some common donut queries.
Q1: What is the best oil for frying donuts?
A: A neutral oil with a high smoke point is best. Canola, vegetable, sunflower, or peanut oil are all fantastic choices.
Q2: Why are my donuts tough or chewy?
A: This is usually a sign of over-kneading the dough or adding too much flour. Your dough should be soft and slightly tacky.
Q3: Can I make the donut dough ahead of time?
A: Yes! After the first rise, you can cover the dough and refrigerate it overnight. Just let it sit out for about 30 minutes before you roll and cut it.
Q4: How do I make donuts without a special cutter?
A: Easy! Use a large round object for the donut (like the rim of a drinking glass) and a smaller round object for the hole (like a bottle cap or a piping tip).
Q5: How long do homemade donuts last?
A: Homemade donuts are at their peak on the day they are made. They are best eaten within a few hours. After that, they start to get a bit stale. But let’s be real, you won’t have leftovers.
Q6: Can I use instant yeast instead of active dry yeast?
A: You bet. You can mix instant yeast directly in with the dry ingredients and skip the initial blooming step.
Q7: What is the secret ingredient that makes donuts taste so good?
A: It’s that little pinch of nutmeg! It adds a classic bakery warmth and flavor that you can’t quite put your finger on, but you’d miss it if it were gone.
Final Thoughts: Go Forth and Conquer the Donut World!
You did it. You stared into the face of yeast and hot oil and you emerged victorious, holding a perfect, homemade donut. You are now officially the coolest person you know. Go on, pour a glass of milk, grab a warm donut (or three), and bask in the glory of your new-found superpower. You’ll never look at a store-bought donut the same way again.