Golden & Crispy: How to Make Fried Chicken Breast That Won’t Break Your Heart (or Your Teeth)
Let’s be honest, we’ve all been there. You crave that perfectly fried chicken breast – crispy, golden exterior, juicy, tender interior. You picture biting into that glorious crunch, then a burst of savory flavor. Instead, you end up with a dry, rubbery, over-cooked hockey puck wrapped in a soggy, pale excuse for breading. It’s a tragedy, really. A betrayal of the highest culinary order.
But fear not, my friend! Today, we’re going to demystify the art of the perfect fried chicken breast. This isn’t just about throwing chicken in hot oil; it’s about technique, patience, and a little bit of sass. Get ready to ditch those sad, dry chicken experiences and learn how to make fried chicken breast that will make you wonder why you ever bothered with takeout. Your taste buds are about to throw a party, and you’re the VIP chef.
Why This Fried Chicken Breast Recipe Is Your New Culinary Crush
Why should you, a busy, fabulous person, bother frying chicken at home when there’s a drive-thru just minutes away? Because homemade is always better, duh!
First, the flavor customization is next level. You control the spices, the seasoning, the very soul of your chicken. Want it spicier? Add more chili. Craving a hint of herb? Throw it in! You’re the boss of this crispy kingdom.
Second, it’s freshness you can taste. There’s no mystery meat here, no questionable oil that’s seen better days (or weeks). You’re using fresh ingredients, and your palate will absolutely notice the difference. It’s like the difference between a fresh Khulna mango and… well, you get it.
And let’s not forget the satisfaction factor. The sheer joy of pulling that perfectly golden-brown, crispy fried chicken breast from the oil? It’s a flex, and you deserve it. Plus, the compliments you’ll get? Priceless.
The A-List Lineup: Ingredients for Fried Chicken Nirvana
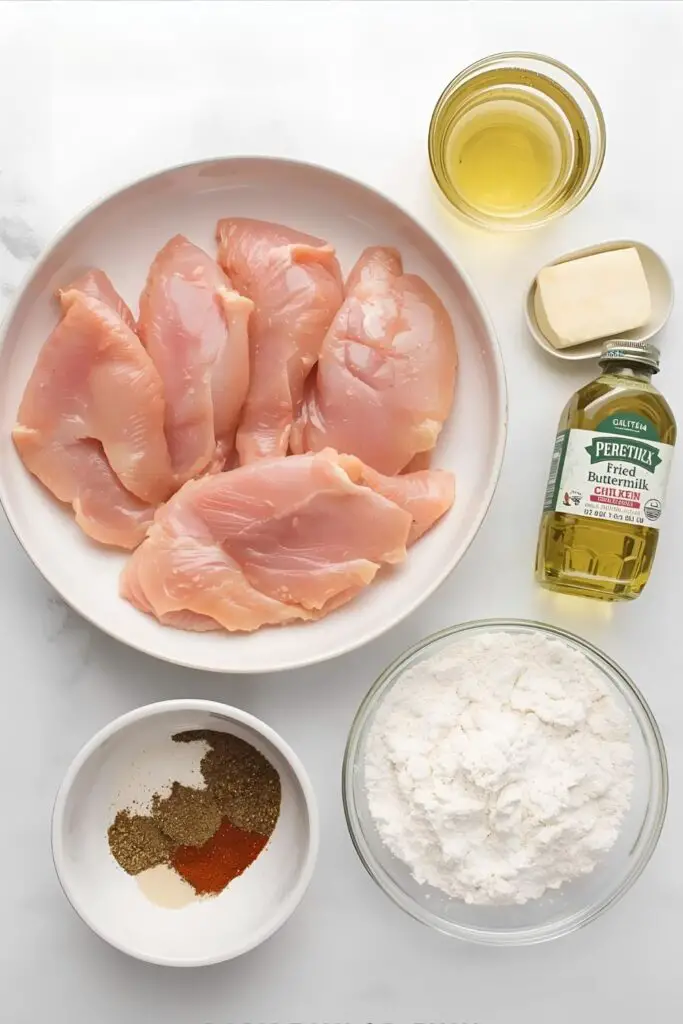
You don’t need a crazy shopping list for this. Just some basic pantry staples and, of course, the star of the show.
- 2-4 Boneless, Skinless Chicken Breasts (about 1.5 – 2 lbs total): The fresher, the better.
- For the Brine (Optional, but highly recommended for juiciness!):
- 2 cups Buttermilk: The acidity helps tenderize the chicken.
- 1 tablespoon Salt: Kosher or sea salt works best.
- 1 teaspoon Black Pepper: Freshly ground, if you’re feeling fancy.
- 1/2 teaspoon Garlic Powder: Because garlic.
- For the Breading:
- 2 cups All-Purpose Flour: The foundation of your crispy crust.
- 1/4 cup Cornstarch: Our secret weapon for extra crispiness!
- 1 tablespoon Smoked Paprika: For color and a smoky kick.
- 1 tablespoon Garlic Powder: More garlic, because why not?
- 1 tablespoon Onion Powder: Team onion!
- 1 teaspoon Cayenne Pepper (adjust to your spice preference): For that gentle warmth, or a fiery kick!
- 1 teaspoon Dried Thyme or Oregano (optional): Adds a nice aromatic note.
- 1 tablespoon Salt: Again, don’t skimp on seasoning the breading.
- 1 teaspoon Black Pepper: Season, season, season!
- For the Dredge (if not brining):
- 2 large Eggs: Beaten.
- 1/4 cup Milk or Water: To thin the eggs slightly.
- Oil for Frying: About 3-4 cups. Vegetable oil, canola oil, or peanut oil are all good choices for high-heat frying.
Your Culinary Command Center: Tools & Gadgets
To achieve fried chicken perfection, you’ll need a few trusty sidekicks.
- Large Bowl (for brining): Big enough to submerge the chicken.
- Shallow Dishes or Pie Plates (3): For your dredging station (flour, egg, flour).
- Heavy-Bottomed Skillet or Dutch Oven (10-12 inch): Cast iron is king here for even heat distribution.
- Tongs: For safely handling hot chicken.
- Wire Rack with a Baking Sheet underneath: For draining excess oil and keeping chicken crispy.
- Meat Thermometer (Instant-Read): Your best friend for ensuring perfectly cooked chicken. Non-negotiable, IMO.
- Paper Towels: For blotting.
- Whisk: For combining dry ingredients.
The Crispy Chronicles: Step-by-Step Instructions
Ready to make some magic happen? Follow these steps, and you’ll be a fried chicken master in no time.
Step 1: Prep the Chicken & Pound It Out
First, take those boneless, skinless chicken breasts and pat them super dry with paper towels. Seriously, moisture is the enemy of crispiness. Now, if your chicken breasts are thick, you’ll want to pound them to an even thickness of about 3/4 inch. This ensures even cooking. Use a meat mallet or the bottom of a heavy skillet, placing the chicken between two sheets of plastic wrap to avoid a mess (and a chicken explosion).
Step 2: The Brine (Do Not Skip This if You Want Juicy Chicken!)
In a large bowl, whisk together the buttermilk, 1 tablespoon salt, 1 teaspoon black pepper, and 1/2 teaspoon garlic powder. Add the pounded chicken breasts, ensuring they are fully submerged. Cover the bowl and refrigerate for at least 30 minutes, or up to 4 hours. This step works wonders for juicy, flavorful chicken. FYI, if you skip brining, you’ll just do a quick egg wash dredge later.
Step 3: Set Up Your Dredging Station (Get Organized!)
While the chicken brines (or while you pat it dry if skipping the brine), prepare your dredging station. Get three shallow dishes or pie plates.
- Dish 1: Whisk together 2 cups all-purpose flour, 1/4 cup cornstarch, 1 tablespoon smoked paprika, 1 tablespoon garlic powder, 1 tablespoon onion powder, 1 teaspoon cayenne pepper, 1 tablespoon salt, and 1 teaspoon black pepper. This is your seasoned flour.
- Dish 2: If you skipped the brine, whisk together 2 large eggs and 1/4 cup milk or water. This is your egg wash.
- Dish 3: This will be your second flour dredge, using the same seasoned flour mix as Dish 1.
Step 4: Dredge the Chicken (The Crispy Coat Begins)
If brined: Remove the chicken from the buttermilk brine, letting any excess drip off. Do not rinse the chicken! Directly transfer it to Dish 1 (seasoned flour). If not brined: First dredge the patted-dry chicken in Dish 1 (seasoned flour), shaking off excess. Then dip it into Dish 2 (egg wash), letting excess drip. Finally, transfer to Dish 3 (second seasoned flour dredge).
Regardless of method, ensure the chicken is fully coated in the seasoned flour. Press the flour into the chicken to ensure it adheres well. Shake off any excess flour. Place the breaded chicken on a wire rack while you prepare the oil. This little rest helps the breading stick better.
Step 5: Heat the Oil (The Make-or-Break Moment)
Pour your frying oil into your heavy-bottomed skillet or Dutch oven. You want about 1.5 to 2 inches of oil. Place it over medium-high heat and allow it to heat up to 350°F (175°C). Use your meat thermometer to monitor the temperature. This is crucial! Too cold, and your chicken gets greasy. Too hot, and the outside burns before the inside cooks.
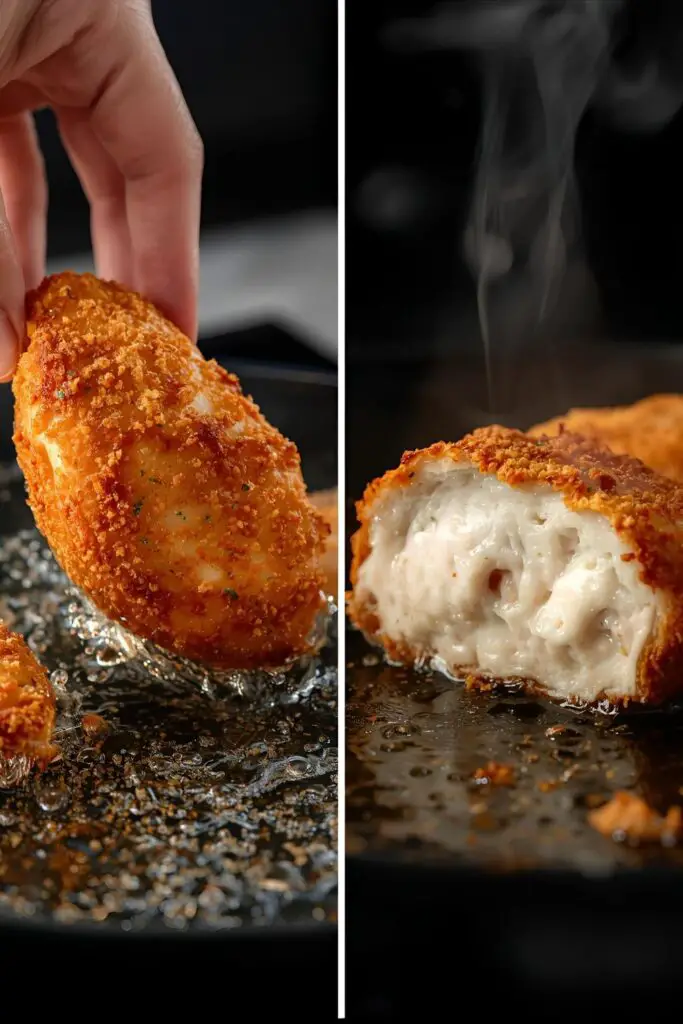
Step 6: Fry ‘Em Up! (Golden Perfection)
Once the oil reaches temperature, carefully lower one or two breaded chicken breasts into the hot oil. Do not overcrowd the pan! Crowding drops the oil temperature too quickly.
Fry for about 4-6 minutes per side, or until the chicken is deeply golden brown and cooked through. Flip gently with tongs.
The most important part: check the internal temperature with your instant-read meat thermometer. It should read 165°F (74°C) in the thickest part.
Step 7: Drain & Rest (The Crispy Finish)
Once cooked, carefully remove the fried chicken breast from the oil and place it on a wire rack set over a baking sheet to drain any excess oil. Resist the urge to stack them; they’ll lose their crispiness. Let them rest for a couple of minutes.
Step 8: Serve & Enjoy!
Serve your perfectly golden, crispy, and juicy fried chicken breast immediately with your favorite sides. Prepare for happy sighs!
Calories & Nutritional Info (Because You Asked, We Answered)
Okay, so “fried” and “diet” aren’t usually in the same sentence, but here’s a general estimate for one fried chicken breast (about 6-8 oz cooked weight). This can vary based on oil absorbed, breading thickness, and chicken size.
- Calories: Approximately 400-600 kcal
- Fat: Around 25-40g (a good portion from the frying oil)
- Carbohydrates: Roughly 15-25g (from the flour/cornstarch breading)
- Protein: About 40-50g (hello, lean protein!)
- Sodium: Can be high depending on brining and seasoning.
- Note: This is an indulgent meal, folks. Enjoy it in moderation, or just don’t think about it too much. TBH, some things are worth it.
Common Mistakes to Avoid (Fried Chicken Fails)
- Not Pounding Chicken to Even Thickness: This is a huge one! Thick parts will be raw, thin parts will be dry. Pound it, baby!
- Skipping the Brine (or Not Brining Long Enough): Dry chicken is sad chicken. The brine makes all the difference for a juicy result. Don’t rush it.
- Over-Crowding the Pan: Your oil temperature will drop, leading to greasy, soggy chicken instead of crispy perfection. Fry in batches!
- Not Monitoring Oil Temperature: This is critical. Too low = greasy. Too high = burnt outside, raw inside. Use a thermometer!
- Removing Chicken Before It Reaches 165°F (74°C): Undercooked chicken is a no-go for obvious reasons. Always use a meat thermometer.
- Skipping the Rest on a Wire Rack: If you put hot fried chicken on a plate, the bottom gets soggy. A wire rack allows air circulation. Let it breathe!
- Using Plain Flour for Breading: No seasoning in the flour means bland chicken. Season your flour aggressively!
Variations & Customizations (Beyond Basic Crispy)
Once you’ve nailed the classic, try these twists!
- Spicy Nashville Hot Style: After frying, immediately dunk or brush the hot chicken with a mixture of hot oil (from the pan), cayenne pepper, brown sugar, and a touch of butter. Warning: it’s messy, but heavenly.
- Herbaceous Mediterranean Twist: Add dried oregano, basil, and a pinch of dried mint to your breading mix. Serve with a squeeze of lemon and a cucumber-yogurt sauce.
- Keto/Low-Carb Friendly: Replace the flour and cornstarch with a mixture of almond flour and finely ground pork rinds. The crunch is surprisingly good! Skip the buttermilk brine or use unsweetened almond milk with a tablespoon of vinegar as a substitute.
FAQ Section (Your Crispy Queries, Answered)
1. What kind of oil is best for frying chicken? Neutral oils with a high smoke point are best: vegetable oil, canola oil, peanut oil, or corn oil.
2. How do I get my fried chicken breast extra crispy? The cornstarch in the breading and not overcrowding the pan are key. Also, ensure your oil is at the correct temperature (350°F / 175°C) and don’t skip resting it on a wire rack after frying.
3. Can I use chicken thighs instead of breasts? Absolutely! Chicken thighs are often more forgiving and stay juicier. Cooking times might be slightly different; always use a meat thermometer.
4. How long does fried chicken breast last in the fridge? Store leftovers in an airtight container in the refrigerator for up to 3-4 days.
5. What’s the best way to reheat fried chicken to keep it crispy? Reheat in an oven or air fryer! Preheat to 350°F (175°C) and bake for about 10-15 minutes, flipping halfway, until heated through and crispy. Avoid the microwave, which makes it soggy.
6. Do I have to brine the chicken? No, but it makes a huge difference in the juiciness and flavor, especially with leaner chicken breasts. If you skip it, use the egg wash dredge method.
7. Why is my fried chicken greasy? Most likely, your oil temperature was too low. The breading absorbs oil instead of quickly crisping up. Ensure your oil stays at 350°F (175°C).
Final Thoughts
You did it! You officially know how to make fried chicken breast that will make your taste buds sing and your ego swell. No more rubbery disappointments, no more soggy breading. Just pure, unadulterated, crispy, juicy goodness.
So go forth, fry some chicken, and bask in the glory of your culinary prowess. And trust me, once you taste this homemade deliciousness, you’ll never look at a fast-food bucket the same way again. Happy frying!