How to Make Tiramisu Cake: The Ultimate Coffee & Cream Dream
Let’s talk about desserts that sound fancy. Tiramisu is right at the top of that list, isn’t it? It whispers of Italian cafes, elegant evenings, and a level of sophistication that feels just slightly out of reach for a Tuesday afternoon in Barishal. It’s the dessert you order to impress a date, the one that translates to “pick me up” because, let’s be honest, coffee and cream are the ultimate pick-me-ups.
But what if I told you that learning how to make tiramisu cake is your ticket to a showstopping dessert that’s easier to assemble than its traditional cousin and ten times as impressive? We’re taking all that glorious coffee-soaked, creamy-mascarpone goodness and turning it into a beautiful, sliceable layer cake. Ready to become the most sophisticated baker on your block? Of course you are.
Why This Recipe Is Basically Edible Elegance
So, why go to the trouble of turning a classic dessert into a cake? Oh, my friend, the reasons are as rich and layered as the cake itself.
First, the “wow” factor is off the charts. You bring this to a dinner party, and people will lose their minds. A regular tiramisu is lovely, but a tiramisu cake? That’s next-level. You will be crowned the undisputed dessert champion.
Second, it has all the flavor you love, with better structure. This cake slices like a dream. No more sloppy scoops of ladyfingers falling apart on the plate. Each slice is a perfect, self-contained universe of coffee-soaked cake and ethereal mascarpone cream.

Finally, it’s a make-ahead masterpiece. Like its traditional counterpart, this cake actually gets better as it sits in the fridge. The flavors meld, the coffee soaks in, and everything just becomes more… well, more tiramisu-y. It’s the perfect, low-stress dessert for any occasion.
The A-List Ingredient Lineup
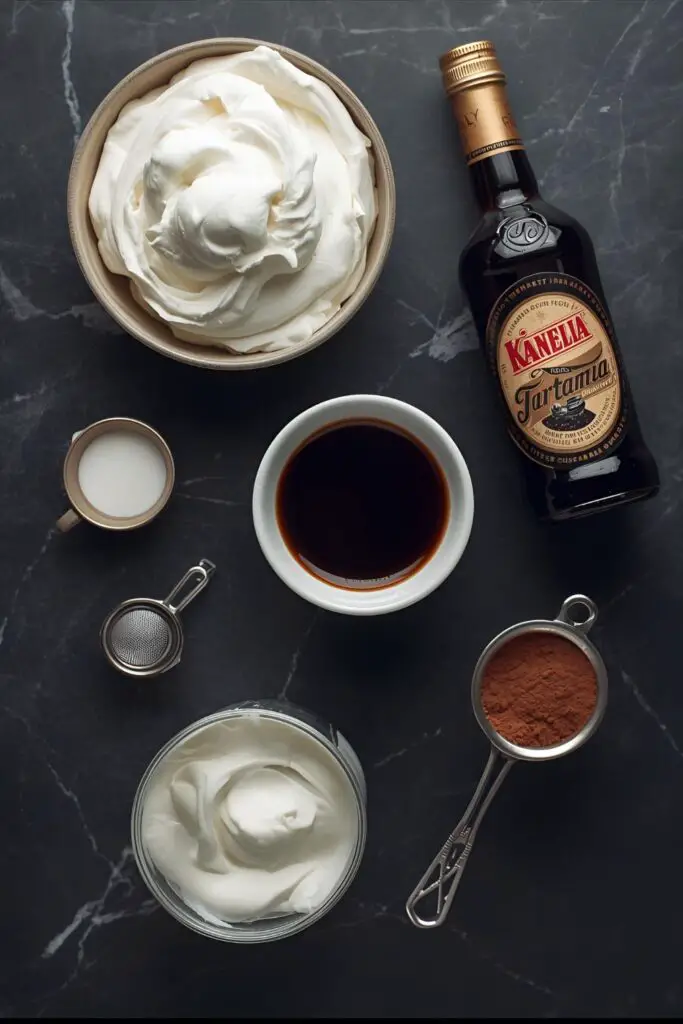
To create this masterpiece, you’ll need a few key players. Don’t skimp on the mascarpone – it’s the star of the show.
For the Cake Layers:
- 1 box Yellow or Vanilla Cake Mix, plus ingredients listed on the box (eggs, oil, water): Yes, we’re using a boxed mix hack! It provides a sturdy yet tender crumb that’s perfect for soaking. If you have a favorite from-scratch vanilla cake recipe, feel free to use that, you overachiever.
For the Coffee Soak (The “Pick-Me-Up”):
- 1 cup Strong Brewed Coffee or Espresso, cooled: It needs to be strong to stand up to the other flavors. Don’t use your sad, watery morning brew.
- 1/4 cup Kahlúa, Marsala Wine, or Dark Rum: This is optional but highly recommended for that authentic, boozy kick.
For the Luscious Mascarpone Cream:
- 16 oz (2 tubs) Mascarpone Cheese, cold: This is non-negotiable. Do not substitute cream cheese unless you want a cheesecake-tasting impostor.
- 2 cups Heavy Whipping Cream, very cold:
- 1 cup Powdered Sugar, sifted:
- 1 tsp Vanilla Extract:
For the Finishing Touch:
- Unsweetened Cocoa Powder, for dusting: The classic, slightly bitter finish that balances all the richness.
Your Dessert-Making Arsenal
You don’t need a pastry chef’s kitchen, just a few trusty tools to assemble this dream cake.
- Two 8-inch or 9-inch Round Cake Pans:
- Electric Mixer (a stand mixer or powerful hand mixer is highly recommended): This is crucial for whipping the cream and getting that light, airy texture.
- A set of Mixing Bowls: You’ll need a couple for the different components.
- Offset Spatula: The best tool for getting a smooth, professional-looking finish on your frosting. A regular spatula or the back of a spoon works in a pinch.
- Pastry Brush: For evenly applying that glorious coffee soak.
- Fine-Mesh Sieve or Sifter: For a perfect, even dusting of cocoa powder at the end.
Let’s Build a Masterpiece: Step-by-Step
Ready to create edible art? Let’s break it down into simple, manageable stages.
Step 1: Bake and Cool Your Cake
Prepare and bake your cake mix according to the package directions, dividing the batter evenly between your two prepared cake pans. Once baked, let the cake layers cool in the pans for about 15 minutes before inverting them onto a wire rack to cool completely. And I mean completely. Don’t even think about assembling this cake with warm layers.
Step 2: Prepare the Coffee Soak
While the cakes are cooling, brew your strong coffee or espresso and let it cool down to room temperature. Once cooled, stir in your liqueur of choice (Kahlúa, Marsala, or rum). Set it aside and try not to drink it.
Step 3: Whip Up the Mascarpone Cream

This is the most important part, so pay attention! In a large bowl, using your electric mixer on low speed, beat the cold mascarpone cheese for about 30 seconds until it’s smooth and creamy. Do not overmix it, or it can curdle and become grainy. Scrape down the bowl and set it aside.
In a separate, clean bowl, pour in the very cold heavy whipping cream. Using the whisk attachment, whip on medium-high speed until soft peaks form. Gradually add the sifted powdered sugar and vanilla extract, and continue whipping until stiff peaks form.
Now, gently fold about one-third of the whipped cream into the smoothed mascarpone to lighten it up. Then, fold in the remaining whipped cream until just combined. You want a light, fluffy, and uniform cream.
Step 4: Assemble Your Tiramisu Cake
Place one of your completely cooled cake layers on your serving platter or cake stand. Using your pastry brush, generously brush about half of the coffee soak all over the top of the cake layer. Let it sink in.
Spread about half of the mascarpone cream evenly over the coffee-soaked layer, all the way to the edges.
Step 5: Repeat and Frost
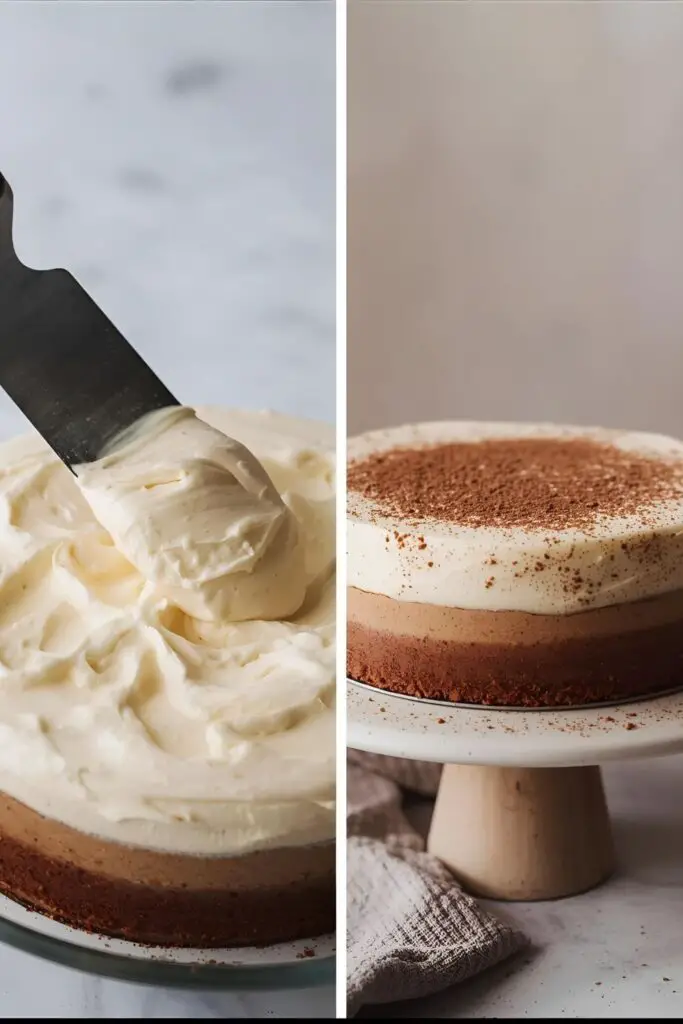
Carefully place the second cake layer on top. Brush the remaining coffee soak all over the top of this layer. Use the remaining mascarpone cream to frost the top and sides of the entire cake, using your offset spatula to get a smooth or beautifully rustic finish.
Step 6: The All-Important Chill Time

This step is not a suggestion; it is a command. Your beautiful cake now needs to go into the refrigerator to chill for at least 4 hours, but preferably overnight. This allows the flavors to meld together, the coffee to fully permeate the cake, and the cream to set up properly. It’s the secret to a perfect tiramisu cake.
Step 7: The Grand Finale
Right before you’re ready to serve, take the cake out of the fridge. Place the unsweetened cocoa powder in your fine-mesh sieve and dust a generous, even layer over the top of the cake. Slice, serve, and accept your standing ovation.
Calories & Nutritional Info
Let’s be real, this is a decadent dessert. It’s a special occasion cake, meant for pure indulgence. But for those who are curious, here’s a rough estimate per slice (assuming the cake is cut into 12 slices):
- Calories: Approximately 500-650 kcal
- Fat: Around 35-45g
- Carbohydrates: Roughly 40-50g
- Protein: About 6-8g
- Note: This cake is rich, creamy, and worth every single calorie. Enjoy it!
Common Mistakes to Avoid (Tiramisu Tragedies)
- Over-Whipping the Mascarpone: This is the #1 sin. Mascarpone is delicate and will break and become grainy if you beat it too aggressively. Mix it on low speed until just smooth and creamy.
- Assembling with Warm Cake: I’ve said it before, but it’s the most common mistake. Warm cake will melt your mascarpone cream into a sad, soupy puddle. Your cake layers must be 100% cool.
- Skipping the Chill Time: I know it’s tempting to dig in right away, but the cake needs time to set. Skipping the chill time will result in a sloppy, messy cake that doesn’t hold its shape.
- Substituting Cream Cheese for Mascarpone: Please don’t. While they’re both creamy cheeses, the flavor and texture are completely different. Cream cheese will give you a tangy, cheesecake-like flavor, not the delicate, sweet creaminess of tiramisu.
Variations & Customizations
Feeling creative? Here are a few ways to riff on this classic:
- Chocolate Lover’s Tiramisu Cake: Add a layer of chocolate ganache between the cake layers, or fold some mini chocolate chips or chocolate shavings into the mascarpone cream.
- Berry Tiramisu Cake: Ditch the coffee! Make a simple syrup with a berry liqueur (like Chambord for raspberry or Crème de Cassis for blackcurrant) to soak the cake layers. Add a layer of fresh berries on top of the mascarpone cream between the layers.
- Mocha Tiramisu Cake: Use a chocolate cake mix instead of vanilla for the layers to create a rich, mocha-flavored dessert.
Frequently Asked Questions (Your Tiramisu Queries, Answered)
1. What is the difference between traditional tiramisu and a tiramisu cake? Traditional tiramisu uses ladyfinger cookies (savoiardi) as the base, which are dipped in coffee. A tiramisu cake uses layers of sponge cake that are soaked in coffee, resulting in a sturdier, more sliceable dessert.
2. Can I make this tiramisu cake without alcohol? Absolutely! Just omit the Kahlúa, Marsala, or rum from the coffee soak. You can add a teaspoon of rum or vanilla extract to the coffee to add a little extra flavor complexity if you like.
3. What can I use if I absolutely cannot find mascarpone cheese? While it’s not a perfect substitute, in a real pinch, you can try beating an 8-ounce block of full-fat cream cheese with 1/4 cup of heavy cream and 2 tablespoons of sour cream to mimic the texture and richness. The flavor will be tangier, though.
4. Why did my mascarpone cream turn out runny? This can happen if the mascarpone was over-mixed, if your heavy cream wasn’t whipped to stiff peaks, or if you didn’t fold the two together gently enough. Make sure all your dairy ingredients are very cold.
5. Does tiramisu cake have to be refrigerated? Yes, absolutely. The mascarpone cream is made with dairy and needs to be kept cold for food safety.
6. How long does tiramisu cake last in the fridge? It will last for about 3-4 days in an airtight container in the refrigerator. Honestly, the flavor is often even better on the second day!
7. Can I use regular brewed coffee? Yes, but make it strong! You want a robust coffee flavor to shine through the rich cream and cake. A weak brew will get lost.
Final Thoughts
Look at you, you magnificent baker! You’ve just created an elegant, sophisticated dessert that looks like it took days to make. You’ve conquered the mighty tiramisu and turned it into an even more impressive cake.
Now, go on. Cut yourself a generous slice, pour a nice cup of coffee (or a glass of wine), and savor the fruits of your labor. You’ve earned it. You are now officially a purveyor of coffee-and-cream-filled dreams. Enjoy the sweet, sweet victory.